
You are using an out of date browser. It may not display this or other websites correctly.
You should upgrade or use an alternative browser.
You should upgrade or use an alternative browser.
Case of the missing shroud...
- Thread starter silverbear
- Start date
scotto-
Custom 4-Stroke Bike Builder
You can use a thermometer that has a probe end on it and put it in the passage to fill oil to check it after running. My HF was 170 degrees after running in 70 degree weather with all stock tin on. Do keep your oil below 230 or so.
My oil has never gotten up to 230F on the hottest days in San Diego....with or with out the shrouds. My temperature monitor/ gauge is a great device for keeping an eye on things like this. $15 for this handy digital device.

scotto-
Custom 4-Stroke Bike Builder
I think what those fins weigh is not very much, especially when you consider what the Whizzer front fork must weigh (a lot), stainless steel gas tank, heavy old Schwinn frame and heavy duty wheels, plus pulling the dog in a trailer and a having an old circus bear sitting on the bike... whew, what a load! I doubt the little bit of weight shaved off would help much in my case. Ha! Besides, I'm pretty happy with the way the bike pulls along and don't want to go any faster than it already goes. For a young speedster maybe shaving off the fins is a good idea. I don't know. Sounds like a lot of work, too. They're out of sight now, so also out of mind.
SB
Normally people shave the fins off of the flywheel (or take out every other one) to increase the RPM's with less resistance for some performance gain....not so much for the next too nothing weight savings. Those fins may weigh a couple of grams at best.
silverbear
The Boy Who Never Grew Up
Silverbear, your "The King of Tins".
Steve.
I think I'd rather be the Prince of Gold as there'd be more profit in it. But Bear of Silver is good enough.
SB
silverbear
The Boy Who Never Grew Up
I'm glad you guys like the shroud and very glad that it appears it will not harm the motor. That said, I would still suggest keeping an eye on your engine temperature. Nobody is endorsing this and if you choose to make your own you'll be taking the same chances I am.
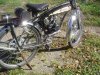
I was going to post these photos in my build thread in the EZmotors build off, but this thread seems to have a life of it's own so I'll post them here. I'm not suggesting this is the best way to make a shroud. It is just the way I made mine. Maybe you can improve on it and it you do I hope you'll share with the rest of us.
HOW I MADE THE SHROUD.
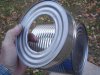
First off the tool you need for this if you're going to do it the I did anyway is a Dremel type of rotary tool. You could probably do it with tin snips, files and such, but the rotary tool makes it much simpler. There are so many other uses for this tool in motorbicycle work that maybe it's time to just get one. I've use both Dremel and a clone made in China I got from Harbor Freight. I like the HF one as it has the flexible shaft and is holding up well to a lot of use. Anyway, you'll need a cutoff wheel for making your straight cuts and for removing the shroud section from the original can. The regular cut off wheels break very easily, so the little extra you pay for reinforced ones is worth it. HF has metal cut off wheels with industrial diamonds embedded, and that's what I used. You also need a grinding attachment for the curved parts.
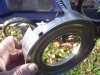
So, get your can at the store. The coffee can is simpler, but now some kinds don't use a metal can and those that do have a foil type of top, so you get just one end that is usable. The tomato sauce gave me two chances if I screwed up the first one. Stand the can on end and with something to use as a punch (an awl if you have one, an ice pick is very good, even an old Phillips screwdriver ground to a tapered point. You'll also need a small hammer and a small knife, like a pruning knife (not a folding knife). You need to remove just part of the end, a circle in the center part big enough for the part of your flywheel which has the pull start assembly. It has b=to fit around that. So, I just used one of the ribbed circles as a guide and pushed holes through with the punch. These don't have to be big holes, just holes about an eighth inch or so apart. When you've gone all the way around use the knife and the little hammer to go from one hole to the next "connecting the dots". Tap, tap, tap. If the punch and knife were clean you can now pour the contents into containers and use if in your spaghetti sauce. No point in wasting it and no there aren't chunks of metal in it. Wash out the can and remove the label.
I cleaned up the ragged edge of the hole in the end of the can with the grinding attachment although I suppose you wouldn't have to. I had to, because it would bother me not to. It would run counter to my fussiness about such things even when they are hidden. I then measured in from the end along the side of the can one and a half inches and followed one of the ribs with a marking pen to act as a guide to the cutoff wheel. Wearing protective eye wear is a good idea with any of this work. Now you have the basic shroud piece. Next comes shaping it...
I was going to post these photos in my build thread in the EZmotors build off, but this thread seems to have a life of it's own so I'll post them here. I'm not suggesting this is the best way to make a shroud. It is just the way I made mine. Maybe you can improve on it and it you do I hope you'll share with the rest of us.
HOW I MADE THE SHROUD.
First off the tool you need for this if you're going to do it the I did anyway is a Dremel type of rotary tool. You could probably do it with tin snips, files and such, but the rotary tool makes it much simpler. There are so many other uses for this tool in motorbicycle work that maybe it's time to just get one. I've use both Dremel and a clone made in China I got from Harbor Freight. I like the HF one as it has the flexible shaft and is holding up well to a lot of use. Anyway, you'll need a cutoff wheel for making your straight cuts and for removing the shroud section from the original can. The regular cut off wheels break very easily, so the little extra you pay for reinforced ones is worth it. HF has metal cut off wheels with industrial diamonds embedded, and that's what I used. You also need a grinding attachment for the curved parts.
So, get your can at the store. The coffee can is simpler, but now some kinds don't use a metal can and those that do have a foil type of top, so you get just one end that is usable. The tomato sauce gave me two chances if I screwed up the first one. Stand the can on end and with something to use as a punch (an awl if you have one, an ice pick is very good, even an old Phillips screwdriver ground to a tapered point. You'll also need a small hammer and a small knife, like a pruning knife (not a folding knife). You need to remove just part of the end, a circle in the center part big enough for the part of your flywheel which has the pull start assembly. It has b=to fit around that. So, I just used one of the ribbed circles as a guide and pushed holes through with the punch. These don't have to be big holes, just holes about an eighth inch or so apart. When you've gone all the way around use the knife and the little hammer to go from one hole to the next "connecting the dots". Tap, tap, tap. If the punch and knife were clean you can now pour the contents into containers and use if in your spaghetti sauce. No point in wasting it and no there aren't chunks of metal in it. Wash out the can and remove the label.
I cleaned up the ragged edge of the hole in the end of the can with the grinding attachment although I suppose you wouldn't have to. I had to, because it would bother me not to. It would run counter to my fussiness about such things even when they are hidden. I then measured in from the end along the side of the can one and a half inches and followed one of the ribs with a marking pen to act as a guide to the cutoff wheel. Wearing protective eye wear is a good idea with any of this work. Now you have the basic shroud piece. Next comes shaping it...
Attachments
silverbear
The Boy Who Never Grew Up
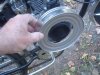
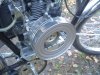
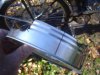
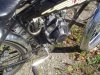
So, as shown in the prior series of pictures it is a matter of fitting the can in between the three bolts which hold the pull start assembly in place... marking out with the pen where you need to cut and grind to make it fit against the irregular contour of the motor. Pull it off, cut and grind, put it back on until you have it the way you want it. You'll notice at the lip of the can I did a cutout where each bolt is to accommodate the flared out part of the bolt where the threading begins... slips down into the cutout and keeps things nice and snug. When it looks good put the pull start back on and pull slowly on the pull start to be sure you have clearance and are not rubbing fins against the shroud. If it is you can use small washers as spacers. Also don't reef down on your nuts holding the pull start in place or you'll distort the shroud as it is just tin. Don't forget the blue locktite to keep those nuts on. That's it. Please contribute your improvements as I'm sure we can make this better. The one you're looking at in the pictures is shroud #1. Good luck with yours.
SB
SB
Attachments
silverbear
The Boy Who Never Grew Up
I do like the looks of the tomato can shroud, and I just might do the same thing. I'd want to remove the shields from the sides of the cylinder as well. Since that engine was designed to be used in a stationary position (such as running a generator), the shroud and shields were necessary to ensure proper cooling. But for bicycle use, it might not be much of an issue.
Yes, I want to remove the heat shields, too, but don't want to pull the motor yet. I wonder if I can get them off without removing the engine. Not that it's such a huge job, but everything is so nice running as it is and the weather is perfect and that open road is calling my name...
I'll do mine later. Next is that air cleaner. Someone said that our friends at SBP are going to be carrying an adapter so the four strokes can use their cool air cleaners. Anyone know if that is true? I'd rather give them my business than somebody I don't know on ebay.
SB
silverbear
The Boy Who Never Grew Up
Normally people shave the fins off of the flywheel (or take out every other one) to increase the RPM's with less resistance for some performance gain....not so much for the next too nothing weight savings. Those fins may weigh a couple of grams at best.
Ahhh,
I didn't know that. It didn't seem to me that little bit of weight would make any difference in my case. So, would this make the engine work a little less hard... run more efficiently? Or is it for speed purposes? The speed part I don't care about as I go plenty fast enough, but if it makes life easier for the motor that is another matter. So how would you remove them if your chose to and is there enough benefit to warrant the surgery?
SB
")
I'm figuring, since those fins are aluminum, you could probably use the dremel to cut them down, and then switch to a grinding or sanding disk, and file them down the rest of the way. Creating less drag would reduce stress on the motor, thats just common sense, and If i go with a 4 stroke on my next build, I'll be doing this for sure. Good thinking SB.
silverbear
The Boy Who Never Grew Up
Thanks, Bill.
Sparrow,
I hope somebody more daring and ambitious than I am will do the fin treatment. It would be cool if someone with a tachometer and speedometer could do a before and after comparison so that we had some idea of what the effect might be with some actual numbers and not just impressions influenced by wishful thinking and imagination. Knowledge is power.
SB
silverbear
The Boy Who Never Grew Up
SB I got a idea just reading this and will draw up and scand you a scetch. Boy I sure love what you did so far...........CURT
Thanks, Curt. I'll look for the drawing.
SB
Thanks, Bill.
Sparrow,
I hope somebody more daring and ambitious than I am will do the fin treatment. It would be cool if someone with a tachometer and speedometer could do a before and after comparison so that we had some idea of what the effect might be with some actual numbers and not just impressions influenced by wishful thinking and imagination. Knowledge is power.
SB
This is getting caried away. The fins still blow air even with the shroud gone. Its only a 2hp engine. Unless you are going to soupe it with a big carb and exaust. Port and polish. Cutting the fins will not gain that much, other then waisting time. If you want to realy go faster use some kind of shift kit,or bigger motor.
silverbear
The Boy Who Never Grew Up
Curtis,
I think you're probably right and for myself I don't care about the speed anyway. The motivation behind this for me was I thought the plastic shroud was ugly and wondered if it was really necessary. My lack of knowledge paid off since I thought it was there just to protect you from the flywheel, with no idea there was a cooling purpose in a stationary application. I won't be removing fins from mine, but it would still be interesting to know what the benefit might be in actual numbers for those who are interested.
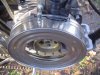
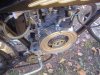
REMOVING THE HEAT SHIELDS
I had the idea that the rear shield needed to have the air cleaner and possibly carburetor removed to get it off. Not so. All three shields come off by removing the screws. The one at the exhaust does require removing the exhaust pipe and gasket, but the others come right off. All three came to a couple minutes for removal. The air cleaner is going to require loosening up the engine in my case, so will be later. I had wanted to try a leaping tuna air cleaner today until such time I can afford a more spiffy one.
http://motorbicycling.com/f3/leaping-tuna-air-cleaner-17262.html
There's the link to that if you want to try making one. If the stainless steel filter makes you nervous, try foam instead.
SB
I think you're probably right and for myself I don't care about the speed anyway. The motivation behind this for me was I thought the plastic shroud was ugly and wondered if it was really necessary. My lack of knowledge paid off since I thought it was there just to protect you from the flywheel, with no idea there was a cooling purpose in a stationary application. I won't be removing fins from mine, but it would still be interesting to know what the benefit might be in actual numbers for those who are interested.
REMOVING THE HEAT SHIELDS
I had the idea that the rear shield needed to have the air cleaner and possibly carburetor removed to get it off. Not so. All three shields come off by removing the screws. The one at the exhaust does require removing the exhaust pipe and gasket, but the others come right off. All three came to a couple minutes for removal. The air cleaner is going to require loosening up the engine in my case, so will be later. I had wanted to try a leaping tuna air cleaner today until such time I can afford a more spiffy one.
http://motorbicycling.com/f3/leaping-tuna-air-cleaner-17262.html
There's the link to that if you want to try making one. If the stainless steel filter makes you nervous, try foam instead.
SB
silverbear
The Boy Who Never Grew Up
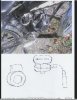
Curtis Fox sent me an interesting drawing of a variation on the flywheel cover and the following message whic he said OK to my sharing with you. \
SB
" My thought was to use a sardine can or equivalent and add a bump to the top. Like the older Birggs. You would not have to go very high just enough to cover the coil. After you get the sardine sides on you could skin it with the ribed coffie or tomato can sides. Or maybe you could find a another can that just right. Just my thoughts. Then I would take all the rest of the covers off. I LOVE IT going to have to do it to my Honda.........Curt"
Attachments
This is getting caried away. The fins still blow air even with the shroud gone. Its only a 2hp engine. Unless you are going to soupe it with a big carb and exaust. Port and polish. Cutting the fins will not gain that much, other then waisting time. If you want to realy go faster use some kind of shift kit,or bigger motor.
As i said, its not so much about performance, but more, about less resistance and making the engine not work as hard. the harder your engine works the shorter its lifespan.
MotorbikeMike
Dealer
Hello Guys, I come from a background of being a Dealership Mechanic new cars. It was a long time ago, but it also means that things I know to be true, have been true a long time.
No engine company I have known of, or even heard of, will warranty an engine when the stock cooling system has been modified to the lesser end. That is to say, that if you install a Larger and Better Radiator, your engine would still be covered, but reduction voids all warranty.
Exhaust valve and seat are normally the hottest component in an engine, they will suffer first.
Removal of shroud, cutting of fins, removal of the tin "airfoils" on these engines will void warranty. None of our engine suppliers will allow this type of modification, period.
I hope this little bit of information is helpful, at least in keeping you from frying your exhaust valve and seat, or, if I have written too late, that at least you know why it has happened.
I run mine fully shrouded, all the time, winter or summer.
Mike
silverbear
The Boy Who Never Grew Up
SB,I know your quick...hows the sardine and tomato shroud coming???
I don't much care for sardines, so don't have a can. I'd rather eat fresh walleye. Maybe this winter when I have time for refinements I'll invest in a can of sardines. The dog will either like them or roll in them or both. Right now I'm happy with having the fins covered up and the heat shields removed. It sure looks better. Mike is right, I'm sure, that warranties go out the window by removing them, but I haven't noticed any tendency for the engine to get hot on my bike. If I were a dealer like he is, I'm sure I'd be telling my customers that altering the engine in this way is not advised and that doing so voids warranties and leaves you on your own. I would like to know what is involved in replacing the valves, etc. if they were to go bad. If I only get ten thousand miles on this motor instead of twenty, at least I don't have to look at that shroud. Gotta be cool even when you're a geezer.
SB