Cafe Creme - my Boardtracker project.

GoldenMotor.com

Beachcomber

Well-Known Member
Nov 3, 2012
302
574
93
80
Redditch [UK] and Reichenau [Saxony ]
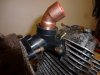
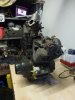
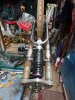
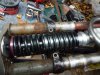
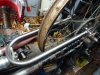
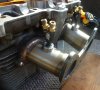
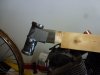
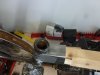
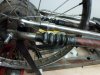
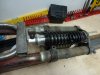
Good news on the intake manifold .......... I took the OEM unit off the engine and found out under all the rubber crap - it's alloy ! I have got an original 1 1/4" SU alloy intake flange - bingo, no need to get a manifold fabricated I just need a simple swan neck bend fron the carb to the original manifold. Not often something just drops into place.

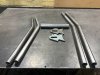
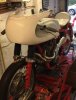
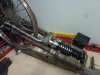
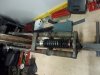
I also priced up the rear axle mount plates ...... HOW MUCKIN FUTCH !!! It's only £35 dearer to get a complete rear end tubing kit together with axle plates !
 

Beachcomber

Well-Known Member
Nov 3, 2012
302
574
93
80
Redditch [UK] and Reichenau [Saxony ]
Oooops, the intake is a composite - a very complicated composite, consisting of an alloy mounting flange each end with a rigid plastic insert to form the actual manifold all covered in some sort of horrible heavy rubber which also forms the intake mount for the OEM carb !!!!!!!!

Gizzajob Yamaha I could have designed a simple cast alloy part to do the job. My basic plan will still work, although I'll use a copper 90 degree plumber's elbow and glue it into the rubber attachment collar.

Fortunately new manifolds are only £9.00 from Chinabay.
 

Beachcomber

Well-Known Member
Nov 3, 2012
302
574
93
80
Redditch [UK] and Reichenau [Saxony ]
The 18" alloy rear rim just didn't look correct, even with a tall profile nobbly tyre.

So I started over with a 21" rear rim and TS125 hub. The wheel was built by Paul at PW Wheels [ UK ] and he did a super job.

Happy now - it looks period correct.
 

Attachments

Beachcomber

Well-Known Member
Nov 3, 2012
302
574
93
80
Redditch [UK] and Reichenau [Saxony ]
Yep, that'll work.

Can't believe how well it's all falling into place .... for a change !

The copper plumbing elbow [ 45 degree ] is an exact fit for the ID of the intake manifold neck [ rubber ] and a simple HD clamp will do the job of securing it, although because of the weight of the SU, I'll make support brackets to take the weight from the existing head brackets [ now redundant ]. The carb will be fully supported by the brackets with no weight on the manifold joint.

That sits the SU float bowl at the correct angle and all that remains now is to attach the copper elbow to the alloy carb flange.

The overall look is just what I was hoping to achieve - "olde worlde" and the SU is relatively easy to tune and literally ALL the parts and spares are available from the SU continuation company - The SU Carburetter Company in Salisbury England.

Next job is to lay all the components out on the floor [ my extension / dining room has 12" square tiles !! ], and essentially, join the dots.

The only concern at the moment is the 100 x 50 ERW box tube top frame member possibly interfering with the carb. As the tank will actually be a cosmetic dummy [ hiding the electrics and other modern squitter ], I could do one of those clever cut outs around the carb if necessary. I can reduce the top tube to 50 x 50 if I have to.
 

Attachments

Beachcomber

Well-Known Member
Nov 3, 2012
302
574
93
80
Redditch [UK] and Reichenau [Saxony ]
that looks great. What engine is that?
Thanx for the encouragement ! The engine is a 125cc Yamaha Virago unit, it is compact and light.

The 250cc unit is the same physical size, but I'm not too bothered about any performance difference as it's the design excercise and hopefully the period look I want to achieve. Here in the UK the 125 units are about half the price of a 250, that was also a big factor as this is being built on my state pension income.

I have designed my own front forks - again for a period look - based on a BSA Bantam !
 

Attachments

fasteddy

Well-Known Member
Feb 13, 2009
7,440
4,877
113
British Columbia Canada
Building on a government pension. Nothing like it to spur on creativity while building a motor bike.

Canadian government just announced that the old folks are getting a permanent raise in benefits. The first since 1973. You have to be over 75, retirement age is 65 and it's about $760 Canadian dollars a year.

There is an election coming soon you can bet.

Steve.
 

Beachcomber

Well-Known Member
Nov 3, 2012
302
574
93
80
Redditch [UK] and Reichenau [Saxony ]
Building on a government pension. Nothing like it to spur on creativity while building a motor bike.

Canadian government just announced that the old folks are getting a permanent raise in benefits. The first since 1973. You have to be over 75, retirement age is 65 and it's about $760 Canadian dollars a year.

There is an election coming soon you can bet.

Steve.
My main "spur" is that at age 78 - I don't have to many more sunrises to look forward to in the grand scheme of things !!

I have 3 projects at the moment - one is long term [ 9 years ] - a 1960's style Cafe Racer based on a KZ750 twin. It was to be my "Swan Song" project and has all the right period parts [ Borrani's, Grimeca. Tarrozi ... etc.,etc.] It's being built as I used to build my bikes back in the early 60's. Oh, apart from the 40 DCOE Weber carb and Nitrous !!!! The other is a "quickie" Flat Tracker based on a VF400.
 

Attachments

Beachcomber

Well-Known Member
Nov 3, 2012
302
574
93
80
Redditch [UK] and Reichenau [Saxony ]
Know what you mean Steve, when I think back to the riding exploits of my youth - I am also amazed that I've reached that milestone !

We finished the crude [ concept ] frame jig yesterday and hopefully I can get it fitted to my bench this afternoon / evening.

I've also decided to replace the top box tube frame section with much lighter 2" x 2" x 16swg, as the tube will no longer be used as a fuel reservoir.
 

Beachcomber

Well-Known Member
Nov 3, 2012
302
574
93
80
Redditch [UK] and Reichenau [Saxony ]
Steve thanx for your kind words of encouragement. Means a lot.

My main issue is that I don't weld [ well sort of ] so all my fab work has to rely on "friends" coming round as and when. Same with machining, again I have to outsource everything.

My build Buddy Brian Knight has been a real support and has been making odd parts for me [ he has facilities ], but at 80 - he too has suffered health issues in the past 5 years.

However, he has made up a P.O.C. piece for the headstock mount using the new 2" x 2" x 16swg box and it's looking the biz.
 

Beachcomber

Well-Known Member
Nov 3, 2012
302
574
93
80
Redditch [UK] and Reichenau [Saxony ]
I'm collecting the final material for the frame jig on Monday. This will allow me to hold the front and rear wheels in the correct place and also allow me some latitude to adjust the final wheel base.

After that I can mock up the front fork and headstock together with the top frame tube and that can all be held in the correct place. When we're happy with that the front end can be tacked up, then we can position the engine [ needs to be raised ?] and make a start on the rear diamond.

As I posted previously ..... cheating a bit here as I bought a complete kit which was only slightly dearer than a pair of axle plates from another compoany !

Oh how I wish I could weld !!!!!!!!!
 

Beachcomber

Well-Known Member
Nov 3, 2012
302
574
93
80
Redditch [UK] and Reichenau [Saxony ]
POC for the frame jig - it will work. Final mock up of the forks. Just need a few brackets and some welding and they will be done.

These are the set up forks, the modified forks [ 3 bushes per stanchion ] have all been refurbed. There's a couple of pieces I want to get nickel plated, but I'm unsure yet about powder coating or painting. The wheels will be powder coated. Depends on the final colourways. I've decided on Coffee and Cream [ Cafe Creme ], just which parts to paint what !!!

We will make a template for the rear engine plates - will be more of a box section by the time it's done.
 

Attachments