98cc Villiers Vintage Style Build

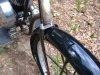
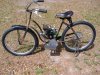
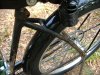
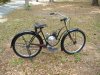
I like the front coaster brake. I spent a lot of time thinking about how it could be done. And you did it exactly like I had imagined doing it but never did. I never read any threads or saw anybody else do one so I'm really wondering if it would actually work right or good. Are you planning on adding a back brake or is the front the only one? Are you going to add any gears to the back wheel?
 
Thanks for all the kind comments everyone!

K007

The jury is out on the front brake until its up and running. I'm not expecting much more than rim brake power. Hoping for more, maybe expecting less.
I will be running a BMX caliper on the rear mounted low on the wheel like on the temporarily abandoned Briggs build. Hope to mount it in the area where the kick stand would be mounted The BMX calipers have the deepest reach to the rim which is necessary running 2.4 tires. Also the softer compound clear BMX pads have incredible grip.

This build wont be ridden fast and hard in consideration of the engine so massive braking wont be necessary. In fact in my area there is little traffic so most of the time I just coast to a stop. I live in a very large county area wise. Would you believe there is not a stop light in the whole county and stop signs are just suggestions. Motorbiking at its best!
 
Got some details attended to. This build has had a bunch of fussy little issues that have taken a bit more time than I would have thought.

Finally got the boards adjusted/placed like I wanted. Made a crankshaft cover for the pulley and added the original Atco mower emblem that came with the engine. This thing was beat 6 ways to Sunday, missing most of it fired enamel finish. I "restored" it with paint. Looks ok from a distance. Will have the Atco emblem on the left side and the Villiers Engineering on the fly wheel cover.

Made a clutch/chain guard using once again a mixing bowl. Will paint the bowl black to lessen its visual impact. Will probably do the same with the engines flywheel cover. Would like the bike to have a bit of a muted/austere look.

Also added the braces to the drop stand. Bike is rock solid on it now. Much needed when rope starting. Left side chain guard next
 

Attachments

  • DSCF1833.JPG
    DSCF1833.JPG
    437.9 KB · Views: 278
  • DSCF1835.JPG
    DSCF1835.JPG
    386.1 KB · Views: 319
  • DSCF1834.JPG
    DSCF1834.JPG
    573.5 KB · Views: 288
Last edited:
Wow CB2! Just, WOW! I'm not not only amazed by the solutions but the speed of the build. This is looking really great. The floor boards came out perfect. I was picturing more of a half round look and couldn't quite get my head around the scale but this looks great.
 
Thanks yall!

HB

I think the half moon boards are really period for your build type and being more of a M/C style will probably scale out. This bike is fairly petite so the smaller boards suited it.
I really liked the early Harley repro boards. They were reasonably priced too, but at 12" I reluctantly concluded they were a bit too long for this one.

This build has been interesting working around issues in a few areas, but I think the worst is over.
 
More problems solved.

Got the left side chain guard fabbed and mounted. Was made from metal from an air duct removed from our house when the new units were installed last year. Very good stuff from 1976. Will look a bit better in paint. I think my extremities are pretty safe now.

Made and welded a tab for the right chain guard at the rear stay. Remade the front brake cable anchor wider so the cable will clear the front fender.

Got the front fender mounted. These are new production fenders. I looked at vintage fenders, not only were they high$$ but looked like maybe a 100 hrs work to make em presentable. I found these made by Sunlite for $32 shipped on ebay. Hyped as full fenders. Figured they would probably be the shorter cruiser fenders that are so common I really dislike. Was super pleased they are in fact full in the old school fashion. They are heavy gauge, beautifully finished and the stays are very heavily made in the fashion of the vintage fenders. Am very pleased with them. The rear fender will have to me modded to fit at the top of the chain stays as it a bit wider. That's next.
 

Attachments

  • DSCF1838.JPG
    DSCF1838.JPG
    561.2 KB · Views: 326
  • DSCF1840.JPG
    DSCF1840.JPG
    334.7 KB · Views: 271
  • DSCF1839.JPG
    DSCF1839.JPG
    519.7 KB · Views: 295
  • DSCF1837.JPG
    DSCF1837.JPG
    536.1 KB · Views: 269
Rear fender.

Took some serious and careful whittling to fit the upper stays. Being as these fenders are such heavy gauge there wasn't an issue. Try this with say current Huffy fenders and more than likely it would have folded thru the stay reliefs.

Bike is beginning to get the look I am after.

Fuel tank is next.
 

Attachments

  • DSCF1842.JPG
    DSCF1842.JPG
    288.1 KB · Views: 265
  • DSCF1841.JPG
    DSCF1841.JPG
    517.9 KB · Views: 266
Thanks Scratch!

Once it begins to get a few parts like lights and the fuel tank it should look a little less "bikey".
 
Got the tank mount done.

Will sit on leather straps, and be retained by the same strapping tensioned by screws
thru the tabs on the bottom of the mount. This method worked very well on a previous build.

Also installed another SS lock ring for the exhaust clamp.
 

Attachments

  • DSCF1843.JPG
    DSCF1843.JPG
    589.4 KB · Views: 296
  • DSCF1844.JPG
    DSCF1844.JPG
    603.6 KB · Views: 301
  • DSCF1845.JPG
    DSCF1845.JPG
    377.4 KB · Views: 297
A bit more.

Welded a tab for the tail light. Added a brace to the fuel tank support and fitted the lights.
The headlight is a fairly old Bosch of Germany unit. Even has Bosch cast into the lens as well as a tag on top. Goes right with the rest of the bike well. I got this from a person that didn't finish a project. He has had the brackets beautifully chromed. I would have preferred black as was original but cant bring my self to paint them now. Plan to power the lights with a generator run off the engines flywheel if I can fit it.

Speaking of paint I had bought a vintage maroon to be used with cream trim. But with the fenders being already black it just might go that way. I love black anyway. Ignore the hardware, its what ever I can find to hold it together at the time.
Waiting on a drop stand clip for the rear fender next.
 

Attachments

  • DSCF1848.JPG
    DSCF1848.JPG
    607.4 KB · Views: 271
  • DSCF1849.JPG
    DSCF1849.JPG
    449.9 KB · Views: 259
  • DSCF1846.JPG
    DSCF1846.JPG
    460.8 KB · Views: 271
Last edited:
Such a nice, understated build. Sometimes I imagine bikes can almost talk. This one makes no claims to being a speedster, but does invite one to take a nice ride down a country lane. The footrests are an invitation by themselves. The maroon and cream would be a rich combination, although black always looks good. This motorbike keeps getting better...
SB
 
Thanks Silverbear!

That means a lot coming from you. I have always admired your vintage builds and your innovative use/repurposing of things( like the canoe!)

My idea with this one is to build something that doesn't aspire to be a factory made piece yet be so detailed in old school methods that it might appear to just that. Keep em guessing.

Scratch

The seat is a restored Troxel maybe from the 30s/40s- not sure as I bought it finished($$!). These long spring seats are on ebay but are getting harder to find and even more $$$! They ride very well besides looking good too.
 
Last edited:
Down to the not so interesting details.

Got the rear brake roughed out. Was more of a pain than expected. The proximity of the chain on the right required a bunch of spacer shuffling to get clearance but finally worked it out. The fender will fit behind the bracket on final assembly.

Made up the cable. I wont use bike brake/clutch handles again. These M/C handles are great in that the mechanical advantage is far greater than even the bigger bike handles. They were not bad price wise and the vintage look is nice too.

Now to fab the shifter system. Love the vintage twist shifter.
 

Attachments

  • DSCF1851.JPG
    DSCF1851.JPG
    299.4 KB · Views: 269
  • DSCF1852.JPG
    DSCF1852.JPG
    314.1 KB · Views: 305
Thanks Curt.

Not sure of your question, you mean where? Off ebay for about $25 shipped per pair. They are very heavy duty, have nice adjusters, and work with a standard bike brake cable. They alone increase the stopping power of a rim brake significantly with the handles being a full 6" compared to some bike units with handles under 4". Therefore its best to use a good quality brake like a cast BMX.

http://www.ebay.com/itm/121884466128?_trksid=p2060353.m2749.l2649&ssPageName=STRK:MEBIDX:IT
 

Attachments

  • DSCF1853.JPG
    DSCF1853.JPG
    372.3 KB · Views: 244
Last edited:
Good deal on the levers...I was looking on Amazon sold individually for $10 plus shipping I think. Bikes lookin nice!!
 
Back
Top