98cc Villiers Vintage Style Build

Thanks Scratch!

Hole saw as in make the carriers? That's how I made them in the past. Not hard, just a pain. If you take a 1 3/8 hole saw and very slightly dress the outer teeth down on a grinder it will cut a perfect hole to securely hold the bearings.

The set of carriers on this build is the first set I have bought. There were larger than I expected which I made the most of bolting them on. Don't mind welding but most folks don't and I try to build sometimes offering ways around it.

I'm pretty sure the $9 carriers are from BMI.
 
Got the parts for the left side chain line fitted.

Most times things work against you but this time all the planets aligned and the chain fit perfectly to the exact link with no slack. There will be enough float in the moveable bearing carriers to adjust out any slack that occurs from wear in.

Still thinking thru the starting scenario. Using the jackshaft is easily doable with a 5/8 bore pulley. However it will be turning the engine nearly twice as fast as the actual rope pull so a large pulley will be necessary to get the mechanical advantage. Found a really cool 6" cast iron spoked pulley cheap but don't know if will be too large. It may in effect be a form of chain guard as a byproduct of its size blocking the chain.. Or could do like Silverbear and make a hand crank. Decisions decisions.

Am bidding on a set of vintage half moon foot boards which should look about right and be an easy fit to the frame. I can just mount a semi circle metal disc on the right board to act as a clutch guard. Hope its as simple as I think, usually never is.
 

Attachments

  • DSCF1819.JPG
    DSCF1819.JPG
    592.9 KB · Views: 328
Thanks Scratch.

Saw the cans at HD a while back, figured Id give em a shot on this build. They are lined with a liner that I hope is fuel proof. This would eliminate slosh sealing if I havent messed a bunch of it up soldering. I will buy another can and fill it with gas to see how it holds up.
 
CB2
Spring thaw is underway here in northern Minnesota so I should to able to retrieve one of those fuel sight gauges soon and will ship one off to you to do with as you wish.
SB
 
Thanks SB, no hurry when ever it happens is fine.

Got more work done. The weather is too humid to begin painting the Briggs build so am continuing with this one.

Got the handle bars and controls mounted. Got the cable hooked to the front(coaster) brake. The M/C handle has plenty of pull. The coaster seems to have about the same braking as a good rim brake, tested by pushing of course. The vintage twist shifter on the left works well.
Won the auction on the floor boards. Have also figured away to pull start the engine directly from the left side crankshaft.
This bike/engine is very narrow drive wise considering it is a double reduction 3speed.
Will post some pics later.
 
I'm looking forward to seeing how you go about mounting your floorboards. I've been watching a few pairs on eBay myself and I think the half moons should look great. Position relative to the seat location will be interesting too.
 
Hey HB

I looked at a zillion floor boards. I too favored the half moon units.
The most commonly found boards were 12" which for this build I felt were a bit too long. I did find some 8" half moons but they were to $$. 8" are right for this bike. I found a passenger set from a early 80s Honda Gold wing that were 8x4.5. They have a look appropriate for the bike. Won the auction @$13.50 so the price was right too. The last alternative was to make boards using a set of pads.

initially I think they will mount just ahead of the BB. The width of the entire primary reduction is only 6.5" well inside of the engines dimensions. This will keep the boards well away from the clutch/chains/sprocket. Hope its as easy as I think!

Have come up with a way to easily mount a pull start pulley to the left side of the engine(on the drive sprocket). This keeps the primary reduction narrow as I had originally expected the start pulley to be on the jackshaft.

This will all make sense one its done and in pics.
 
Last edited:
Little update.

Got the drive train basically finished. Roughed out a drop stand. Vintage stands have gone out of sight $$ wise. Have two braces to add to it to finish. Finished the front brake. Plan on making a hub cover for it to hide the sprocket. Built up the handle bars and controls. Have to finalize the front mounts and the basic build is nearly complete.
 

Attachments

  • DSCF1820.JPG
    DSCF1820.JPG
    552.4 KB · Views: 388
  • DSCF1824.JPG
    DSCF1824.JPG
    538.2 KB · Views: 357
  • DSCF1823.JPG
    DSCF1823.JPG
    494.5 KB · Views: 341
  • DSCF1821.JPG
    DSCF1821.JPG
    535.8 KB · Views: 377
Last edited:
No.

I sometime back read the sticky thread on the conversion and thought I would do a coaster front on a future build. This is it I guess.

I wanted to build up this fork and put it on a pedal bike and try it, but the older stems are much longer(like 7") so wouldn't fit on my pedaler.
Seems to work fine pushing against it. Hope the braking is fairly linear. Cant have a front lock up on the sandy roads down here.
 
Curt, only you would notice.

Yeah I increased the sprocket from an 18t to a 22t. It increases the lever arm a slight bit to increase the pull on the brake.
 
Easier to lock up? How about a travel limit, often thought about a setup like this. Can't wait to see how yours works....................Curt
 
Guess it will be a while before we know Curt. Hopefully it will work ok.

Got the floor boards fabbed and installed. Wound up using only the boards themselves.
Trashed all the M/C mounting brackets. Too much involved in making them work and it would have looked cluttered.

Used the inner mounting brackets from a small set of M/C foot pegs. These are mounted at the boards and allow the inclination of the boards to be adjusted as well as fold up if the bike is dropped. They fit me comfortably. The boards will also make some form of chain/clutch guards easier to do as they should easily attach to the inner side of the board.

Exhaust next.
 

Attachments

  • DSCF1828.JPG
    DSCF1828.JPG
    505.2 KB · Views: 316
  • DSCF1825.JPG
    DSCF1825.JPG
    559.1 KB · Views: 356
  • DSCF1827.JPG
    DSCF1827.JPG
    487.8 KB · Views: 303
Thanks Curt!

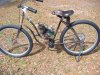
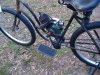
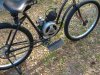
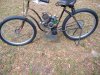
Got the exhaust and the starter pulley fabbed. The exhaust is made from a CG "bomb" muffler these are less common than the usual issue. This has a look that is similar for the period of the engine. The down pipe is made from a seat post.

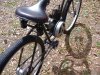
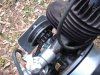
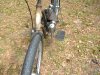
Got the starter pulley worked out. I hunted for a rolled edge pulley as it needed to pants friendly as it will have no guard(the chain definitely will!). The rope engagement hole is on the back side and is really a hole and not a slot for a knot. The rope needs no knot, just stick the end through the hole and wind the rope over it works fine. This leaves nothing to snag the old jeans.

The pulley is welded to the lower half of an 1 1/2" split lock collar This locks positively to the sprockets boss. This is a very simple way to mount the pulley, but requires careful centering. The rolled edges make for a tight fit on the allen wrench, but its not an issue with a ball driver.

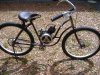
Guess guards, fenders and fuel tank are next.
 

Attachments

  • DSCF1829.JPG
    DSCF1829.JPG
    519.4 KB · Views: 328
  • DSCF1832.JPG
    DSCF1832.JPG
    257.4 KB · Views: 318
  • DSCF1830.JPG
    DSCF1830.JPG
    525.2 KB · Views: 329
Last edited:
There are so many things to like about this build. I like the way you think and come up with straight forward and innovative solutions to the problems we all face in turning a bicycle into a motorbike. And you make it look easy...
SB
 
There are so many things to like about this build. I like the way you think and come up with straight forward and innovative solutions to the problems we all face in turning a bicycle into a motorbike. And you make it look easy...
SB

^^^^^^^ .wee.
 
Back
Top