silverbear
The Boy Who Never Grew Up
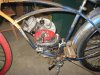
Coming along nicely! I'm glad you're leaving the fenders and rack alone. You never know... sometime in the future you may decide you want 26" wheels on it and use those 24's on something else. The stand should loosen up eventually. PB Blaster is better than WD-40 and last summer Fasteddy was using something by Seafoam from NAPA that was better yet. Can't wait to see the engine sitting in the frame... I imagine you can't either.
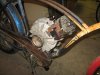
Save your dad's old wheels. Those are nice rims cleaned up and you can drill out the spoke holes for heavier spokes and lace in moped drum brake hubs. That's what I've done. You can also keep the Bendix rear coaster brake and lace the heavier spokes into it You have to drill the spoke holes out a bit for the thicker spokes. As coaster brakes go, the Bendix were well made. Your whole Wasp was well made.
SB