2nd 212 build... heavy duty

GoldenMotor.com

Tony01

Well-Known Member
Nov 28, 2012
1,743
1,749
113
sf bay area
0D7281DE-F5F5-4C41-95F8-D026FEB92381.jpeg


D9FBD8F2-09A6-49E4-B7C5-AFCC3BECC75B.jpeg


I had to delete this thread but I’m bringing it back.

Previous build: 212cc 2-speed Schwinn rebuild
Next build: World’s fastest Schwinn cruiser

Original:

Starting with a '69 CT1 as my frame. No more old schwinns. I've found their limit ~8hp.

Built up some new wheels. Husky 26x50mm steel rims, 11g spokes, rear hub moped (drum brake) and front hub a SA HDS22 dynohub. 12V maint-free system coming soon...

Going to use the same 212 block I've put 13000 miles on.. We shall see how long a 212 really lasts!

Pictured is dirtbike after I stripped most of the crap off it, and before I stripped it further (missing) And my first mockup photo. seems like about a 4-5" drop from original. Going hardtail. Hows the mockup look thus far? Gonna have a gas tank on it too so I need to figure that in at some point for the look.
 

Attachments

Last edited:
  • Like
Reactions: indian22

curtisfox

Well-Known Member
Dec 29, 2008
6,046
3,949
113
minesota
Looks like a good start, if you could incorporate the tank into the top frame part. It has the forum or shape all ready there, should make a good build...........Curt
 
  • Like
Reactions: indian22

Tony01

Well-Known Member
Nov 28, 2012
1,743
1,749
113
sf bay area
man if I had the skills I would definitely make my own tank. For now I'll be using the 1gal tank that's on my bike currently.

Swingajig:
I made the assumption that the swingarm is square/straight to the head tube. Everything from there is right on the money. The swingajig does move up and down, but the final location is bounded by the endpoints of my chainstays, which are shown in the next post.
 

Attachments

Last edited:
  • Like
Reactions: indian22

curtisfox

Well-Known Member
Dec 29, 2008
6,046
3,949
113
minesota
That frame has a Simplex look where the tank goes. Just a thought, my old Monark twin had a 2 piece tank. Gas tank half clamped to the frame, then studs stuck through where the tool box clamped to the other side. Weld one up and fill it with goo sealer. LOL..............Curt
 
  • Like
Reactions: indian22

Tony01

Well-Known Member
Nov 28, 2012
1,743
1,749
113
sf bay area
well I screwed up a little, so i had to flip the dropouts to have enough meat on the chainstays. cut em too short

the jigarm worked great. Added a brace under the frame rails that ties them to the center part, on the underside.

Slotted the tubes for the dropouts. Made a jig for the seat stays. Measured out where to cut for the frame tube, made a support from tubing... tacked it together... looks like a frame now. Can take out the piece of metal that was holding the lower rails together.

Frame is tacked together now. Need to make gussets and supports.
 

Attachments

Last edited:
  • Like
Reactions: indian22

Tony01

Well-Known Member
Nov 28, 2012
1,743
1,749
113
sf bay area
Thank you! Yeah bike was daily until a couple months back when i got a car so I started mixing it up. avg commute was 25mi with 200 per week since last summer. I seen every problem!

Yep.. not based on a bicycle frame any more. Deep down I knew this would happen...

Well I did some more work yesterday. Did some finish welding and the rear spacing only shrunk an eighth of an inch when I pulled out the jigarm. Now to figure out how to mount a jackshaft and align it with the engine. I'm thinking of using some steel plate I have here from something else to line up the side cover to the JS somehow, like a torque converter backing plate type deal. And still need to decide on the style and size of jackshaft. Since the 5/8" jackshaft on my schwinn is bent, I'm thinking of moving up to a 3/4" JS and want to rethink the current setup.

.100" wall 7/8" tubing.. no tubing benders or notchers.
 

Attachments

Last edited:
  • Like
Reactions: indian22

MEASURE TWICE

Well-Known Member
Jul 13, 2010
2,742
1,212
113
CA
Like seeing the progress of DIY stuff! The jig, how was it fastened temporarily to assist with keeping warpage and other undesirable from happening?

It is a bit small for me to see.

Also if closer up or clearer how that rear suspension is to be operating. I really think I need that on my off road bike, but mostly I am standing on pegs anyway. The un-classy extra foam added to my banana seat helps but only so much.
 

Tony01

Well-Known Member
Nov 28, 2012
1,743
1,749
113
sf bay area
Jeff, there is no rear suspension. The swingarm was the frame jig for the rear. It did warp a little but not much.

Yesterday did the motor mounts. Still haven't decided on jackshaft mounts, whether to go with the typical minibike weldment kit like you have Jeff, or continue using the flanged bearings. I think I will just do the flanged bearings again. They have lasted me thousands of miles and I could replace them anytime I want to. They do also seem to be heavier duty than the typical 1-3/8 OD bearings used on the weldment kit, and they come in 3/4" ID also which I will upgrade to when I have cash for a new transmission.

Today I built a new rear wheel using a motobecane rear hub, 11g spokes, and a husky 50mm steel rim. Pics tomorrow.

Here's the mockup photo from yesterday with the 212 just sitting there before I put the motor mounts in. The front wheel is built already in the pic, it's a 50mm husky steel rim laced with 11g spokes to a Sturmey Archer HDS22 dynohub.
 

Attachments

Last edited:
  • Like
Reactions: indian22

MEASURE TWICE

Well-Known Member
Jul 13, 2010
2,742
1,212
113
CA
Those sturdy looking pillow bearing blocks that include a oiling cap would be what I would spend more on if I had to do it again. Also the looseness of the bearings in the holder (if you can call it that) I had to deal with to make it where I was satisfied with it not spinning inside the holder itself you do not want to experience. There should be a set screw that holds the bearing for replacement and so it is fastened well to the block. The sprockets in the kit could be more accurate too. I know you are looking for perfection in the working hardware. And maybe unlike what I have done so far with my bike, for the other side of the coin, aesthetic looks, you have some good lines in the frame you have going on!
 
  • Like
Reactions: Jaroe and indian22

Tony01

Well-Known Member
Nov 28, 2012
1,743
1,749
113
sf bay area
Thanks! Alright then flanged bearings it is. Yes I am looking for perfection. About 500mi ago my jackshaft got bent at the output sprocket. Probably cause the chain jumped and got caught up. I bet that is what snapped my seattube as well. I've been riding with a nasty bent js for a while now. It's very scary and I was probably losing 5-10mph on the top end.


Yep that's right I'm cutting out dropouts for the dirt bike fork. It is spaced at 5" and I need it at 100mm which is a 1/16 under 4". Half inch per side. Dropouts are gonna be a quarter inch thick steel at the axle. I don't want to replace the fork seals, so I'm just going to cut the springs down to drop it.
 

Attachments

Last edited:
  • Like
Reactions: indian22

Tony01

Well-Known Member
Nov 28, 2012
1,743
1,749
113
sf bay area
Welding on the fork is done. I finished my dropouts. Clamped the steel pieces together, tacked, an hour or two later of grinding and welding then grinding again and welding to the fork over a period of 5 hours to keep it cool, and here we are. I still messed it up though. There are apparently boogers on the inside from too much heat, as the fork bottoms out as seen in the photo. No problem though, it still has the 3" of travel I wanted just not the range I wanted but w/e. I'll just drop it in the crowns then.

Time for another mockup! Love these mockups makes me feel like the build is almost done. If it looks weird, it's cause the forks are too tall; the front end will be a few inches lower.
 

Attachments

Last edited:
  • Like
Reactions: indian22

Tony01

Well-Known Member
Nov 28, 2012
1,743
1,749
113
sf bay area
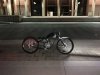
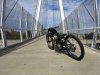
Well I haven't had much time to work on it, but I've made some progress. The hard stuff is done.

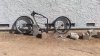
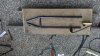
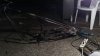
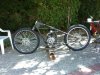
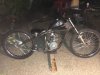
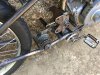
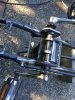
Shortened my forks. When I welded the dropouts I guess I used too much heat and it probably caused boogers on the inside.. on both sides, which prevent the fork from compressing fully and get it stuck even with springs in place.

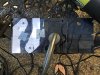
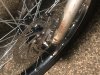
So what I did is I simply shortened the damn fork. I still had about 3" of movement, which is exactly the amount I want anyway. But now at full extension the tire is only about 5" from the bottom crown. Also fabbed up a top brace for the lowers, which is actually a stop for the fork in case it tries to compress more than it should and get stuck (and stop the tire). Hard to see but its behind the lowers in the 2nd pic.

B9B1C386-2942-4DF0-B7F4-E482C40389DD.jpeg

2216414D-EA5F-4F76-8D84-B43C70890FAE.jpeg

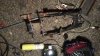
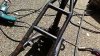
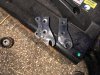
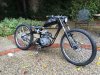
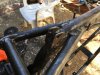
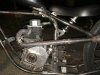
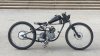
The last couple days I've been making the jackshaft mount. I used the same 4x4 box tubing and will be using the same flange mount 5/8" bearings. I finished cutting out the mount and installed the bearings and a fresh jackshaft, and lined it up to the motor crank. Flat and parallel. Clamped an I-beam level to the crankshaft with the shoulder up against the 4-bolt mount pattern for squareness and went off that. Welded it all together.

A4ED7266-2150-4824-86B9-B7ED660734E4.jpeg

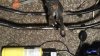
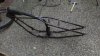
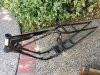
Removed some of the gusset material at the head tube, along with the old gas tank mounts that were on the sides. Had to do this to allow my 1gal gas tank to seat all the way down on the tube. Welded in some 5mm bolts to mount my 1gal gas tank on. It is not like the typical kit 1.9l or 2.5L tanks with the studs coming out of the tank, the 1gal tank has much better construction overall, same type gas cap, but the mounts are just flanges with holes similar to the strap that is used for the underside of the top tube. Much, much better design.

7AA896B4-8207-4663-8D37-05B55682C195.jpeg

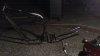
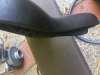
Cut out the old front mounts and welded in mine, for the boss on the 212 cylinder that used to hold the pullstart cover, throttle linkage plate assembly, and gas tank I think..

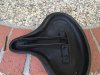
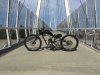
Tomorrow I will install a hinge and shock mount for my seat, and will have to modify the frame under the seat to suit. I have a junk shock off a cheap bicycle but the spring says 750lb/in, which is not going to work unless it is leveraged. I'm gonna put it about a 1/2 the distance from the hinge, between hinge and seat pan spring perches.. but this will still not be enough to even get it to move a tiny bit. I just need a different spring, or a better complete shock.
 
Last edited:
  • Like
Reactions: indian22 and Hud

Tony01

Well-Known Member
Nov 28, 2012
1,743
1,749
113
sf bay area
Geez I really need to finish this build thread. I lost my phone (under the bed) for over a month and went through two cheapies, taking build photos, so I don't have all the pics in one place. But I got the bike running and just slapped a cvt on her.

Motor revs out much higher than it used to with a clutch which tells me I made a mistake with gear ratios. Actually it's in the cvt. I thought it would shift to a 1.4 for an overall of 6.8 but I guess it maxes out at a 1.6 or something. This is the 20 series symmetrical one with the 7" driven pulley. It has 4 holes for spring tension and comes stock on #3. I will set it at #1 (high gear sooner) one of these days before going to a taller final drive ratio. The motor revs high but my top speed is actually lower according to the butt dyno. Well here it is. I'll update this thread later on with more progress pics that I was taking as I went.

I've put about 200mi on it thus far. The rear wheel needs retensioning of the spokes (rear feels muddy sometimes), the rear brake still needs to be hooked up, and the engine block needs the deck resurfaced. Still the same high mileage predator, still haven't opened the case since I bought it and removed the governor in summer '16. This bike is just begging for some chrome fenders!
 

Attachments

Last edited:
  • Like
Reactions: indian22 and Hud

MEASURE TWICE

Well-Known Member
Jul 13, 2010
2,742
1,212
113
CA
Before changing springs I want to see you doing that dirt hill climbing thing! HAHA. Looks nice sleek design.
 

Tony01

Well-Known Member
Nov 28, 2012
1,743
1,749
113
sf bay area
She climbs hills fine. Only issue is there is some vibration around 5000rpm but it clears up a little higher. I set the spring for high gear and it prevented the motor from going to higher rpms, and it would just vibrate like crazy. Well I set the spring back to where it was. I'm not fully sure I like this transmission that much. It's fun to ride but it's not so smooth. I think I still prefer a 2-speed.
 

Tony01

Well-Known Member
Nov 28, 2012
1,743
1,749
113
sf bay area
Continuing the build... its done but.. I'm gonna be reading this in a few years...

I built up a little subframe for a seat I had, at the same 3 mount points for the springs and front frame mount. I used a corner piece of the 4x4 box tubing I had as a piece of angle iron to go across the spring perches on the pan and welded it in, then made some rails and stuck them to the front mount. painted it all.
The intake and exhaust were made for the thinner Schwinn frame, and were both hitting. I was able to heat both and bend them out. The exhaust was easy, but the intake being .125" wall tubing was difficult to bend even with heat, but I did it. I had to remove the choke lever to make it fit. Fortunately I don't need to use it much to start, however I used to use it to kill the bike and now just short the kill switch tab on the coil with whatever metal I have... usually with my knife.
 

Attachments

Last edited:
  • Like
Reactions: indian22

Tony01

Well-Known Member
Nov 28, 2012
1,743
1,749
113
sf bay area
I wasnt about to make another pedal chain ultra-granny gear like I had on the previous build, in which the chain was hooked up to the jackshaft but it was so low of a gear that it was practically useless.

The moped rear hub has freewheel threads on it, but they are for a French-threaded freewheel, so I am still looking for one.

Also, since the pedal crank sprocket is outside of the frame, I had to make a pedal chain jackshaft. This will allow me to overdrive the rear wheel with the pedals with a ratio much close to that of a BMX bike or beach cruiser. However, as of this moment, it still isn't hooked up... because the left side pedal hits the CVT driven pulley. more on that later.

A lot of people ask me, why have pedals at all? Well, apart from the very important reason that they must be there for the bike to be a legal motorized bike, the big one is that I want to pedal the bike sometimes.

The pedal chain jackshaft is a thing in itself. I was unable to remove a freewheel from any hub that I had, so I took one steel hub with the freewheel on it, cut it in half, and welded it back together with a sprocket on the inside of the flange. I never got it hooked up, but...

One day I was riding going about 35mph and hit a bump, which caused the pedal chain jackshaft to jump out of its dropouts and go under the rear wheel. The sprocket essentially cut the tire like a knife and I got an instant 0psi flat... the bike fishtailed till I came to a stop. It was scary!!


Also, when I built this wheel, I had a lot of problems with 1977mopeds, a moped parts retailer you should avoid. Even this hub they sent me is damaged around the brake liner and outside edge, there is a huge crack. I don't know if it will be a problem or not, but I needed a hub to use so I used it. The holes are way too big even for 10g spokes, also too large for the spoke lengths, so I drilled new spoke holes and built the wheel. You can see the damage of the hub at the 6 o'clock position.
 

Attachments

Last edited:
  • Like
Reactions: indian22

Tony01

Well-Known Member
Nov 28, 2012
1,743
1,749
113
sf bay area
The last step was putting all sorts of little brackets in. Battery holder brackets, frame ground wire post, header bracket, moped brake arm stop, pedal chain tensioner brackets, etc, and the pedal cranks. Most of the extra stuff like the two bearings in the middle, and the small sprocket on the end, are just spacers.

MT, I decided to use the crappy azusa bearing hangers for the pedal crank.


No photos of the paint process. Wire brushed, sanded, flap wheel'd, degreased, 3 coats primer, 3 coats black paint+primer, 3 coats satin clear. Came out nice. I was cheap and fast. I was busy for about two weeks after painting so it was the perfect time for the paint to cure.

The build went together okay. Putting the forks in was a real PITA. I used the original headlight mounts on my autozone headlight, which was a real pain to set up. But I did it and it is solid.

Riding with the CVT on it now, it is a 20 series symmetrical belt comet knockoff with a 7" driven that supposedly upshifts to 1.4. Together with my rear ratio that is about a 7.5:1 overall. The engine does rev out quite a bit after the CVT finishes shifting at ~40mph. More info to come later, as I only have a few hundred miles with the CVT.

Still got a few things to do on it. Finish the pedal chains.. which will be a day of work all on its own. Also need to finally hook up my front dynohub to the regulator and battery, and get the charging system working. I'm so sick of charging the battery which only lasts for 45-60min of riding total. I make it last an hour by shutting it off at stoplights.

Also, I want to build a leaning sidecar for it similar to FFV8's. I have a couple wheels that would be up for the job as well. One drum, one disc

Far as the engine goes, there is trouble. At 500hrs/13000mi it is probably in the top 10 highest hour predators with the governor removed, in the state.. maybe even the country... and it shows it. Thread and/or yt vid coming soon.
 

Attachments

Last edited:
  • Like
Reactions: indian22