
You are using an out of date browser. It may not display this or other websites correctly.
You should upgrade or use an alternative browser.
You should upgrade or use an alternative browser.
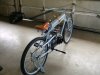
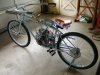
1900s Vintage Style Build
- Thread starter cannonball2
- Start date
cannonball2
Well-Known Member
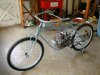
Thanks Gents! I have read YOUR threads with much interest. After growing up in the "Space Age" and living large with the technogly we now enbrace, I was impressed with the revertation of certain builds on the forum. MB building is a great thing. A hobby for some, trans for others, art for even others. This bike allows me to go back to the time that it all began. Its not fast/friendly, but it is surely endearing. Its what I call a fantasy bike. Who can know what it was like back then? A period piece is worth a fourtune, but a loose copy is worth more because you can ride it!
cannonball2
Well-Known Member
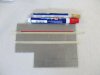
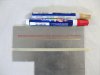
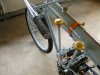
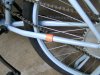
A trick I just came up with on this build for painted pinstripes. Im sure many have done it. I just cant work a stripe brush period. Constantly amazed at those that can. Any way, common paint pens from Walmart @ $2 are used. Have many colors in solids and metallics. Simply run your tape lines, then carefully drag the pen down the tape edge. Plastic tape is really a must, or you will get bleed under on the solids, the mets are not bad. What really works well is 1/8 vinyl pinstripe tape as it will make almost any bend required, and is paint tight. The thickness of the tape and the size of the pens tip determines the stripe size. I wanted stripes about 1/16 so the fine points worked out to about that. The paint is pretty durable once dry, and stands up to clear coating. A couple of light coats first to seal it down before really flowing it to it. The stripes in the pics were quickly done and arent as nice as on a painted surface, but it gets the idea across.
Attachments
cannonball2
Well-Known Member
cannonball2
Well-Known Member

cannonball2
Well-Known Member
Thanks guys!
Using vice grips Mr.B.
Using vice grips Mr.B.
silverbear
The Boy Who Never Grew Up
Well, isn't that a sweetheart! And thanks for the pin striping tip. You've had a lot of fun with this, I can tell. And we've had fun watching it progress,
SB
SB
Mr.B.
Well-Known Member
cannonball2
Well-Known Member
Thanks for all the positive comments guys! I have had some fun with this build. Gave me a chance to try several ideas. Waiting a few days for the paint to be fully cured, we have had cool damp weather during some of the the painting. Then its gas it up and ride!
cannonball2
Well-Known Member
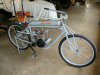
Thanks Harry! When you are not building anything in particular you can really add the different little details and ideas. I generally add a coin or two to certain builds. This one has a 1950 $.50 piece on the front of the tank(the year I was born) and a 1939 quarter in the left bar end I have had in my drawer forever. Guess I will always have 75 cents in case of an emergency.
cannonball2
Well-Known Member
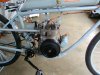
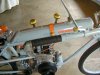
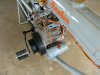
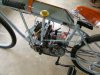
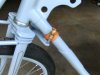
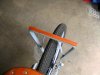
A couple of more(and hopefully the last) details. Drive chain clearance was an issue on this build. Had to run a BMX chain. I can assure you these are tough chains! Any way ther was some slight frame contact so I stitched a band of leather on the frame at the point of contact. Another concern was the worry if the bike was shown in a show of the fork being accidentally knocked causing the bars to whip around and hit the tank. I had them raised so the throttle lever would miss but there was still some contact near the fuel cap. So I fabbed a fork stop. Was lucky the old fork had a 1/4" tapped hole. I used stainless hinge pins, with a brass finial for the stops. Once again leather provides protection. This allowed me to drop the bars to horizontial which looks better than being above. Also the delima of a painted drop stand looking bad when up. Just added a stained piece of hard wood to the bottom. It can take the abuse and not look too bad, easily replaceable too.
Attachments

killercanuck
New Member
Those are awesome little details that only add prestige to your overall theme. ") Definitely easier to replace a little leather and wood, than to repaint areas. For sure.
Definitely easier to replace a little leather and wood, than to repaint areas. For sure.
Definitely easier to replace a little leather and wood, than to repaint areas. For sure.cannonball2
Well-Known Member
Thanks killercanuck! I figure the more to look at the better it is on a bike of this sort.