
silverbear
The Boy Who Never Grew Up
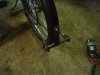
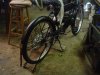
There's nothing that says "vintage" quite like a rear drop stand. Dan made one some time ago for his stretch Worksman and it turned out very nice as you can see in the photos. The problem was in fixing it to the fender. I had the same trouble with the couple drop stands I have made for my builds, so it has been the subject of much discussion and brainstorming.
The ones I have seen on old bicycles used a bent piece of metal made from spring steel which acted as a catch to keep the stand in an upright position while riding. I had an original one on a 1934 Elgin and while it works, it is cumbersome to use and still allows for some noise of metal rattling against metal while riding. Back when, they also sometimes bounced loose from the catch and ended up dragging on the ground. The switch to side mounted kickstands was for a reason, but if you want an authentic vintage look a side kickstand with one leg doesn't do it.
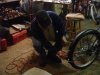
One I made I simply tied to a leather loop on the fender using leather thongs. It was quiet, but a pain to tie up and undo again which cannot be done with one hand (at least for tying it up). It was one of those temporary fixes that becomes permanent because you can't come up with something better. On my current Indian Hiawatha build I scrapped the idea of a drop stand, much as I like them, because of the dilemma posed by the catch.
After a lot of 'creative staring' and a few wrong turns along the way Dan has come up with an elegant solution to the problem. Here it is: Timsmith's keyed drop stand catch. Dan is a quiet guy and doesn't like to toot his own horn, so I'll toot it for him with this little thread. It may seem to some of you like a small thing, but it is the cat's meow for those of us who have lived with a vintage drop stand.
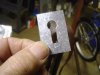
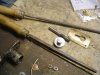
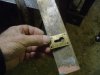
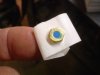
The inspiration came from a standard sliding chain door latch. While at the hardware store one day the light bulb flickered to life when he looked at the door latch with that "creative stare" and saw not just what it was, but how it worked in principle and what it could be in another application. This is his first one, right on the money first try. Elegant in it's simplicity, the catch works perfectly. It looks good, is quiet, holds the stand securely and can be done with one hand.
SB (cont.)
The ones I have seen on old bicycles used a bent piece of metal made from spring steel which acted as a catch to keep the stand in an upright position while riding. I had an original one on a 1934 Elgin and while it works, it is cumbersome to use and still allows for some noise of metal rattling against metal while riding. Back when, they also sometimes bounced loose from the catch and ended up dragging on the ground. The switch to side mounted kickstands was for a reason, but if you want an authentic vintage look a side kickstand with one leg doesn't do it.
One I made I simply tied to a leather loop on the fender using leather thongs. It was quiet, but a pain to tie up and undo again which cannot be done with one hand (at least for tying it up). It was one of those temporary fixes that becomes permanent because you can't come up with something better. On my current Indian Hiawatha build I scrapped the idea of a drop stand, much as I like them, because of the dilemma posed by the catch.
After a lot of 'creative staring' and a few wrong turns along the way Dan has come up with an elegant solution to the problem. Here it is: Timsmith's keyed drop stand catch. Dan is a quiet guy and doesn't like to toot his own horn, so I'll toot it for him with this little thread. It may seem to some of you like a small thing, but it is the cat's meow for those of us who have lived with a vintage drop stand.
The inspiration came from a standard sliding chain door latch. While at the hardware store one day the light bulb flickered to life when he looked at the door latch with that "creative stare" and saw not just what it was, but how it worked in principle and what it could be in another application. This is his first one, right on the money first try. Elegant in it's simplicity, the catch works perfectly. It looks good, is quiet, holds the stand securely and can be done with one hand.
SB (cont.)


")