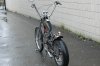
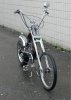
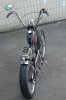
Some time ago i posted pics of my chopper with a pocket bike engine in it. Well that motor didnt work out too well since I couldnt get it geared low enough and the motor wasn't able to wind out. So I pulled it and built a gearbox onto a chainsaw motor which was somewhat more powerful but with a similar result. Then I got my hands on a chinese motor kit, put that in and the gearing issue was solved. I have to say that it was alot of fun messing around with the first 2 motors but alot of wasted time in the long run. While I was waiting for the motor kit to arrive I needed something to do, so I designed and built from scratch with what I had laying around a springer front end and a few other doodads for the bike. The springer worked out amazingly well and the wheel tracks perfectly straight throughout its entire length of travel. I will post some pics and you guys tell me what ya think.

You are using an out of date browser. It may not display this or other websites correctly.
You should upgrade or use an alternative browser.
You should upgrade or use an alternative browser.
Update on my Schwinn Chopper
- Thread starter Scary G
- Start date

")
chainmaker
Well-Known Member
Like Bill said !! Real nice looking bike.
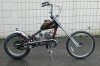
Thanks guys. 2door, I just finished modifying a seat for it. Its a smallish banana type seat from an unknown chopper bike. I modified the pan so it fits down into the frame better, I'll post some pics soon.
Wight, believe it or not it handles great with the rake. I put alot of thought into it and engineered the springer for proper rake and trail. It certainly paid off. I've been a builder of custom Harleys for 25 yrs so its not exactly new ground for me.
Dobzeh, yes you are correct its a modified pocket rocket pipe.
KCvale
Well-Known Member
It looks 'chopper cool' for sure, nice job.
How does it handle with that long fork and handlebars, and how about stopping with just a coaster brake?
A local guy bought a 66cc kit and tried to mount it in a Stingray and suffice it to say he wasn't a very good welder nor mechanic so he brought it me to 'make it go'. What a nightmare but I did manage to make it work,


I managed to get a front caliper brake on it as I won't let anything out of the shop with just one brake but it was too damn scary for me to ride other than up the block and back.
The guy wanted me to just sell it for him and I couldn't get any takers but a 13 year old kid for $350 and I wouldn't sell it to him despite his clueless mothers OK. They were both furious with me and tried a couple of times but there was no way I was going to put something I didn't feel safe riding on in the hands of a kid on the roadway.
How does it handle with that long fork and handlebars, and how about stopping with just a coaster brake?
A local guy bought a 66cc kit and tried to mount it in a Stingray and suffice it to say he wasn't a very good welder nor mechanic so he brought it me to 'make it go'. What a nightmare but I did manage to make it work,
I managed to get a front caliper brake on it as I won't let anything out of the shop with just one brake but it was too damn scary for me to ride other than up the block and back.
The guy wanted me to just sell it for him and I couldn't get any takers but a 13 year old kid for $350 and I wouldn't sell it to him despite his clueless mothers OK. They were both furious with me and tried a couple of times but there was no way I was going to put something I didn't feel safe riding on in the hands of a kid on the roadway.
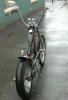
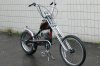
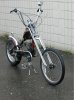
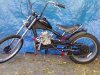
Good call KC, on not selling the kid the bike. My bike handles great with the springer, no suprises at all. As far as braking, it stops quickly with just the stock Schwinn caliper on the back but since the above pics were taken i mounted a rotor on the front wheel and a cable activated caliper in case I need some extra braking power for a panic stop. Haven't needed it yet. The Schwinn hubs are great for mounting brake rotors, sprockets. etc. because they have the nice wide flange on them.
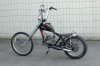
As promised I am posting some pics of my stingray with the new seat and disk front brake. I am also currently working on stretching another frame by cutting up 2 frames. I dont like the look of the schwinn seat mounted up high enuf to allow proper reach to the pedals, so my seat is too close to the pedals. Therefore I am stretching it up and out to get some extra legroom. Will keep you all posted on progress.
Attachments
Crazy Horse
Dealer
I am also currently working on stretching another frame by cutting up 2 frames. I dont like the look of the schwinn seat mounted up high enuf to allow proper reach to the pedals, so my seat is too close to the pedals. Therefore I am stretching it up and out to get some extra legroom. Will keep you all posted on progress.
Scary G, I've Stretched a few Schwinn OCC Pedalchopper Bikes!
Here's a Picture of my version of the Uni-Strut bicycle frame jig!
These inexpensive bicycle frame jigs are amazing, if you don't already have a frame jig for stretching these Schwinn OCC Stingray Choppers try one of these.
C.H.
P.S.
Click on the photo to see full size of picture.

what would you charge for a springer like that??? really nice work... can you tell me more about thee process to make them? were they milled??? or mostly welding done??? and the springs???
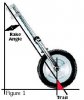
Hey Diany, I don't know what to say about price to build one. It is a bit of work. I started with a set of mountain bike forks for the stem, cut the tubes in half and welded the new tubes to them. That got everything in line for me. For the rockers to swivel on the bottom of the tubes, I used pieces from the swingarm of a full suspension mountain bike. That took a bit of machining and fabricating. Its important to have bearings or bushings at this location so your wheel tracks true. The top tree is a piece of stainless from a shopping cart as are the tubes and rockers. The main springs are from a motorcycle shock, I cut one in half for the 2 springs. The top springs are from a bicycle seat. The most important thing to building one of these is making sure of correct rake and trail. I've included a simple diagram indicating how to measure trail. Ideal trail measurement should be 3-6 inches.
Attachments
fatdaddy
New Member
I've built a few of these, 10 or 15, can't remember exactly, It's been a while. And I had a couple issues with them.
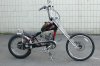
First, the frame metal on these is thin. After all, they were made for a kid to ride, not an adult with an engine added. If not supported in a few places it will eventually crack. I'll include a pic to show where I had problems.
Second, even with a springer which may help some, your still pretty much riding ON the rear tire and that gives a person a real stiff ride. A youngster might be OK with this, but I'm getting to the age where I want a little softer ride.
Anyway, heres the pic.
fatdaddy.
Attachments
Last edited:
Thanks for the heads up on the weak spots Fatdaddy. I will do some preventative bracing there. And yeah the hardtail is a bit of an issue. I've already been giving some thought to a sprung solo seat. We'll see what happens. Like any home project, they're never done. Always something that needs tweaking, tinkering or changed.
16v4nrbrgr
Active Member
Thanks for posting the trouble spots. My seat post tube was definitely cracked in that spot from somebody over-tightening it with the post up or something. I'll keep an eye out for those frame cracks too, I went over it when I modded it and just found the cracks in the seat tube. I reinforced my frame too by adding a piece that links the rear fender mount to the bottom tube to try and stiffen up that seat and rear triangle area.
I actually thought that the frame is quite beefy, it's the same thickness steel in the main tubes as many vintage sports racers and formula cars, hopefully it holds up to my abuse! Considering that this bike has been ridden by two previous owners motorized by people of about 200 lbs, just finding cracks in the seat post tube actually surprised me.
I was especially surprised that the bottom tube wasn't fatiguing after they installed the "Happy Feet" Ebay Happy Time engine mount by just drilling holes through the bottom tube, right next to the old ones from an old Briggs install or something. I welded all that stuff back up before putting the fast motor on because it sure would suck to have a frame taco at 50!
chris crom
New Member
did you make the forks or did you buy them?
if you bought them, may I ask where?
if you bought them, may I ask where?