
You are using an out of date browser. It may not display this or other websites correctly.
You should upgrade or use an alternative browser.
You should upgrade or use an alternative browser.
Fabricating a Fairing
- Thread starter Gbrebes
- Start date
dogcatcher
Well-Known Member
You might want to read this link. https://www.practicalmachinist.com/vb/general-archive/forming-lexan-sheet-85875/
Gbrebes
Well-Known Member
Thank you very much dogcatcher. I did read that discussion before I baked my lexan, but now that I re-read it, I would have had to “dry” my lexan sheet for 9 hours at 250 degrees!!! I only did 2 hours.
I really like lexan because it’s basically shatterproof and unbreakable, but that’s a lot of drying time in the oven.
I really like lexan because it’s basically shatterproof and unbreakable, but that’s a lot of drying time in the oven.
Gbrebes
Well-Known Member
Another option is, buy one. I've seen many motorcycle windshields on Craigslist for cheap. In fact, I have one sitting around that I paid five bucks for at a swap meet. You can have it. I'll get a picture of it later...
Your offer is looking better and better Baird. My windshield measurements are 15” long, 14” wise, and 4 1/2” tall. Yours looks like 7” tall, but it I cut off some around the bottom, I might get close to my dimensions.
I might be making arrangements to visit you soon.
Gilbert
Gbrebes
Well-Known Member
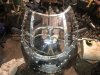
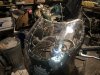
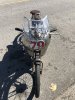
I finished my three-panel windshield tonight, and it fits pretty ok.
I gave up on using Lexan. I kept a getting bubbles from heat and Lexan scratches terribly from just touching it.
I used acrylic sheet and heated the pieces over my wood form. I forwent using clamps and used my left hand (with glove on), my left knee, and my right knee to push the various sides against the mold. I used a heat gun to soften the acrylic. I would heat a section, bend it onto the form, hold it until cool, and then heat another nearby section.
I cracked one of the panels and had to re-do it. Then when I finish tightened this set-up, I got another little crack. The acrylic is brittle.
It’s looking a lot more “Twently Thousand Leagues Under The Sea” now with the windshield frame. I also think I added a whole pound in hardware for the windshield fasteners! Look at all those little nuts and bolts, there’s like 60 freakin’ bolts in that thing! Not sure why I put the bolt spacing so close, I kind of went off the rivet spacing on the sheetmetal.
I’m still going to visit Baird and take him up on his generous offer of the domed canopy.
Gilbert
Attachments
-
 BFCFE20B-12E5-40E3-9E39-620E5626EF29.jpeg119 KB · Views: 522
 -
 974486FD-080B-4F21-9213-1A85D2E756E7.jpeg117.2 KB · Views: 463
 -
 3553D2BB-F2B6-4459-9542-517A3FA00170.jpeg105.3 KB · Views: 514
 -
 570AE344-DDEF-439C-BF50-2C8BD7126A1B.jpeg105.6 KB · Views: 522
 -
 BA870DA8-1EB9-4A36-A279-C5DCAD8FDA82.jpeg95.7 KB · Views: 548
Last edited:
Tom from Rubicon
Well-Known Member
Great wind screen Gilbert! There is a solvent available that will knit cracks and scratches. Comes in small like 2oz bottle with a needle applicator. I have some in my machineshop. I will look at it later.
Tom from Rubicon
Tom from Rubicon
Gbrebes
Well-Known Member
Hello Everyone,
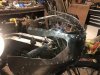
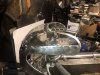
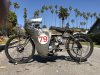
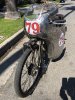
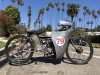
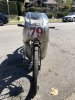
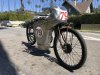
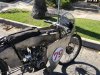
Nice sunny day today, so I took some daylight pictures.
I think I’m done with the fairing for now, I’m still going to try and fit Baird’s windshield on, but the way it looks now is pleasing to me.
I bought some race number stickers. Made a front plate out of metal that screws onto the headlight bezel. Not sure about the side numbers, I wanted them for the race, but not stuck on permanently. I think I put them on too high, but I just used scotch tape. Also they cover my beautiful rivets!
Getting closer to race ready. Pretty soon it’ll be time to put on the hookworms, install the race clutch and gaurd, and put on the race seat.
The last picture is trying to recreate my original pencil drawing at the beginning of this thread. Not too far off.
Attachments
-
 982C40F7-106C-4F82-93C6-8BB92C4D5F3A.jpeg154.7 KB · Views: 581
 -
 6305D24D-3E08-47E9-B476-AADC8082B8B7.jpeg163 KB · Views: 563
 -
 E863491C-6D71-4A66-A8A7-B9332D170DAA.jpeg164.5 KB · Views: 536
 -
 7FE32D95-CE59-486C-9E82-D682E283D431.jpeg174.1 KB · Views: 558
 -
 697B9B28-0FFC-4E6D-B611-AA6DBC3BE0A0.jpeg183.7 KB · Views: 521
 -
 91C0940D-B6B1-470E-A95A-423658E6C013.jpeg160.2 KB · Views: 548
 -
 A29EEF9C-C629-4C68-AE43-C88F6E80519A.jpeg158.6 KB · Views: 498
Tom from Rubicon
Well-Known Member
That is Bitchen Gilbert! Don't change anything unless the engine seizes. There needs to be an opening for air flow.

My Beemer has a Hannigan fairing with air slots in mid section for crankcase cooling.

Tom from Rubicon
My Beemer has a Hannigan fairing with air slots in mid section for crankcase cooling.
Tom from Rubicon
dogcatcher
Well-Known Member
I thought you were crazy when you started this, but you made a great bike look better. I hope you have also inspired others to persevere and follow their dreams.
Venice Motor Bikes
Custom Builder / Dealer/Los Angeles
Great job Gilbert!!!! ")
Gbrebes
Well-Known Member
That is Bitchen Gilbert! Don't change anything unless the engine seizes. There needs to be an opening for air flow.
Thanks Tom
Yes, I am also concerned about airflow to my engine. My faring has a 4” - 5” gap between the two sides in the middle. However, the front wheel mostly blocks this opening. Hopefully enough air will flow into the engine compartment. There are quite a few turns in racing, so hopefully the bike won’t be straight on to the airflow all the time.
Otherwise, I may have to add louvers to the fairing. I love louvers! I put a few onto my clutch/chain gaurd to help cool the race clutch. That clutch gets really hot!
Tom from Rubicon
Well-Known Member
I agree with Tom "don't change a thing" till you mentioned louvers & I also love some louvers!
Rick C.