please help!! I wanna buy this bike&engine tommrrow !!

Has anyone tries harbor freight tool thread locker no.71?? They say it's ideal for high vibration heat application, resistant to gas, oil, and trans n other fluids.

And will this 7function meter work to see if I have spark or volts coming from mag??
 

Attachments

  • 1431390212139987244912.jpg
    1431390212139987244912.jpg
    540.1 KB · Views: 116
Sorry here's thread lock
Don't use it! On the package it clearly states, "Permanent". It is probably comparable to Loctite #262 (Red). There is no need for a permanent thread locker on a motorized bicycle. It requires heat to loosen any fastener you use it on and that you don't want.

I don't know if that tool store has a product similar to Loctite #242 (Blue), which is sufficient for a bike. It doesn't require heat and will hold any fastener as good as you'll ever need.

Tom
 
A man with tools can solve many of the problems that will certainly find him.

Just a helpful hint, be sure to take pictures as you disassemble things. The photos can be valuable when comes time to put it back together.
 
2door is right, ya don't wanna locktite too much of anything permanent on a MB. You'll run into problems every time ya try to fix something. blue locktite is fine. And the meter ya show is a lot better than the one I got from Fred Flintstone's yard sale. It'll do just fine.
fatdaddy.usflg
 
OK so doing good so far taking engine off. How do I take clutch cable off should I unscrew tension tightner or take off this piece in first picture. Plus look at exhaust gasket it's fried on their lol gonna scrape it off Tom Mr row an then get new one. This is SO AWSOME guys ha I might stay up all night cleaning an figuring out what to replace!! Def all nuts an bolts what do I need to get grade 6 or 7? An their was only a back motor mount front one non existent. Are the bolts suppose to come out like this? Look at the end does it look like a piece broke off or just minor stripping?
 

Attachments

  • 1431406044644-672269937.jpg
    1431406044644-672269937.jpg
    432.9 KB · Views: 111
  • 1431406087128-1060484546.jpg
    1431406087128-1060484546.jpg
    441.4 KB · Views: 112
  • 1431406133113-1577332074.jpg
    1431406133113-1577332074.jpg
    383.3 KB · Views: 118
I'm sorry guys I know that was a bunch of easily answered questions. I'm going to search now Woo!! This is so fun!! My son is gonna have a blast when he wakes up in am with the engine taken apart.
 
2door: saved receipt returning tommrrow. Also I think I will just get blue lock tight but wait a long while until engine has been suffiently worked on, re worked on, and then worked on just skittle more!

Crassisus: thank you. Will be reading an watching how to check the magneto momentarily.

Xseler: with this being new to me an seeing as their are a lot of washers and other little hardware I am taking pictures of everything! I want to be able to show Everyone around town and at work how cool these things really are plus I want to be able to help people on this site. Things that I've followed this communities walk threws and guides and also if I make mistakes what not to do lol.

FatDaddy: thanks! I live in Florida so all our yard sales are 70's clothes( which I like ha bell bottoms an disco shirts) and moth balls lol.
 
OK so engine off. Exhaust off. And I'm trying to take off the clutch cover plate an this bolt is bent. What is my best option should I cut it off with the dremel and then replace it??
 

Attachments

  • 1431439304877.jpg
    1431439304877.jpg
    374.7 KB · Views: 131
  • 1431439379051.jpg
    1431439379051.jpg
    341.3 KB · Views: 122
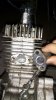
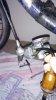
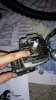
If you have a Dremel with a cut-off wheel, yes, cut that screw close to the case and replace it. That one is too long anyway. You might try straightening it just a little first so the bend isn't as severe near the case.

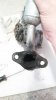
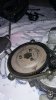
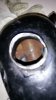
Before you reinstall the exhaust you can help it seal better. Clean the gasket surface of the flange then 'paint' it with magic marker. Lay a sheet of sandpaper, about 150 grit will work, on a flat surface like a counter top or better yet, a sheet of glass. Swipe the flange across the sandpaper a couple of times then check it. You'll see high and low spots. The flange is usually warped from the welding process and that makes for a poor gasket seal. Keep sanding, or filing, until you've removed any high spots and you have a uniform/flat surface on the exhaust flange. Use a gasket material made for high heat/exhaust applications. Auto parts store should carry it. I like 1/8" material.

Repeat the above process on the intake manifold flange. If yours is steel it will be warped just as the exhaust flange is. I go a little thinner on the intake gasket. 3/32" is good.

You can check the mating surface on the cylinder but they are usually pretty good. If it needs some work either do it with the cylinder removed or stuff the port with paper towel to keep any filings or abrasives from getting into the cylinder.

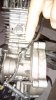
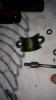
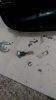
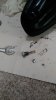
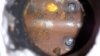
From an earlier photo it appears that there is a broken engine mount stud. They usually aren't threaded in too tight, unless someone used thread locker. If it protrudes from the case enough to get a grip on it with vicegrips or pliers, you can unscrew it from the case. If it is broken off flush with the case you can try cutting a screwdriver slot in it and use a screwdriver to back the sud out.

Personally, I don't use studs and nuts for the intake, exhaust or engine mounts but instead I choose to use Allen head capscrews. They are all 6mm X 1 and lengths will vary but generally somewhere between 15 and 24mm will work.

Hope this helps a little. And wake up that 'little guy' and put him to work :)

Tom
 
Last edited:
It seems the clutch plate is in the engaged position? Is this right or shouldn't it be able to spin freely? Or do I need to unscrew the little nut and then the butterfly nut.
 

Attachments

  • 1431448592569.jpg
    1431448592569.jpg
    397.9 KB · Views: 115
  • 1431448656774.jpg
    1431448656774.jpg
    506.2 KB · Views: 111
  • 1431448758533.jpg
    1431448758533.jpg
    409.7 KB · Views: 112
Just PMed you, Mike.
The clutch will always be 'engaged' until all the parts are installed and adjusted. Don't mess with the flower nut right now. Give it some time.

Tom
 
Do I still need any of these pieces for the gas tank or is this the petcock which I will be replacing?? Also when I removed it their was no red washer, or any washer for that matter...

Also like others have stated b4 their is rust an debree in the tank. So I rember the thread said put in metal bb's in their an then mix it with what? CLR or carb cleaner? I know after washing with soap and water an making sure to remove ALL degree I will swish some gas mix in their correct?

In the pictures the plastic piece that goes into the tank, is that the "mesh" screen the kits say are included lol or is a piece missing. After all this that I see I'm DEF getting an inline fuel filter. I've seen the paper cone ones are their any like upgraded or performance filters? I'm looking for longevity out of this build not speed.
 

Attachments

  • 1431464804595.jpg
    1431464804595.jpg
    340.5 KB · Views: 114
  • 1431464839433.jpg
    1431464839433.jpg
    314 KB · Views: 101
  • 1431464935461.jpg
    1431464935461.jpg
    357.4 KB · Views: 112
  • 1431465004254.jpg
    1431465004254.jpg
    357.2 KB · Views: 113
  • 1431465027954.jpg
    1431465027954.jpg
    344 KB · Views: 114
Also in my haste to take out the spark plug I broke the heat sink fin closes to the plug... Will this effect the heat dissipation of the motor?? You think I can sodder it back on or more harm then good.
 

Attachments

  • 1431466468639.jpg
    1431466468639.jpg
    453.3 KB · Views: 119
One broken fin won't hurt anything. You're good to go. Except for that skinned knuckle. That's gonna leave a mark :)

As for the fuel tank; you'll be getting a new petcock soon. It should thread into the tank and it will have the red gasket. Cleaning the tank was a good idea. Most hardware stores, auto parts stores or lawn mower repair shops will have small in-line fuel filters. Make sure to install it so the fuel enters on the outside of the paper cone.

Just an afterthought. If the threads in the fuel tank look damaged you might want to seal the new petcock into the tank. There is a product called SealAll, which is made for gasoline applications. Auto parts stores sell it. Most silicone based sealants aren't compatible with gas. And whatever you do, don't use JB-Weld :(

Tom
 
Last edited:
Awesome Tom! When it stops raining cats and dogs I'm gonna go check the mail. I'm like a little kid waiting for my prize after I sent in box tops!!! Just waiting for that key to be on a stack of bills woo hoo.
 
Back
Top