HOS - First build "The Donald"

Yesterday during lunch hour:

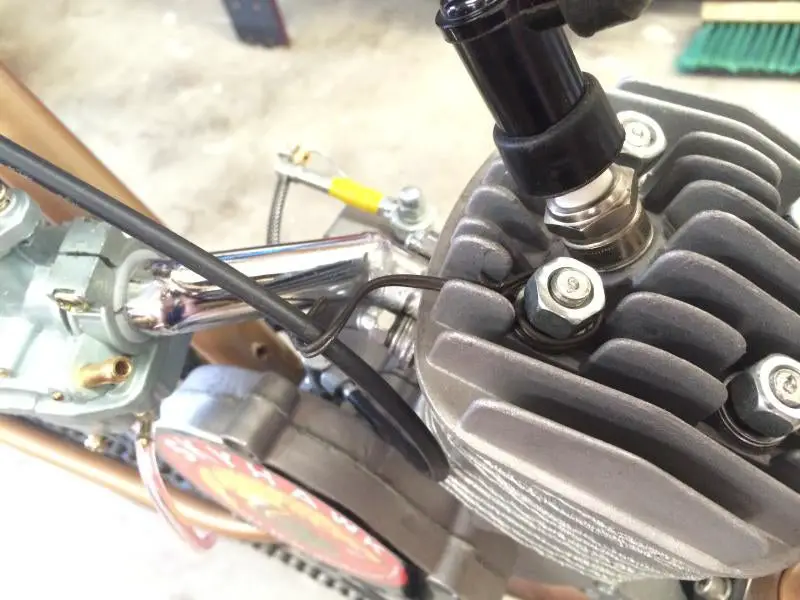
During my lunch hour yesterday I shortened the clutch cable and mounted it to the lever. I left a bit extra for "adjusting" and taped it to the lever arm. I Will probably add a zip tie later.
1448481d1410241038-hos-builds-gas-powered-bike-donald-img_1400.jpg


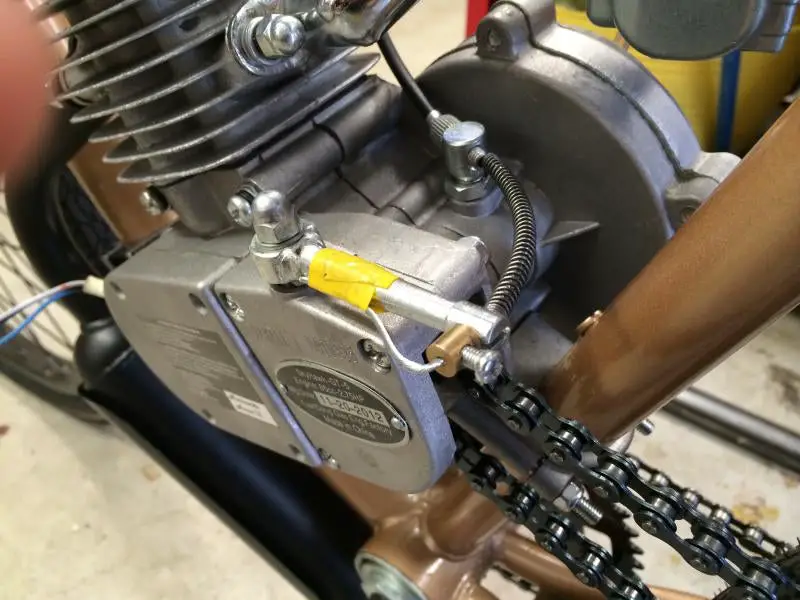
Made a quick cable hanger out of baling wire to help keep the cable off of the cylinder
1448489d1410241038-hos-builds-gas-powered-bike-donald-img_1401.jpg


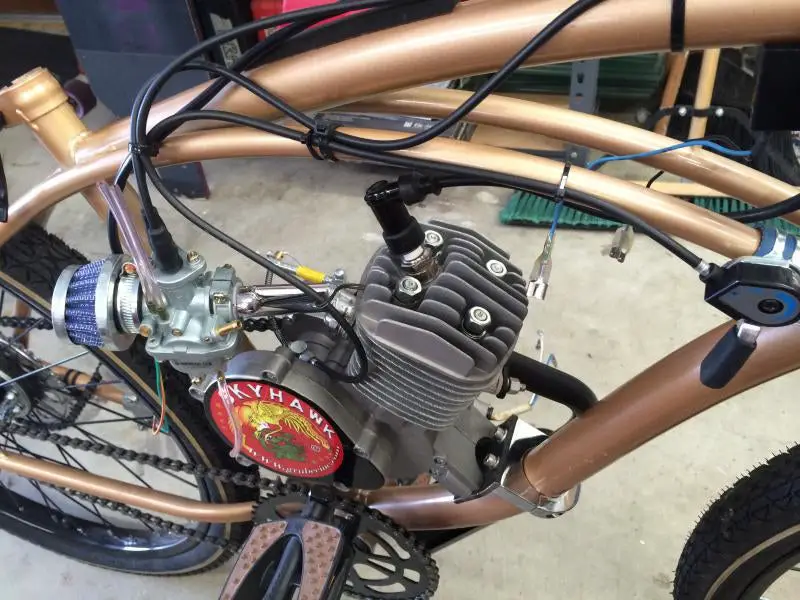
Cables are all routed and pretty clean I feel. Looks legit and the all are hidden by the tank.
1448497d1410241038-hos-builds-gas-powered-bike-donald-img_1402.jpg


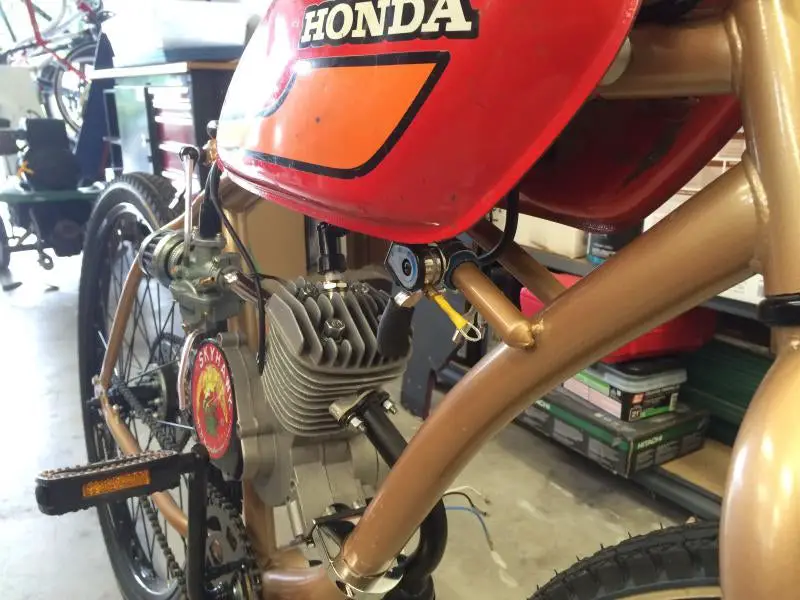
Here you can see the location that I chose for the choke. I didn't want to stick the thing on top of the bars like a wart. I want this thing to be as wart free as possible! I think the location is choice.
1448505d1410241038-hos-builds-gas-powered-bike-donald-img_1404.jpg
 
Last edited:
From last night...and now current:

The rear tank mount was next up. I was going to weld a nut onto the top of the frame...but it would have not come out nice. So I opted for the quicker and simpler idea to run a bolt through the frame top tube.
1448513d1410241409-hos-builds-gas-powered-bike-donald-img_1408.jpg


Here you can see that the bolt is captured and thus creates a stud.
1448521d1410241409-hos-builds-gas-powered-bike-donald-img_1409.jpg


I used a surplus cast aluminum knob from the garbage bin at work that works nicely for securing the tank. The thread is 5/16 coarse thread. Not that it matters...just to give a proportion for the bolt size.
1448529d1410241409-hos-builds-gas-powered-bike-donald-img_1410.jpg


I also adjusted up the clutch so that it will free-wheel during "lock-out" and then allow for pedaling.

Next up on the list is:

1. Run the wiring from the CDI and the kill switch.
2. Fab up and figure out my rear mount for the banana seat to add strength and function. (have an idea of how I want to do this...)
3. Modify seat post clamp and fab bracket to kick seat back.
4. Fuel tank clean, add filter, fuel lines.
5. Fire in the hole?

Looking forward to getting it ready to fire.
 
Your bike is coming along quite nicely!
For your safety, please, PLEASE weld in steel bushings through the frame where those holes are.
You see, when it comes down to the quality of these cheap Huffy frames, whenever you drill a hole in them it becomes not a question of "if" it will crack but rather "when" it will crack.
 
Update from lunch break today:

I picked up and hoarded this luggage rack from a thrift store last fall I think. I was going to fab up a single post U shaped frame for the rear of the banana seat...when WHAMMO....inspiration struck.

So a quick zip with the grinder and cut-off wheel I was able to re-purpose the luggage rack:
1449017d1410295698-hos-builds-gas-powered-bike-donald-donald-bike-seat-mount.jpg


I think that if fits the lines of the rear of the frame and helps finish off the rear of the bike nicely. Also it has a location for me to easily add a light and a shorty fender in the future. Sooo much less fab for me to do the same amount of work that is already included for the orginial $5 purchase.
1449025d1410295698-hos-builds-gas-powered-bike-donald-donald-bike-seat-mock-up1.jpg


Here is the side profile. I will just make the seat mount angles to the correct elevation to have the seat sit level as shown.
1449033d1410295698-hos-builds-gas-powered-bike-donald-donald-bike-seat-mock-up2.jpg


Bonus is that it is made of that fancy ALUMINIUM...which we all know is faster than steel.
 
The fuel line in the kit isn't long enough for my tank configuration so I grabbed some 1/4" ID line. It is green...and green = faster.
1450073d1410381514-hos-builds-gas-powered-bike-donald-donald-bike-fuel-line.jpg


Small engine fuel filter sourced from autoparts store. Nice little filter and will help keep the possible chunks of tank crud from getting into the carb.
1450081d1410381514-hos-builds-gas-powered-bike-donald-donald-bike-fuel-filter.jpg


Grabbed a piece of stainless steel out of the trash bin at work that looked like it "might" work with my banana seat. Took it home and measured up the flats to be formed. Brought it to work and had the sheetmetal guys press the verticals.
1450089d1410381514-hos-builds-gas-powered-bike-donald-donald-bike-stainless-seat-mount.jpg


I had to trim up the front end of the bracket to not interfere with the seat. Next will be to clean up and trim the subframe and mount the bracket to it.
 
Your bike is coming along quite nicely!
For your safety, please, PLEASE weld in steel bushings through the frame where those holes are.QUOTE]

Thanks for the compliment!

As for the holes...I am not too worried about the holes and filler studs creating any stress risers. I am a bit more worried about a couple of horrible weld areas instead!

The majority of my body weight and subsequent force/lever is going to be located well behind the seat post.

As a matter of fact, this shift in weight will probably greatly accellerate the wear of the sub-par rear axle/bearing set-up.
 
That's a very interesting seat mounting solution! I've been trying to figure out how to best integrate a rear rack and fenders with mine and that just gave me a few ideas from your cut down rack.
 
The look I am going for is a BRAT, MUSCLE, SPORT type of bike. So the seat will be low, the tires will end up being big balloons like Schwalbe's etc., the bars will be forward and straight. The look will evolve as **** breaks, falls off, and rattles to the ground. The next phase will more than likely be a 212cc four.

Bike is looking nice so far......your next build might look a bit like this 212cc

 
Your bike is coming along quite nicely!
For your safety, please, PLEASE weld in steel bushings through the frame where those holes are.QUOTE]

Thanks for the compliment!

As for the holes...I am not too worried about the holes and filler studs creating any stress risers. I am a bit more worried about a couple of horrible weld areas instead!

The majority of my body weight and subsequent force/lever is going to be located well behind the seat post.

As a matter of fact, this shift in weight will probably greatly accellerate the wear of the sub-par rear axle/bearing set-up.

I'm thinkin' you'll be doing wheelies more often than not.....just learn the balance point of the machine and all will be well ;)
 
Re: Update from lunch break today:

I picked up and hoarded this luggage rack from a thrift store last fall I think. I was going to fab up a single post U shaped frame for the rear of the banana seat...when WHAMMO....inspiration struck.

So a quick zip with the grinder and cut-off wheel I was able to re-purpose the luggage rack:
1449017d1410295698-hos-builds-gas-powered-bike-donald-donald-bike-seat-mount.jpg


I think that if fits the lines of the rear of the frame and helps finish off the rear of the bike nicely. Also it has a location for me to easily add a light and a shorty fender in the future. Sooo much less fab for me to do the same amount of work that is already included for the orginial $5 purchase.
1449025d1410295698-hos-builds-gas-powered-bike-donald-donald-bike-seat-mock-up1.jpg


Here is the side profile. I will just make the seat mount angles to the correct elevation to have the seat sit level as shown.
1449033d1410295698-hos-builds-gas-powered-bike-donald-donald-bike-seat-mock-up2.jpg


Bonus is that it is made of that fancy ALUMINIUM...which we all know is faster than steel.

I'm guessing you are left-handed ?
 
Got some garage time last night:

Trimmed up the rear banana seat mount/platform. Flat blacked the cut area and then bolted up the u-bracket. Pretty happy with the way it turned out and it is going to be stout when triangulated with the front mount.
1457265d1410883601-hos-builds-gas-powered-bike-donald-donald-bike-banana-seat-rear-mount.jpg


Cut into the spot welds of the seat post clamp and popped it off.
1457273d1410883601-hos-builds-gas-powered-bike-donald-donald-bike-seat-clamp.jpg


Trimmed the tube and slid the clamp down to the lowest it would go on the frame. It will stay loose until I finish up the kick back bracket.
1457281d1410883601-hos-builds-gas-powered-bike-donald-donald-bike-seat-clamp-modified.jpg


Next up is to layout the seat geometry and fab up a double post seat stand-off. One end will go down into the frame, the other end will go into the seat clamp.

The list is getting shorter to when I can fire this thing up and shake it down.
 
Re: Update from lunch break today:

Yes sir. What is the give away...the vice location or the work area photos?

The removable handle on your angle grinder :) I've got an eye for things like that.......

Keep up the good work bro!

EDIT: so does Dan (GearNut) laff
 
Last edited:
Weekend updates:::

Got a chance to spend a minute or two (literally) this weekend on the gas bike. Was able to find a small piece of scrap in my steel scrap box that fit the bill for a small off-set seat post mount. Dropped it off in the machine shop here at work and had them make it to my sketch.
1471441d1412020337-hos-builds-gas-powered-bike-donald-donald-bike-off-set-mount.jpg


I then cut up a donor seat post for the downtube insert and then the reducer portion that interfaces with the seat clamp.
1471449d1412020337-hos-builds-gas-powered-bike-donald-donald-bike-seat-mount-painted.jpg


Painted up it looks legit.
1471457d1412020337-hos-builds-gas-powered-bike-donald-donald-bike-seat-mount2.jpg


Inserted into the downtube you can see how it kicks back the seat location.
1471465d1412020337-hos-builds-gas-powered-bike-donald-donald-bike-seat-mount-inserted.jpg
 
After everything was dry and ready for assembly I went ahead and put the seat on the rear mount platform. I found some flanged bolts in my scrap bolt bin that were the right diameter and length. BOOM. Tightened with locknuts.
1471473d1412020560-hos-builds-gas-powered-bike-donald-donald-bike-seat-mounted.jpg


This thing is solid. So rigidly mounted, I can't get it to sway at all with my 220lbs on it.
1471481d1412020560-hos-builds-gas-powered-bike-donald-donald-bike-seat-mounted-close-up.jpg


This week should see it finished. I need to wire the CDI, KILL SWITCH, and run the wiring. Then clean and plumb the tank/filter.

Then fire in the hole!!!
 
Lunchtime updates from today:::

Here is my update from today...WIRING. These things are quite simple when it comes to the engine ignition/kill switch wiring. Blue to Blue and Black to Black. Then you tie in the kill switch wires to those two circuits.

I decided to cut the kill switch wires up close to where the CDI is so that I would then only be looming two wires.
1474305d1412200209-hos-builds-gas-powered-bike-donald-donald-bike-wiring-started.jpg


Here is the finished 2 wire extension that runs from the CDI/kill switch down to the engine wiring. Luckily I had some scrap (hoarder) blue and black wire to run.
1474313d1412200209-hos-builds-gas-powered-bike-donald-donald-bike-wiring-finished.jpg


Wiring is all loomed and run as clean as I could get it to be. Again I want as little wiring/cables/**** attached to the frame in visible places, like the down tube, etc.
1474321d1412200209-hos-builds-gas-powered-bike-donald-donald-bike-wiring-routed.jpg


I attached two wire clips to the two lower case bolts. I also Loctited the case bolts while I was at it.

Tonight should be cleaning the inside of the tank up and installing the new pet-cock. Then running the fuel line and filter.

Getting close!!
 
Updates from last night:::

So last night I grabbed a bit of time to wrap up some stuff.

I was going to flush the gas tank and such and decided against it as it wasn't tooooo bad. So I threw some BB's in the tank and then shook the tar out of it. After that I blew the tank out from both the petcock port as well as the filler.

After that I cut up my poly line and ran it down hill.
1476385d1412348996-hos-builds-gas-powered-bike-donald-donald-bike-fuel-passenger.jpg


I installed the new petcock/pre-filter and then used a hose-clamp that I think I have owned for like 25 years? All of the other barbs in the line are for .250" line...this petcock barb is for something like .1875" or so and was a bit loose. Hence the clamp.
1476393d1412348996-hos-builds-gas-powered-bike-donald-donald-bike-petcock-filter.jpg


This thing is ready for some gas. Going to mix up a gallon of 20:1 per the instructions and try to fire it up this weekend.
1476401d1412348996-hos-builds-gas-powered-bike-donald-donald-bike-ready.jpg


I did take it for a pedal test around the cul-de-sac last night and I noticed two or three main things:

1. The motor drive chain is horribly loud against the ****ty plastic tensioner. That will be getting replaced by a sprocket or grooved skateboard wheel soon.

2. The pedal chain derails on it's own. The bike would do it before I even touched it with the kit. In other words from the shelf at Walmart...it wasn't even really able to be ridden. Sad.

I blame it on the very, very cheap stamped drive sprocket and the combination of the horrible stamped rear sprocket/coaster brake. I will be quickly getting the rear upgrade together after motor break-in.

3. The bike "I think" will weigh around +/-55lbs with a gallon of gas. We have a freight scale at work that I will weigh the thing on next week.


.
 
Back
Top