HOS - First build "The Donald"

GoldenMotor.com

harvesterofsorrow

New Member
Feb 14, 2012
27
0
0
Seattle, WA
Hello everyone,

Well this is my first build ever of a gas powered bike. I have been wanting to build one of these for quite some time and have lurked here and there on other forums gleaning information as needed.

I won some money earlier this year whilst on a business trip to Atlantic City. The winnings came right out of Mr. Donald Trump's pocket book at the casino...thus the name "The Donald".

I used the money to purchase the motor kit from KingsMotorBikes/GasBike.net/whatever-they-go-by and got the ball rolling. Kit was on special for $165.00 to my door with "upgraded carb" blah, blah, blah.

I then just recently purchased a Huffy Cranbrook Cruiser...bronze/gold in color from Walmart for $94.00. I am aware of the sketch quality of some of the components...but for this first of what will be many more machines...meh, who cares.

The look I am going for is a BRAT, MUSCLE, SPORT type of bike. So the seat will be low, the tires will end up being big balloons like Schwalbe's etc., the bars will be forward and straight. The look will evolve as **** breaks, falls off, and rattles to the ground. The next phase will more than likely be a 212cc four.

The goal is to use this thing as my commuter for work and short trips around my area. The gas savings will be worth it as will the lack of wear and tear on my car. Besides it is fun to build **** and look as cool as ****ing possible while doing it.

Now on to the good ****:


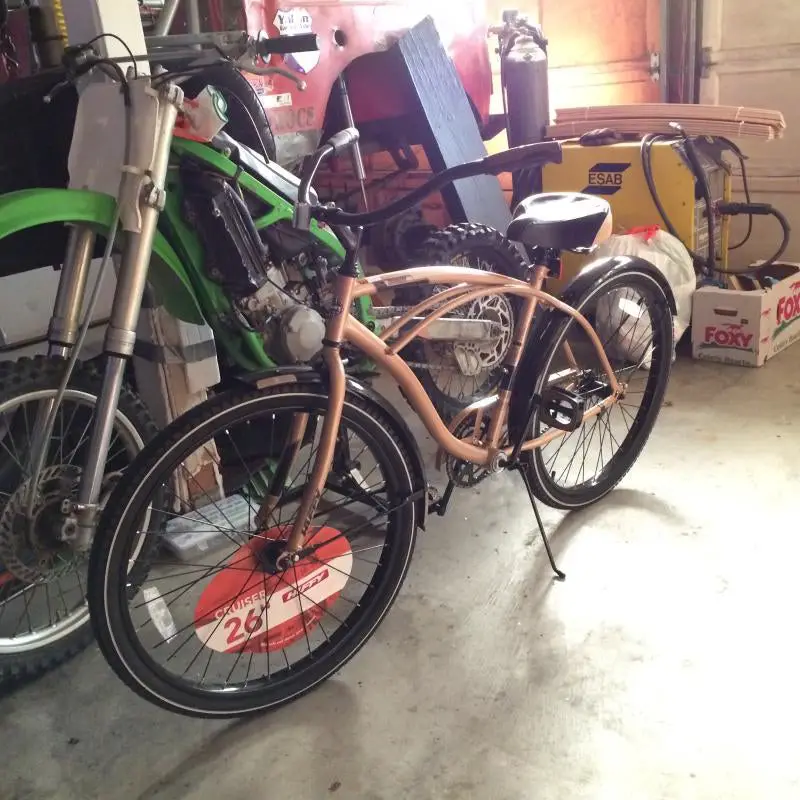
This is the Walmart Special the day I brought it home a couple of weeks ago.


I have been hoarding some bike odd's and end's from some bikes I have scrapped through the years. The idea was to build something like this a couple of years ago...well we all know how that goes.

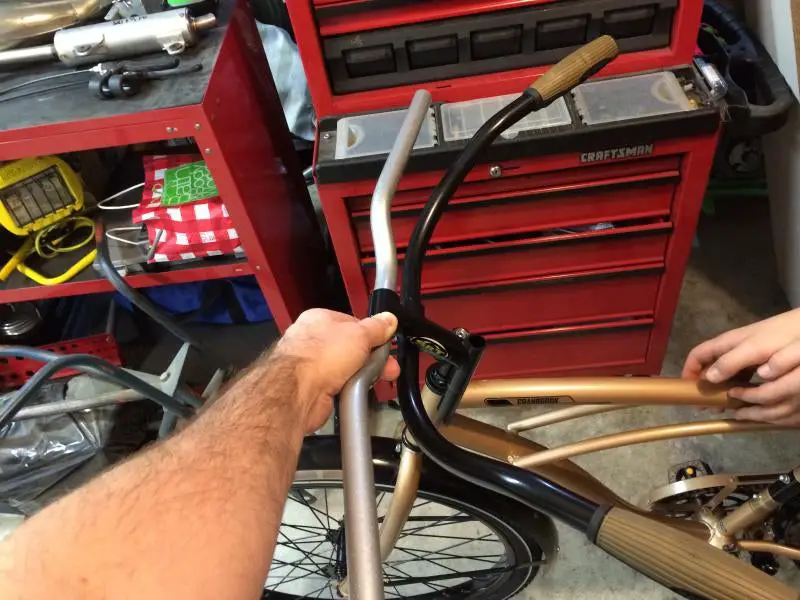
You can see the stock bar sweep, and the bars and neck that came off of some donor ****. The straight bars are tits.


The stock "peanut" gas tank that comes with all of the *****-mo-fab engine kits is just hideous and a ****ing copout to use. The tank sits right on top of the upper tube like a ****ing scab.


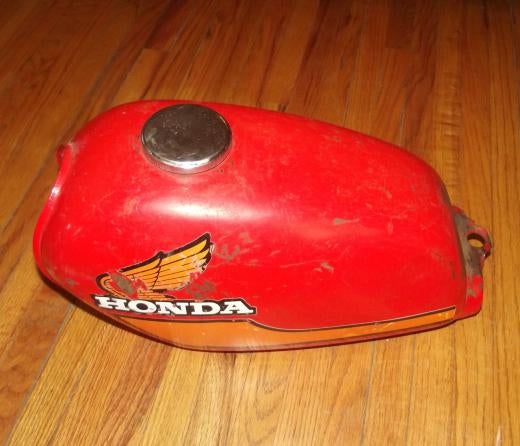
So a little flea-bay action scored me this sweat vintage Honda tank today for $23 shipped to my door.


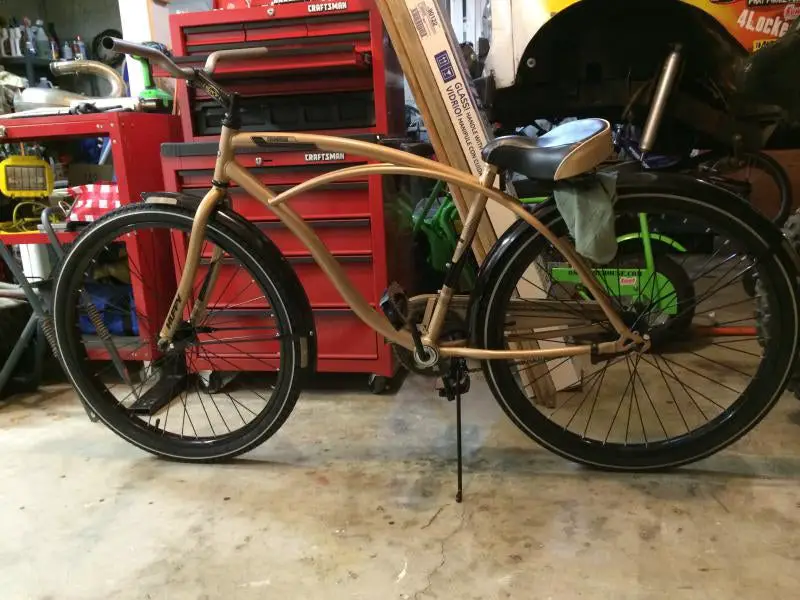
Here is how it sits as of today. The seat will end up somewhere as shown. I want it to be low and right above the fender area. YES it will suck if I have to pedal the bike any great distance...but **** it. There is the possibility of a banana seat going there...but this will work for now.

More updates as they happen.
 
Last edited by a moderator:

harvesterofsorrow

New Member
Feb 14, 2012
27
0
0
Seattle, WA
Thank you for approving the build thread.

I apologize for the profanity...I am mirroring this thread from another website that is a little more "bar" like. :oops:

Looking forward to contributing here.
 

GearNut

Active Member
Aug 19, 2009
5,104
11
38
San Diego, Kaliforgnia
Well it sounds like you are off to a good start. The Cranny should work fine for you. Many folks here started with one and most are still going down the road in one piece.
The profanity thing... yeah... this is a family oriented site.
At least you understand and I commend your admission. :thumbsup:
I don't know diddly about mirroring from one site to another. Can you edit?

Good luck on your build! I hope to follow it as you go along.

Oh yeah, Before you ride that bike down the road, even under pedal power, take apart everything that has bearings and thoroughly clean out the Chinese ear wax that the factory puts in them as lubrication and regrease them with high quality bearing grease.
And one last idea, how about taking that engine out of that Kawi and stuffing it into a bicycle frame? :D brnot
 
Last edited:

Danschutz

New Member
Aug 19, 2013
392
0
0
Wyoming
Thank you for approving the build thread.

I apologize for the profanity...I am mirroring this thread from another website that is a little more "bar" like. :oops:

Looking forward to contributing here.
*****-mo-fab engine kits
I'll be straightforward here and state that Im not impressed with the language, however the use of a racial slur really has no merit anywhere.

Now with that out of the way your build looks good, something close to my first build. I would consider an in frame tank to the Honda tank just to keep the lines tight and really get that look your going for.

Dan.
 
Last edited by a moderator:

harvesterofsorrow

New Member
Feb 14, 2012
27
0
0
Seattle, WA
My tanks came in:::

Well now that the holidays are over......I can get back to plinking on my spring time commute machine.

These two tanks are what I sourced on flea-bay and am going to choose between for now.

First up is the Honda tank:


The tank came with a cap. It has some small "character" dents in it that will be left on it. I like that it is rounded and soft...

Next up is the Tomos tank:


This tank is really big. I love the knee knocks in it and the lines of the tank, BUT I think it is a bit too big for this stock frame. I think it would look dope on a stretched frame or a custom frame.

So I think that I am going to run with the Honda tank for now...because it has a cap, looks like it will be easier to mount, and also looks most proportionate for the build and shape of the bike.


Hoping to mock up motor in the next day or three...
 

maniac57

Old, Fat, and still faster than you
Oct 8, 2011
4,484
22
0
memphis Tn
I'll simply repeat the best advice for building a Cranbrook:
Re-grease ALL moving parts with good quality wheel bearing grease and remove the Chinese ear wax.
Lose the fenders too! :)
 

harvesterofsorrow

New Member
Feb 14, 2012
27
0
0
Seattle, WA
Looking good so far. If you are gonna use fenders I would read up on the accidents and injuries caused by them on this forum.
I am going to dump the fenders (but save them). If I decide that I need some weather protection I will probably make better mount tabs like I have read about whilst lurking.
 

harvesterofsorrow

New Member
Feb 14, 2012
27
0
0
Seattle, WA
I have some updating to do...but have to ask:

When I installed my rag joint drive sprocket to the rear axle and tightened it down, it sure seems to have taken the rear wheel wayyy out of true.

Also the sprocket seems to be pretty "wobbly".

Should I torque the bolts to similar ft/lbs settings?
 

maniac57

Old, Fat, and still faster than you
Oct 8, 2011
4,484
22
0
memphis Tn
True the rim first. try to get all the spokes tensioned similarly. I like to let a screwdriver ''ring'' each spoke and listen for dull thumps. Loose spokes allow the ragjoint to pull and distort the rim.
You may also need to add or remove rubber spacers to get things right. You want the sprocket to pull down snug to the hub and spokes, but not pulling a dish in the rim. You can stack extra rubber spacers to get proper spacing if needed.
 

harvesterofsorrow

New Member
Feb 14, 2012
27
0
0
Seattle, WA
Finally I am able to spend some time to update this thread

Well life gets busy sometimes. This thing has/was put on a side burner while I took care of some big house projects and just didn't have time to tinker on it. I used the down time to collect some parts and a get some things together.

I have been spending a bit of time on it the past couple of days so I thought I better get this thread up to date!

Back in March I scored this sweeeeet brand new banana seat on Flea-Bay. It matches the color of the tank so tightly. I also scored a KTM FMF pipe with silencer for future upgrading of the motor.


Here is/was the first mock up of the tank and the seat together. It shows the look that I am going for. Low and straight...sporty.


My kit specs...I had to dig it out of a pile of garage growth.
 

harvesterofsorrow

New Member
Feb 14, 2012
27
0
0
Seattle, WA
More updates back updates:

While I was mocking things up I figured I would get to modifying things right away. Why just start bolting things up...right? So I laid out a hole pattern on the stock drive sprocket.


Took it to work and handed it to the machine shop downstairs. Had them mill out the hole pattern. Weight reduction and makes it look so much faster!


While the rim was apart to install the sprocket I took the advice of some experienced folks with the Huffy/Chinese bikes. I broke down the rear coaster brake and cleaned out the yellow ear wax looking "grease".


This stuff is/was NASTY. I reassembled everything with high performance automotive wheel bearing grease. I think I have the rear coaster assembly a bit too tight as it slightly catches. BUT I am not too worried as I have a wheel and tire upgrade on deck after the bike is broke in or broke...whichever comes first :)


All put together for now...with a very slight sprocket wobble...but together non-the-less.
 

harvesterofsorrow

New Member
Feb 14, 2012
27
0
0
Seattle, WA
Starting the cool stuff:

I went ahead and de-stickered almost all of the bike. I wanted to remove the HUFFY information as much as possible.


Next, I had an idea of how I wanted to mount the tank and it replicated the factory style of stand-off mounting. So I did some layout work and came up with these parts. Quick turn of the lathe in the machine shop and I had a set.


Laid out the approximate elevation where I wanted the tank and then transfered a mark onto the frame. Drilled a cross hole and just went for it.


Here is the assembly all bolted together. Basically a piece of 3/8-16 all thread cut to length captured with nuts. Then the stand-offs. Finally a thin 3/8-16 lock nut to act as a jam nut.


Tank located:
 

harvesterofsorrow

New Member
Feb 14, 2012
27
0
0
Seattle, WA
Progress from last week:

I really wanted to securely mount the front of the motor to the frame as the stuff that comes in the kits seems sketch to me. So I ordered up a set of clamps from the web. I then fabbed up a simple adapter plate to connect the motor to the clamp. The first set of clamps got STOLEN out of my mail box while the family and I were on vacation...So it took about 3 weeks to complete this picture.


The tubing on the bike frame is squashed...so while one area of the tubing might caliper at 1.5 inches...the 90 degree measurement is going to be about 1.69 inches...So you can see the grinding required to clearance the clamps which then chipped my chrome...


After setting the elevation of the motor to where I wanted it...I needed to add some heat and bend the adapter plate to allow the clamp to contact the frame perpendicular.


Here is a close up of what the frame clamp looks like. I might paint it black after a shake down run or 3. I would probably also sand blast off the chrome plating...


Next up was mounting the CDI. I really want the bike to look like a motorcycle...and most examples I have seen just clamp these things to the down tube like a big wart. So one of the main advantages to using a saddle style tank is that I can hide stuff like the CDI.

Here you can see how the iginition sits nicely in the tank. You can also see the tank mount in action.
 

harvesterofsorrow

New Member
Feb 14, 2012
27
0
0
Seattle, WA
From this weekends progress:

I mounted up the exhaust that comes with this kit. I plan on using this one for a bit and then figuring out if I can fab up the KTM exhaust I sourced. I do fear that the Cranny frime might be a bit too short to make it work with the current trail. A fork change might give more room...or just a different frame.


Mounted the carb and the controls and grips. I didn't realize the cables on these kits are suuuuper long...so long. So I started shortening the cables to make this "right"...I really wanted to make the kit fit the frame layout.


Starting to look like something!


After working on the cables for a bit I modified the drive chain tensioner. The thing was bound up from the get go. I don't see how they expected it to even spin with the too short spacer dimension. So I ground down the shoulder on the bolt and then chamfered the lead in of the wheel. This allowed me to stack a couple of aeronautical SS washers to shim the wheel off of the mount plate. Spins nicely now.


I used my welder to put a "barrel" on the end of my shortened throttle cable. We will see how long the cable lasts. But I think that the 18 inches of extra cable I cut off is worth the try.


The action of the throttle assembly is completely rough and "chunky". Not smooth at all. I can see why people upgrade the throttle assembly. I think that it will be something I pick up soon.