You are using an out of date browser. It may not display this or other websites correctly.
You should upgrade or use an alternative browser.
You should upgrade or use an alternative browser.
"MotorNewsBoy"
- Thread starter tyrslider
- Start date
silverbear
The Boy Who Never Grew Up
Thanks SB
I'll get you measurements tomorrow.
I'll be getting back on this project very soon now that the holidays are behind us. Got a bunch o' stuff to do w/ it. Also been workin' on the new 4 stroke kit Should have it runnin this wknd!
Yes, we have survived the holidays. Good to hear you're making progress. Don't forget to take photos!
Thanks for your help with the measurements.
SB
silverbear
The Boy Who Never Grew Up
3.5" d x 12" l till it starts tapering also took frame butt at front into consideration.
Watch for fotografs of thee "ShellyBelly Whisper Drive" mounted to an Electra Street Rod!
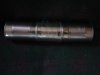
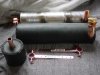
Excellent! This may actually work. I tinkered around a bit last evening and the cans I'm considering are just shy of 3" in diameter. Two are corn cans and the third which is the same diameter, but shorter is from a can of mandarin oranges. The corn cans have a lip for a can opener only at the top, so I left that alone and with a knife and small hammer opened up the bottoms enough to remove the corn and then used a dremel to open it up. A grinding attachment on the drill and finish up that edge. The oranges can I opened both ends with the can opener since it will be the middle section. The bottom end of the corn cans fit into the ends of the middle can so there is a slight overlap and when I solder them up it should make a better joint than edges butted up. I don't see a problem getting them soldered nice and tight. Aftet that I figure out the filler pipe and fuel line, sight gauge and vent. Total length is a hair under 12", so with a harness leather covering it should be a nice fit with enough room for fasteners. It's worth a try anyway... what's to lose? If it doesn't look good the I won't use it. Volume is 40 ounces which isn't bad. Photo is with the cans just set in place together. Thanks so much for taking the time to measure that. I'll let you know how it works out.
SB
Attachments

silverbear
The Boy Who Never Grew Up
Excellent! This may actually work. I tinkered around a bit last evening and the cans I'm considering are just shy of 3" in diameter. Two are corn cans and the third which is the same diameter, but shorter is from a can of mandarin oranges. The corn cans have a lip for a can opener only at the top, so I left that alone and with a knife and small hammer opened up the bottoms enough to remove the corn and then used a dremel to open it up. A grinding attachment on the drill and finish up that edge. The oranges can I opened both ends with the can opener since it will be the middle section. The bottom end of the corn cans fit into the ends of the middle can so there is a slight overlap and when I solder them up it should make a better joint than edges butted up. I don't see a problem getting them soldered nice and tight. Aftet that I figure out the filler pipe and fuel line, sight gauge and vent. Total length is a hair under 12", so with a harness leather covering it should be a nice fit with enough room for fasteners. It's worth a try anyway... what's to lose? If it doesn't look good the I won't use it. Volume is 40 ounces which isn't bad. Photo is with the cans just set in place together. Thanks so much for taking the time to measure that. I'll let you know how it works out.
SB
Tyreslider,
I finally got around to making that tank for the Worksman and it turned out pretty nice. I'll post photos tomorrow or the next day. I wish I had my Worksman here in Maryland instead of back in Minnesota so that I could put it place to see how it looks, but I guess I'll find out in a couple months. I covered it in black harness leather and think I like the look. It's different anyway. I have one more request for a measurement. I'm using copper plated plumbing hangers (forget what exactly they're called) which I found at Lowe's to affix the tank to the frame. Can you tell me what the diameter of the upper cross tube is? The hangers are for 3/4" pipe, so I may well need to spread them out a bit, especially since I want to use a little elk hide for padding so that I don't screw up the paint on the frame. Many thanks. How go your projects?
SB
diceman2004
New Member
cool , i,m gonna have to keep an eye on this one , thats the same motor i used on my wcc bike .
silverbear
The Boy Who Never Grew Up
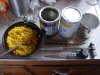
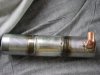
Pictured below is my tin can version of an in frame tank for the Worksman Paperboy. The first photo shows the raw materials... two corn cans and a slightly shorter mandarin oranges can of the same diameter. The corn cans have a bottom which is slightly recessed and fits inside the ends of the oranges can, so the joint is lapped slightly and makes for a nice union. To open the ends of the corn cans I used a punch, small hammer and knife.
Hangers are copper plated steel and bolt on to the ends by way of a nut soldered to each end of the tank before covering in harness leather. Fill tube is a 3/4" copper plumbing elbow and male threaded fitting with a 3/4" brass hose cap. The pipe hangers will affix to the upper cross tube. Length should exactly match the straight portion of the space between upper and lower cross bars and the diameter is about 1/8" shy of filling the space top to bottom. Fuel capacity is 40 ounces. The second tank in progress will get a sight gauge at the front end. Made a matching funnel from a little mandarin oranges can and a section of copper pipe, one end of which is flared.
SB
silverbear
The Boy Who Never Grew Up

tyrslider
New Member
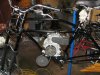
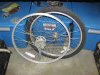
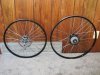
lookin good! Ordering spokes this week for the "MotorNewsBoy". Gonna do a Sturmey 90mm DynaDrum 6v 3w generator hub up front and clean up and respoke the drum that's aready on the rear. The rims are gonna be black for sure but I keep thinkin' blk spokes'll be cool too. Other than the wheels I just need to finish the gas tank and she'll be ready to mock up and dial in. Then it's strip down and powdercoat. Luckily it's really fun and cool projects that're keepin' me away 'cause I really look forward to finishing this one.
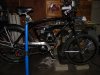
This bike really started my "GasPunk" fascination. It is actually standard jackshaft configuration on gokarts.
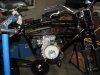
Diceman, what do you think of this motor?
This bike really started my "GasPunk" fascination. It is actually standard jackshaft configuration on gokarts.
Diceman, what do you think of this motor?
silverbear
The Boy Who Never Grew Up
Tyreslider,
Excuse me for kind of stepping into your thread with the tin can stuff. I look forward to some photos of where things are with your project.
Dan,
Thanks for the kind words. I ate that corn, by the way.
SB
Excuse me for kind of stepping into your thread with the tin can stuff. I look forward to some photos of where things are with your project.
Dan,
Thanks for the kind words. I ate that corn, by the way.
SB
Dan
Staff
I ate that corn, by the way.
SB
If you had a better appetite, you'd have more fuel capacity. snork

civlized
New Member
Photos did not come through with the prior post, so will try again...
SB
That's freakin' awsome! I like the 40oz capacity. Just add up the labels! LOL! Really nice, though.
tyrslider
New Member
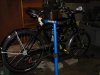
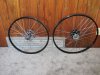
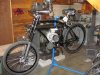
Well here's a sneak of the MotorNewsBoy on it's way back (finally)! Some revisions include Marzocchi front suspension w/ Shimano Disc Hub. Hub set to go on a 24" front rim to soak up an inch of extra fork length (already moved the trees down 2"). Downhill forks are very long!
See what else unfolds!
More to come Soon!
Cheers!
See what else unfolds!
More to come Soon!
Cheers!
Attachments
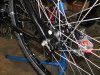
How close does the front tire come to the jackshaft with the 26" and 24" wheels?
And I also have to say, on those photos of the original Harleys, the engine sits out in front of the pedals. With your jackshaft positioned where it is, it also kinds of gives that effect. Very nice looking!!!!
andy b.
And I also have to say, on those photos of the original Harleys, the engine sits out in front of the pedals. With your jackshaft positioned where it is, it also kinds of gives that effect. Very nice looking!!!!
andy b.
tyrslider
New Member
")
tyrslider
New Member
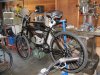
Then the bike so far, sits pretty level and is going to be quite comfortable!
Drum brake 7 sp mega range rear and a Shimano 20mm axle disc downhill hub up front.
Wald "Moustache Bars". Hayes Caliper and Lever.
More to come!
Cheers!
Drum brake 7 sp mega range rear and a Shimano 20mm axle disc downhill hub up front.
Wald "Moustache Bars". Hayes Caliper and Lever.
More to come!
Cheers!
Attachments
tyrslider
New Member
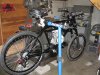
I'm truly enthused w/ the "how I invisioned it: how it's turning out" (ratio).
Love the Worksman platform! Funny how small the front wheel looks in these foto's. It's a 24" only 2" smaller!
Anyway I think it's pretty cool!
Cheers!
Love the Worksman platform! Funny how small the front wheel looks in these foto's. It's a 24" only 2" smaller!
Anyway I think it's pretty cool!
Cheers!