
You are using an out of date browser. It may not display this or other websites correctly.
You should upgrade or use an alternative browser.
You should upgrade or use an alternative browser.
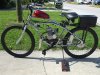
working crusier without a tensioner
- Thread starter upsrogue
- Start date


captainrichhill
New Member
If your particular build works out that you don't need to take any slack out of the chain then you won't need to use a tensioner. BUT, the new chain will stretch and you will need one eventually. Some guys have had success using shims in the engine mount to take up the slack in the chain and therefore eliminating the need for a tensioner. Shifting the engine forward has double the effect tightening the chain. (ie. move the engine forward 1/16" and you get 1/8" tighter chain because of the top and bottom runs of the chain are both effected by the 1/16" movement of the engine.

Hi, well my particular build did'nt just work out that way I put the tensioner on at first, it did'nt fit the frame right so I could never get it clamped down tight enough for it to do the job to begin with. Then when it received some real tension fom the chain it bent in toward the spokes and bent the rim, after replacing the rim and of course changing everything out again sprocket ect. I felt well this is going to happen again FIX IT.
Thats when I seen that by taking out four of the links in the chain I could just get the chain master link on with no tensioner, but there was no slack in the chain so I took the engine off and filed down the rear motor mount block that slides onto the two bolts that thread into the engine its self, I filed maybe an 1/8" off the flat part of that motor mount block and got the proper slack in the chain that was needed to operate correctly. So I figure IF the chain stretches I can always put a spacer back into that spot that I filed away on that motor mount, if it streches even more I'll take out one more link in the chain.
To me it beats bent replacing high dollar rims and making up skate board wheeels, derailers, and what ever kind of brackets that have to be made up in order to fix what I think is a design flaw.
If I need to take the rim or engine off all I have to do is disconnect the master link and the chain is off.
If somebody on the forum can see where I'm developing some other problem, that I'm not seeing please let me know I'm new at this and learning too. Thanks
captainrichhill
New Member
upsrouge,
If you run into using the tensioner again, you can use a small set screw in the side of the derailer to prevent it rotating into the spokes. Just get the tensioner into place and drill a small hole through the tensioner AND into your frame. Then put a sheetmetal screw or something in the hole to keep the tensioner in place. FYI
If you run into using the tensioner again, you can use a small set screw in the side of the derailer to prevent it rotating into the spokes. Just get the tensioner into place and drill a small hole through the tensioner AND into your frame. Then put a sheetmetal screw or something in the hole to keep the tensioner in place. FYI
floridaboy
Member
Just_Gassit
New Member
Well done, that tensioner is a great idea! Simple too.
silverbear
The Boy Who Never Grew Up
Ah, that's the one I'm going to make. Perfect. Are those conduit clamps or U bolts you're using? Thanks for sharing that. Along with a guide wheel I made from a skate board wheel it should be a good setup.
Silverbear
Silverbear
floridaboy
Member
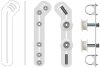
The clamps were from Home Depot in the elec. department. They were for 3/4 inch tubeing. The metal used was 1/8 inch alum. The hardest part was cutting the slot for the bolt for the tensioner. It has proved to work out real well. Hope this helps.
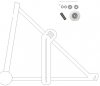
If you're a welder and have access to a welder here's another approach. I TIG almost everything but the same could be done with MIG or brazing. 1/4" X 1" flat stock works well for this. I put a bend in the bracker just to follow the contours of the frame but it's not necessary. A straight piece will work as well.
Tom
Tom
Attachments

silverbear
The Boy Who Never Grew Up
Maxpower,
That's an interesting setup which you could transfer from one bike to another. Have you tried making and using one yet?
Silverbear
That's an interesting setup which you could transfer from one bike to another. Have you tried making and using one yet?
Silverbear
silverbear
The Boy Who Never Grew Up
2door,
You do nice work. That has such a nice, clean look. So simple it is elegant. Since I don't weld floridaboy's setup looks like a good answer for me, but if I could weld I'd make one like yours.
Silverbear
You do nice work. That has such a nice, clean look. So simple it is elegant. Since I don't weld floridaboy's setup looks like a good answer for me, but if I could weld I'd make one like yours.
Silverbear
floridaboy
Member
The main reason that i built the tensioner the way i did was so i could use it on the Electra alum. frame with no welding or drilling. You can get scrap alum. at a recycler real cheap and the clamps at Home Depot or Lowes some 1/4 20 bolts and use you tensioner wheel from your kit and you are in bussiness.
Thank You, Sir.2door,
You do nice work. That has such a nice, clean look. So simple it is elegant. Since I don't weld floridaboy's setup looks like a good answer for me, but if I could weld I'd make one like yours.
Silverbear
")
Tom
MaxPower
New Member
Maxpower,
That's an interesting setup which you could transfer from one bike to another. Have you tried making and using one yet?
Silverbear
No. haven't done anything with it yet. just an idea.
Cabinfever1977
New Member
max thats the kind that should come standard with these kits.but they would also make great upgrades for our bikes.
I put the tensioner on at first, it did'nt fit the frame right so I could never get it clamped down tight enough for it to do the job to begin with. Then when it received some real tension fom the chain it bent in toward the spokes and bent the rim
IMO the tensioner is more trouble than it's worth and a safety hazzard. Specially if your bike has regular droputs so you can move the wheel back-and forth. Between that and half-links there's no reason to get involved with engine shims either.
KCvale
Well-Known Member
Exactly!IMO the tensioner is more trouble than it's worth and a safety hazzard. Specially if your bike has regular droputs so you can move the wheel back-and forth. Between that and half-links there's no reason to get involved with engine shims either.
It never made sense to me to put a tensioner on the main drive chain.
Sure, it's easier, put why put an extra moving part on the chain that is always in motion?
I size my drive chain to fit with the hub bolt about 1/4 to 1/3rd of the way back in the frame slot and adjust the pedal chain accordingly.
On a brand new bike, chances are your pedal chain will be too short like mine, so I added a link pair.
I just used a link from the extra chain from the drive chain and the kit included extra master link.
At first I just put the tensioner on the pedal side and it works great for that first 20 mile or so chain break-in period. You could of course just leave it on and it will never wear out, but it didn't make sense I couldn't get the pedal chain to match so I did some research.
Low and behold I found the Half Link.
What a wonderful little $1.99 fix!
This is the pedal chain with the extra link pair that requires a tensioner.

This is it on the bike using the Half Link.

Here we are with the drive chain snug, and about 1/2" slack in the pedal chain.


As the drive chain stretches more I can just move the wheel back.
Tensioner? Pffff... We don't need no stinking tensioners ;-}
silverbear
The Boy Who Never Grew Up
KCvale,
Nice photos and explanation. I don't use tensioners either if I can help it and usually I can help it. One of the things i like about vintage cruisers is the horizontal dropouts which make adjusting the chain tension so easy.
Nice photos and explanation. I don't use tensioners either if I can help it and usually I can help it. One of the things i like about vintage cruisers is the horizontal dropouts which make adjusting the chain tension so easy.