You are using an out of date browser. It may not display this or other websites correctly.
You should upgrade or use an alternative browser.
You should upgrade or use an alternative browser.
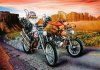
Winter Project, Nirve Switchblade
- Thread starter 2door
- Start date
I'm starting to get used to it. If it would quit snowing and the streets would dry I could get some riding/practice in. Actually I'm getting more comfortable with the thing. It is weird to ride however. That front tire out there in front and the somewhat unorthodox seating position.Tom,
With the new turning radius you are having to deal with you are going to have to exercise your "Carnack" skills when approaching cars in cross streets and pre-planning that lefthand turn into 7-11.......LOL
As for turning radius, my concerns are some of the trails we ride. There's some pretty sharp curves on a few of them. I won't be taking them at the speed we usually ride. Especially that switchback trail out by Arvada reservoir. Now that might be a challenge on this thing
")
Tom
Thanks, Biknut, but there's nothing special about this build. Just plain old backyard fabrication.That looks great Tom. I've always liked the Nirve Switchblade. I might make one someday myself. Probably won't be as nice as yours though.
I've seen your builds and they're just fine, sir.
Let me know if/when you start a Switchblade project. There's some weird little things about it that if you know ahead of time you'll avoid some troubles.
Keep in touch.
I put a few more, about 20 miles on it today. I'm settling into that fork and handlebars. It's actually starting to feel natural. I think it'll just get better the more I ride it. The weather here is supposed to cooperate for the next few days and I want to take advantage of it.
Tom
F_Rod81
Dealer
Thanks, Biknut, but there's nothing special about this build. Just plain old backyard fabrication.
I've seen your builds and they're just fine, sir.
Let me know if/when you start a Switchblade project. There's some weird little things about it that if you know ahead of time you'll avoid some troubles.
Keep in touch.
I put a few more, about 20 miles on it today. I'm settling into that fork and handlebars. It's actually starting to feel natural. I think it'll just get better the more I ride it. The weather here is supposed to cooperate for the next few days and I want to take advantage of it.
Tom
That's good that everything is going accordingly Tom. Sounds like you'll be ready for some trails in no time. Being that your getting accustom to the chopper style, just think, when you ride your Norton it will feel more like a racer rather then a cruiser.
")
andrewflores17
New Member
what great looking bike raly pumped to see her in real life this summer .
Back in post #63 I mentioned the two chrome paints, Plasti-Kote and Rust-Oleum. I sprayed some on a piece of scrap sheetmetal and there was no comparison. The Rust-Oleum was far better. I was pleased with it, until, I shot a coat of clear over it. Unlike the Plasti-Kote, the Rust-Oleum turned dull and when it dried it looked like dull grey paint. Not silver anymore. The clear dulls the Plasti-Kote somewhat but completely killed the reflectivity of the Rust-Oleum paint.
Now I have two choices; I can use the Rust-Oleum on the frame and go without the clear coat or consider a powder coat job. The powdercoat I've seen that would be the closest to a chrome-like finish is nowhere as shiny as the Rust-Oleum but would be much more durable than not having the clear coat to protect the rattle can paint.
I'll keep you posted. Oh, and before you suggest it, no, I'm not even considering having the frame chrome plated
Tom
I've about given up trying to find a fuel tank that suits me. Everything I can find is either too big, not the right shape or way overpriced. I refuse to pay $200. or more for a tank and those chopper/bobber tanks are too big for a motorbike. Therefore................I've decided to make my own.
Here's the plans as of today. I'm going to use one of the oversized tanks available from several of our vendors. I found one that is 2.5 litre. I'm going to foam and fiberglass around it and carve it to the shape of the Captain America tank. That way I'll have a steel tank, inside a fiberglass shell. Has anyone ever tried that?
I've built fiberglass fuselages for R/C planes, fuel cells for boats and the center console/dash for street rods so working with glass isn't anything new. My idea is to embed the steel tank in a block of sprayed in foam, carve the foam to shape and then glass over it. Using this method I don't have to worry about the fiberglass holding fuel. It will just be a decorative cover over a steel tank.
I'd like any input from you guys. I know I'll probably use epoxy resin, not polyester and glass mat and cloth and gel-coat for the outer layer. Any other suggestions?
Tom
Attachments

Last edited:
silverbear
The Boy Who Never Grew Up
Cool idea, Tom. Post photos of the transformation as you go. I think there will be a lot of interest.
SB
SB
Thanks guys. Here's something I found today. I'm thinking something like this but built around a steel tank > http://www.youtube.com/watch?v=--uLkHGKsgg
I'm ordering that 2.5 litre tank and I have a few yards of glass mat and cloth. Maybe I'll get started on this project when I get the tank in hand.
Keep those ideas coming guys. I appreciate them.
Tom
I'm ordering that 2.5 litre tank and I have a few yards of glass mat and cloth. Maybe I'll get started on this project when I get the tank in hand.
Keep those ideas coming guys. I appreciate them.
Tom
Tom, that sounds like a good idea to try. Don't know much about the process you are talking about but it sounds like it might work. Long ago on this forum someone floated the idea of taking two of the peanut tanks rolling them on their sides (bottom to bottom) and joining them together with some sheet steel at the seams and hang them over the frame. Of course you would have to eliminate and relocate the fixtures, but I have considered trying that on my chopper if I ever get around to it. Dan
Dan what a good idea I have to remember that. Check out this tank build still working on it............Curt
http://motorbicycling.com/f38/moto-guzzi-neva-lost-board-track-36596.html
http://motorbicycling.com/f38/moto-guzzi-neva-lost-board-track-36596.html
F_Rod81
Dealer
I've about given up trying to find a fuel tank that suits me. Everything I can find is either too big, not the right shape or way overpriced. I refuse to pay $200. or more for a tank and those chopper/bobber tanks are too big for a motorbike. Therefore................I've decided to make my own.
Here's the plans as of today. I'm going to use one of the oversized tanks available from several of our vendors. I found one that is 2.5 litre. I'm going to foam and fiberglass around it and carve it to the shape of the Captain America tank. That way I'll have a steel tank, inside a fiberglass shell. Has anyone ever tried that?
I've built fiberglass fuselages for R/C planes, fuel cells for boats and the center console/dash for street rods so working with glass isn't anything new. My idea is to embed the steel tank in a block of sprayed in foam, carve the foam to shape and then glass over it. Using this method I don't have to worry about the fiberglass holding fuel. It will just be a decorative cover over a steel tank.
I'd like any input from you guys. I know I'll probably use epoxy resin, not polyester and glass mat and cloth and gel-coat for the outer layer. Any other suggestions?
Tom
Tom,
Do you remember my old 1 gallon tank that I had to fix prior to us riding?? I still have it aside, if your planning on building your own tank then you can have this 1 gallon tank as a start. Cut it up, reshape & re-weld it... do what you got to do with it to suite your needs, no charge $. PM me if your interested
Dimensions are roughly: [15"L x 7.5''W x 7" T]
Rats! Frank, I just ordered the same tank from PistonBikes. It shipped yesterday.Tom,
Do you remember my old 1 gallon tank that I had to fix prior to us riding?? I still have it aside, if your planning on building your own tank then you can have this 1 gallon tank as a start. Cut it up, reshape & re-weld it... do what you got to do with it to suite your needs, no charge $. PM me if your interested
Dimensions are roughly: [15"L x 7.5''W x 7" T]
I'll PM ya.
Tom
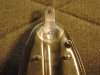
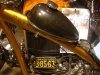
Got that 2.5L tank and started working on it. The top bar is wide and weird shaped and I didn't want to use the stock mounting method because I wanted the rear mount to look like the one on Captain America. Actually I've used this same method on a couple of other motorcycle tanks I've put on motorbikes so it's nothing new.
I made a steel bracket and TIG welded it to the rear of the tank then picked up a couple of rod couplings for the front mount. The top bar is very wide which required lengthening the tank studs.
Tomorrow I'll start making the foam molding box and maybe get the foam injected into it. I'm planning on painting the inside of the box with melted paraffin wax to act as a release agent. If all goes well what I'll have is a steel tank inside of a block of polyurethane foam which I'll begin carving into the shape to resemble the movie bike.
If that step works, as I hope, I'll start layering on fiberglass mat then cloth. This cold weather might hold up that step. You shouldn't really work with epoxy resin below 75 to 80 degrees and my wife would holler if I kept the garage heater on for a couple of days.
I'll let you know how things go tomorrow.
Tom
Attachments

silverbear
The Boy Who Never Grew Up
Real interesting, Tom. This should be helpful to a lot of the folks who wish their peanut tanks (stock size and ones like yours) looked different. What do you call the little threaded extender pieces on your studs? I need to tuck that away in me brain for a someday application. Looks like the deal on the old screen doors which kept the door from sagging. Your Ford sure makes a nice background, Brings back memories of Hot Rod magazines I pored over as a teenager when I was supposed to be reading textbooks.
SB
SB
Rats! I had plans to work on the bike today but the 'Honey Do' list is gonna preempt.
Char wants me to take a look at the vacuum cleaner. She says it isn't sucking. Then she asked if I'd fix the dripping faucet in her shower. This is her third or forth request about that faucet; guess I'd better fix it. She went to see her folks today and I know she'll expect me to spend my time doing things besides working on the bike. Oh well.....
SB,
Those are called 'rod couplings'. The Ace hardware I deal with has them in metric and SAE. The larger, 2.5L tank has 6mm studs whereas the kit peanut tanks have 5mm. Look in the metric fastener section or ask the guy for 'rod couplings'.
Tom