
You are using an out of date browser. It may not display this or other websites correctly.
You should upgrade or use an alternative browser.
You should upgrade or use an alternative browser.
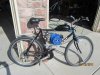
New HF 79cc Shift Kit Pictures
- Thread starter bird_e
- Start date
")
matt200288
New Member
So how do you make it so the pedals don't keep spinning? do you use some kind of freecoaster or cassette in there?, and if so where can i get something like that? i plan on making something similar to this
wheelbender6
Well-Known Member
That's a very clean job of installing all that hardware. I'm curious too about how you are able to freewheel the pedals.
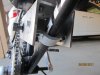
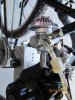
The freewheel on the front is the HD freewheel sold by Sick Bike Parts.
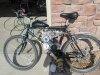
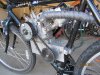
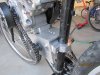
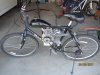
The engine mount is something the I CNC Machined, each tube clamp is machined from 1" thick alum plate with two 6mm cap screws on each side to secure the clamp. The down tube is oval so I actually machined it to be oval and is a perfect fit. The part that the motor sits on is made from 1/4" X 4" aluminum channel. This channel is then bolted to the tube clamps with 8mm bolts. I bored the holes and press fit the bearings in for the jack shaft. The whole engine mount is super heavy duty!
Thanks!
Bob
Few more specs:
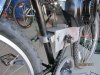
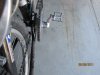
I'm using a Max Torque clutch with 11 Tooth sprocket, #35 chaing going to a 30 sprocket
the other side of the jack shaft is a 10 Tooth going to a 48 tooth. Then a 24 tooth going to the rear cassette. I'm in the process of changing the 24 tooth to a 30 tooth, its a bit too small and find my self running in gears 5-7 and not much time in 1-5.
I will try to post some more detailed pictures this weekend.
I have had a bunch of drive line problems from the from 24 tooth to the rear cassette.
Broke a few chains when the chain has jumped off. I'm in the process of getting that dialed in.
Bob
MEASURE TWICE
Well-Known Member
Did you put studded tires on it as the year end cooler weather is starting")
Make it a snow cat!
But seriously about the real great achievement of the machining, I was wondering how you transferred the measurements for complex milling from the frame to make engine mount parts.
If a high-tech camera takes a picture of parts and a gerber file is made for CAD I suppose that is a way to do this. I really know very little other than the names of some things about CAD, but find it amazing.
On the lower tech side I know going to Tap Plastics and getting stuff to make a mold could be a way to do this, then you can get the changing radius of a curve in one dimension and then 90 degrees opposed do that again and sort of get multiple points measured.
Just taking a calipers alone and measuring directly from the frame tubes you say are oval shape would I think really be challenging. The way I have gotten some things to fit is the last mentioned and then making a slight bit smaller and grinding final shape to fit. That can be hard to do and often is not anywhere near perfect.
Although I can say that the way whatever is it that Japanese wood temple buildings were made by old time crafter without glue or fasteners, that is sort of analogous to what I sometime attempt. Measure, look, and carve but in metal.
Heating up stock metal in a crucible and pouring molten metal into a waste mold would be fun I suppose too. I had taken a sculpture class and gone on a field trip to a foundry and seen this method. I had also seen jewelry made with this method and none of the near microscopic shapes were lost in molding.
I did the eye ball and some measuring and welded a platform to my steel 60's era JC Penny Foremost frame so I did not encounter too many problems. A hub I made with washing machine pulley and getting to clamp to spokes and the cone shape the spokes make have been the most time consuming part of my current build.
Measure Twice
MEASURE TWICE, no nails were used in Japanese temples, either.
bird_e, I also use a 24t bicycle chainring. It has not dropped a chain yet, although I've jumped and broken MANY bike chains before I got it dialed in.
The key is the SBP Jump-Stop, which keeps the chain from falling inward. You could always keep the front derailleur, to keep the chain from falling outward.
Sprocket alignment to the cassette helps too.
If you're always between 5-7, isn't that where you want to be?
You could always swap the 24t to a 30t. That'll raise the gear ratio substantially.