
You are using an out of date browser. It may not display this or other websites correctly.
You should upgrade or use an alternative browser.
You should upgrade or use an alternative browser.
New here, first build.
- Thread starter crawler
- Start date

LS614
Well-Known Member
wait, crap, can you not weld or solder? seriously money doesn't look like to much of a problem for you on this build but machinists eat money for breakfast. A buddy on here Trax made a super cool and sturdy rear rack out of copper pipe and solder and it looks really good. http://motorbicycling.com/attachment.php?attachmentid=15535&d=1257570767 there's a fairly good pic of it ")
I don't have the capability of welding aluminum, and I don't have a way of machining slots in the rack. It can't be soldered, due to powdercoating. I could cut the slots, but it would take forever, and one little zing across it with the cutting wheel, and it would be trashed. It's not worth it.
I got one of the chain guards done. I used a harbor freight oil squirt can for the piece covering the sprocket…don't. It's the worst metal I've ever dealt with, borderline unweldable.

I put it back together to get an idea of what it was looking like.


I got one of the chain guards done. I used a harbor freight oil squirt can for the piece covering the sprocket…don't. It's the worst metal I've ever dealt with, borderline unweldable.
I put it back together to get an idea of what it was looking like.
LS614
Well-Known Member
hey man that looks pretty darn good Now don't quote me on this but back in the older days I'm pretty sure them custom builders used lead solder just fine and then covered it in PC. I think the solder melts around 700+ degrees and PC cures at around 300. Soldering WOULD be an option if you wanted to go through with it. But if it's a concern of the slots then the machinist is the best option for those.
Now don't quote me on this but back in the older days I'm pretty sure them custom builders used lead solder just fine and then covered it in PC. I think the solder melts around 700+ degrees and PC cures at around 300. Soldering WOULD be an option if you wanted to go through with it. But if it's a concern of the slots then the machinist is the best option for those.Hey Crawler,
Great lookin build, Im halfway through mine too and Ive also got a monark springer fork but mines the Monark II with the stainless steel rocker plates built for disc brake calipers.
I wanted to ask you how you got your rotor and rotor bolt heads to clear the rocker plate bolts? The bolt heads on my rocker plates interfere with the rotor mount hub. The bolt heads on the other rocker plate interfere with the spokes on the other side of the wheel. Even if i grind the bolt heads down, I dont know if im going to clear rotor plus rotor bolts.
Would you be able to post a close up shot of your rotor and mount on your front wheel and what clearance you have with the fork rocker plates?
chainmaker
Well-Known Member
Hey Crawler,
Great lookin build, Im halfway through mine too and Ive also got a monark springer fork but mines the Monark II with the stainless steel rocker plates built for disc brake calipers.
I wanted to ask you how you got your rotor and rotor bolt heads to clear the rocker plate bolts? The bolt heads on my rocker plates interfere with the rotor mount hub. The bolt heads on the other rocker plate interfere with the spokes on the other side of the wheel. Even if i grind the bolt heads down, I dont know if im going to clear rotor plus rotor bolts.
Would you be able to post a close up shot of your rotor and mount on your front wheel and what clearance you have with the fork rocker plates?
You have to put the plates on the outside of the forks and flip the bolts around. The nuts should be on the outside and the flat head of the bolts on the inside facing the wheel. Edit: he is using the Felt Abraham forks, I gave you info for the monarks ( I had the same issue when I got my forks with the wheel fitting in)
Last edited:
Dogtown Burner
New Member
Hey Crawler,
Great lookin build, Im halfway through mine too and Ive also got a monark springer fork but mines the Monark II with the stainless steel rocker plates built for disc brake calipers.
I wanted to ask you how you got your rotor and rotor bolt heads to clear the rocker plate bolts? The bolt heads on my rocker plates interfere with the rotor mount hub. The bolt heads on the other rocker plate interfere with the spokes on the other side of the wheel. Even if i grind the bolt heads down, I dont know if im going to clear rotor plus rotor bolts.
Would you be able to post a close up shot of your rotor and mount on your front wheel and what clearance you have with the fork rocker plates?
hey gshock- I had the first completed pair of monark II's, and Crawlers subsequent post is right for sure. you gotta switch the dropout plates to the outside. (someone should tell david this, maybe I will) and the bolts need to be reversed and I even played with the washer/spacer setup to get the right clearance. then, Voila! good fit after some caliper spacer tinkering. but then I had to go and **** it all up. I figured since I had it all working great, (rather than go to David and get bronze bushings ) I removed the quick release axle and put a straight solid axle in, thinking it would reduce some head wobble from the mismatched size of the dropouts and the skewer diameters issue. oops run on sentence. (The skewer axle is smaller than the dropout grooves, so it can move around. theoretically. at least in my pea brain.) WELL---after I put the solid axle in, the retaining nuts make the wheel assy so wide that it no longer fits, and when I get back from this weekend business trip I am going to put the skewer back in and get brass bushings for the axle
 !!! sheesh. lotsa words, sorry.!
DTB
Hey guys,
I got a solid axle in with spacers, ground the bolt heads down and got it all together. I took the bike for a ride today with the new forks and disc brake but I have another problem. The Monark II forks came with their own new cups, cones and bearings but the cups wouldnt fit into my original frame fork tube. They are about 1mm too wide in diameter but the bearings they came with look exactly the same size as the original set so I left the original cups in the frame fork tube and used the new cones and bearings on the springer forks. I tightened the stem nut down as much as I can without seizing up the steering and I still have movement between the fork stem and steering tube. Did you have the same issue with your forks? Im thinking the only option I might have is to try and find some slightly larger bearings to take the slop out. Any ideas?
I got a solid axle in with spacers, ground the bolt heads down and got it all together. I took the bike for a ride today with the new forks and disc brake but I have another problem. The Monark II forks came with their own new cups, cones and bearings but the cups wouldnt fit into my original frame fork tube. They are about 1mm too wide in diameter but the bearings they came with look exactly the same size as the original set so I left the original cups in the frame fork tube and used the new cones and bearings on the springer forks. I tightened the stem nut down as much as I can without seizing up the steering and I still have movement between the fork stem and steering tube. Did you have the same issue with your forks? Im thinking the only option I might have is to try and find some slightly larger bearings to take the slop out. Any ideas?
As stated, I'm running felt forks, so I can't help much.
I learned machinists in an aviation town want nothing to do with the average joe. I found one place, and hey wanted $300 to machine the rack for me. So, I bought some end mills and played on the drill press.


The next set of slots might be tough. The drill press only likes to mill forward and back, not side to side. I'm hoping angling the slide table just enough to clear the column won't affect it. We'll see…
I learned machinists in an aviation town want nothing to do with the average joe. I found one place, and hey wanted $300 to machine the rack for me. So, I bought some end mills and played on the drill press.
The next set of slots might be tough. The drill press only likes to mill forward and back, not side to side. I'm hoping angling the slide table just enough to clear the column won't affect it. We'll see…


killercanuck
New Member
I just want to say that is beautiful bike, great work. wow. Many happy miles to you sir.
MEASURE TWICE
Well-Known Member
New here first build, but "NOT" new to knowing how to build!
Thanks for all the pictures of how it is going.
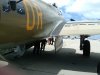
I suggested that a WW2 B17 with guts removed for a gas tank, but where to get one. What you have on the back sized down should cover many miles on the bike before fillup and should get some interesting look from passers-by.
From my walk aboard Wings of Freedom Tour 2011 Collings Foundation pictures.
MT
Thanks for all the pictures of how it is going.
I suggested that a WW2 B17 with guts removed for a gas tank, but where to get one. What you have on the back sized down should cover many miles on the bike before fillup and should get some interesting look from passers-by.
From my walk aboard Wings of Freedom Tour 2011 Collings Foundation pictures.
MT
Attachments
Ayotaybrink
New Member
This bike is truly beautiful, ill be tuned in to this thread to see what else you have up your sleeve. Great job!


killercanuck
New Member
Nice rack.
Here's a thought for a support. How about a foot-peg on the right side(or something), mount an arm off of that and do a trick one sided mount that clamps onto the peg.
Know what I mean?
Here's a thought for a support. How about a foot-peg on the right side(or something), mount an arm off of that and do a trick one sided mount that clamps onto the peg.
Know what I mean?
MEASURE TWICE
Well-Known Member
Can't see the front engine mount in the pictures, but the rear which is not done so far as you say, I thought can the clamp for the jackshaft do both it and the rear engine mount?
I when welding a plate for my engine mount I left the extra length of metal go behind the down tube and now have my jackshafts dual stacked mounted there. For multi purpose use I have 1 pulley of the 6, I'll switch for 25:1 dirtbike or 50:1 parade speeds.
At about the same height as the rack clamp on the down tube I bought some steel seat clamps I can spread enough to clamp on down tube below the top tube.
It I am still working on to stabilize the top jackshaft as the bracket is only so far mounted in four places at the bottom. It is really rigid forward to aft, only side to side not as steady.
I thought of welding to the down tube and I am not going to be ever removing the seat post, thinking the weld might distort the inside of the tube, but I only have access to a MIG welder now unless I pay to go to a shop and use the TIG again. Heating control is much easier with the TIG.
Since you clamps look quite beefy, you could make more if they fit or connect angle brackets to extend to the engine mounts if not too far away.
MT
Last edited:


