my new build

GoldenMotor.com

jasonh

New Member
Jun 23, 2008
1,590
0
0
40
Longmont, CO
Well it's about darn time I start a thread for my "new" bike.

So a few months ago, I blew my motor up - piston ring retaining pin came out, ring rotated and trashed the cylinder. It took me so long to get around to getting a new motor, I figured I'd paint the bike while I wait. Well, I got the motor and the bike wasn't even close to being finished. Here is my painting thread: http://motorbicycling.com/f26/painting-my-bike-4656.html ... So my the time I'm done painting I figure it's getting close to Christmas time, why not get a Shift Kit for Christmas? So I had to wait longer. And then I figured I might as well order some other accessories while I was at it...

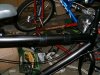
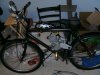
So here we go. First picture is how I decided to mount everything so I wouldn't mess up the nice new paint. I just took an old leather belt and cut it into pieces and wrapped it around the frame. Worked well I think.

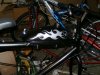
Next is the gas tank sitting on the frame to see how it looks. My graphic job was okay, not the greatest...I ended up pinstriping with a sharpie. I hope to make a new tank soon, so I'll work on a better graphics job then.

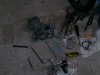
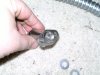
Third image is halfway through the shift kit install. Nothing special here.

4th - yay my box-o-goodies from Niagara Cycle Works finally came...after Christmas. This box contains: fenders, 3.5" rise handlebars, speedometer, a mirror, and a new chain.

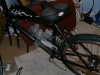
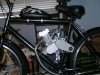
Last pic for this post is the motor finally installed....took me forever. I wasn't able to use the leather on the 2 rear mounts unfortunately. So I just wrapped the tube in electrical tape.

I'm limited to 5 pics per post, so I'll be back in a jiffy with the rest....
 

Attachments

jasonh

New Member
Jun 23, 2008
1,590
0
0
40
Longmont, CO
Alrighty then.

First pic on this post is the motor and other goodies installed. Looks sweet I think.

2nd and 3rd pictures are the exhaust and intake, respectively. I took a dremel with a sanding drum to them. The intake had a nasty harsh lip in there where the flange mated to the pipe, and the exhaust had a massive build-up from welding. I think I doubled the size of the exhuast flange, lol.

4th, I have the intake an exhaust on and mocked up how I want the muffler mounted.

5th is my sweet muffler mounts I came up with. Just used the stock mounting brackets for the gas tank, some zip ties, and a couple hose clamps. I think it worked out well. I love reusing old random parts.

The bike is now finished. Unfortunately I can't get it started. In order to spare myself from pedaling all day and do some better tests, I'm cranking the motor by connecting a drill to the magneto. My problem is the spark. First issue is my good plug wire is having problems today. I can use my old stock wire though. I can get a spark with the plug out of the motor, but once i put it back in, I can't get a spark, even just by holding the wire near the cylinder. It's cold and I'm tired of monkeying with it tonight, so I'll mess with it some more in the morning.

On the muffler mount pic, you can see my fresh new paint is already trashed, unfortunately. What happened is I ordered the rear hoop kickstand from SpookyTooth (along with a Skid Lid flat black MC helmet which was my birthday present), and was desperately trying to make it fit. Looks like because of the way my rear derailer mounts, it's not gonna happen. So now I have this kickstand doing nothing, no kickstand on the bike, and messed up paint. Eventually I'd like to get an internally geared hub, so I'll be able to use the kickstand at that time.
 

Attachments

wheelbender6

Well-Known Member
Sep 4, 2008
4,059
221
63
TX
Where did you get the flexible exhaust pipe? Was it part if a kit? I may try something like that. Thanks
 

jasonh

New Member
Jun 23, 2008
1,590
0
0
40
Longmont, CO
wheelbender, it just flexible conduit, found at your local Home Depot. Get 3/4". Mine had it available by-the-foot, so I didn't have to buy a whole roll.

Haven't tried to get the bike running yet today, but one piece of good news is my new clutch actuator from Creative Engineering arrived in the mail today, woohoo! On first inspection, it looks to be a very nicely machined piece. Way better than the cast China junk.
 

jasonh

New Member
Jun 23, 2008
1,590
0
0
40
Longmont, CO
IT'S ALIVE!@!!!!!! (and I'm cold - 37 degrees out there...brrrr)

So it looks like all my fiddling last night was just because I'm dumb. Apparently a drill can't spin fast enough to kick it over...which means when it comes time for my electric starter, I might have to do a little gear reduction.

I'm really used to just kicking the pedals to start the bike. SBP says don't do this because of the freewheel...so I am kicking the left side pedal, so hopefully that's ok. It is SOOOOOO much easier to kick over than my old motor with the old left side drive.

The flex conduit isn't terrible, but it's not great. I need to use more muffler repair goop because I have leaks where it joins the header and the muffler. What I need to do is just take it to a muffler shop and have them replicate it with some real pipe and weld it up...but that might take a while, because we're currently trying to get a house (we'll see if we can get approved first....)

The shifting is so nice to have. I was cruising with super low rpms in 7th at 30mph, woohoo. I think I got up to around 32 or so on a slight downhill. I'm sure that'll improve once the motor wears in a bit. Unfortunately my derailer isn't too great right now so shifting is a little clunky, but it's good enough. Eventually I think a 3 or 5 speed internal hub will be fantastic. Honestly, 3 would be just fine if the top and bottom are similar to my current cassette. A 2-speed kickback hub would be really cool with this setup...don't they shift automatically for you, then you downshift by pedaling back?

I just have to remember that Up is no longer forward with the shifter, it's upside down, lol.

The mirror is usable, but vibrates a lot....not much vibration isolation going on with leather and electrical tape.

I need to go back out there and install the new clutch actuator and grind down the clutch cover a bit more so I can get all the nuts on. My printer doesn't work so I can't do the clutch cover/chain guard til I go back to work.
 

2door

Moderator
Staff member
Sep 15, 2008
16,302
175
63
Littleton, Colorado
J,
Let's go ridin'. I took the Halloween Gal out tonight for a five mile run. Cold but still good.
I'd really like to see your bike. Pictures don't do it justice.
I'm wondering about the flex conduit. They make some with a rubberized coating but I have no idea how much heat it will take. Talk to me first before you pay someone to bend up a pipe for you. I have access to a complete machine/welding shop and we have pipe benders too. I'm right down the road and my labor / material is free. Congratulations on getting that beast running. (It's about time) :)
(clutch cover, chain guard...printer??????????)
Tom
 

jasonh

New Member
Jun 23, 2008
1,590
0
0
40
Longmont, CO
Tom,

Yeah, we do need to go riding some time...I gotta figure out how to get the bike down that far though :)

SBP provides a sheet of material to use for the clutch cover/chain guard, but you have to print out the pattern and cut it out yourself. Since I don't have access to a printer till Monday, I don't have a chain guard yet.

I've seen the coated flex conduit. I'm not sure how much heat it'll take either...seems like it's some type of vinyl.

I think I might have to take you up on that machine shop offer, thanks :)

I need to get some pictures of the full bike...I just realized I don't have any of it completed....
 
Sep 20, 2008
1,668
12
0
Clearwater, FL
web.tampabay.rr.com
IT'S ALIVE!@!!!!!! (and I'm cold - 37 degrees out there...brrrr)

I need to go back out there and install the new clutch actuator and grind down the clutch cover a bit more so I can get all the nuts on. My printer doesn't work so I can't do the clutch cover/chain guard til I go back to work.
Jason,

I didn't know you were going to be using my clutch kit with SBP's shifter kit!!! I have a modified clutch kit for use with the SBP shifter kit.

Nice build BTW!

Jim
 

2door

Moderator
Staff member
Sep 15, 2008
16,302
175
63
Littleton, Colorado
Tom,

Yeah, we do need to go riding some time...I gotta figure out how to get the bike down that far though :)

SBP provides a sheet of material to use for the clutch cover/chain guard, but you have to print out the pattern and cut it out yourself. Since I don't have access to a printer till Monday, I don't have a chain guard yet.

I've seen the coated flex conduit. I'm not sure how much heat it'll take either...seems like it's some type of vinyl.

I think I might have to take you up on that machine shop offer, thanks :)

I need to get some pictures of the full bike...I just realized I don't have any of it completed....
J,
You're supposed to be down here on the 17th of Feb. Maybe you can bring a pattern and we can work with that for the exhaust pipe/muffler. I'll change my days off to coincide with your court date and be at the office that Monday. In the interm I'll research the plastic coated conduit (Greenfield) and find out what kind of temps it will withstand.
I know its made for wet environments but as for the heat...your guess is as good as mine.
I just got back from a 12 mile run. Stopped by the Columbine Memorial. Sort of somber there but a pretty ride around the park. There are bike trails surrounding it and around a lake. Very nice; few people so I used the motor most of the time but shut it down and pedaled when I came upon folks walking. Just common courtesy. As for coming down here, maybe this spring/summer we can get together up your way for a ride. You'll have all the bugs worked out by then:) Happy New Year and we'll talk later.
Tom
 
Jun 25, 2008
455
0
0
I have a modified clutch kit for use with the SBP shifter kit.

Jim
In my opinon Jim, it would be best to make the modified and compatible kit the standard. That way if you decide to save up and upgrade to a Shifter kit theres no faffing. Looking forward to getting these fitted as standard along with the shifter on our bikes. In my opinion we'll be selling possibly the finest commerciallly available motored bikes in the world!
 

jasonh

New Member
Jun 23, 2008
1,590
0
0
40
Longmont, CO
Jim,

What have you modified to be compatible with the shift kit? I would assume a shorter arm and maybe thinner cover? No biggie really.

Tom,

Well don't go changing your days off yet...I actually just got a thing in the mail...they changed my date to the 24th. Ugh, what a pain.

So it's kind of a crappy picture, but here's where I'm at so far...

I guess I should add...my spark plug wire was giving me trouble, so I just grabbed a piece of coax cable. The plug end is just wrapped around the screw thing, and the cap is screwed on. I've poked fun of people for that before, so Sorry guys. But it works for now.

I also have to raise the motor up to tension the chain...again. I'm starting to think I should've sprung for the chain tensioner from SBP. I'm wondering if I can use an old derailer to rig up a spring loaded tensioner so I don't have to keep messing with the mounts.
 

Attachments

Last edited:
Jun 25, 2008
455
0
0
Looking good jason, just received the same speedo in the mail today. Can't wait to mount it on my next project. Am thinking of some sort of illumination system for it though....
 

jasonh

New Member
Jun 23, 2008
1,590
0
0
40
Longmont, CO
Looking good jason, just received the same speedo in the mail today. Can't wait to mount it on my next project. Am thinking of some sort of illumination system for it though....
I had to modify the sensor gear drive thing a bit. had to open up the middle hole a lot and file it to lock in with the nut on my axle. Otherwise it wouldn't have fit.

I've got to say though, for $6 this speedo works incredibly well.
 
Jun 25, 2008
455
0
0
Ahh, was wondering which side to mount it. The gear has L and R which i take it means you flip to mount on chosen side. Hand wound it to test and got it to 5mph!!
 

2door

Moderator
Staff member
Sep 15, 2008
16,302
175
63
Littleton, Colorado
Grainger Industrial Supply

Jason,
This might solve the flexible exhaust pipe problem. I thought of it last night. They come in all lengths, made of stainless steel and could certainly be adapted with just minor work. Some tig welding maybe but, heck, that's a breeze. Let me know what you think.
Tom
 
Last edited:

jasonh

New Member
Jun 23, 2008
1,590
0
0
40
Longmont, CO
Tom,

Thanks for the link. The concept sounds great, but I do see a couple issues: first the max ID of those is 1/2", and the stock pipe is 3/4". Also, it says the max pressure is 1/2 PSI. I'm not sure how much pressure the exhaust makes, but it does make a little bit. I'd like to know how you have less than 1/2 PSI going to appliances though...