I am bad at Titles (OCC first build)

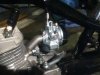
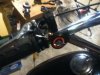
the good news is that the Delorto clone just went straight onto the existing manifold, probably gonna go through with my custom plan in the fututre but for now, the carb is on.


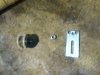
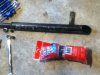
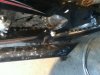
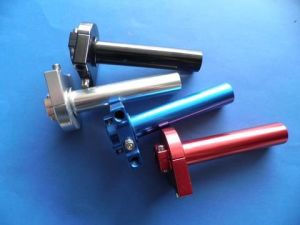
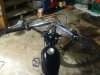
the bad news though: the throttle grip that came with my kit is done now.
the peg that holds it to the handlebars snapped when I took it apart, replaced it with a bolt, then when i got it back together I found that it doesn't hold the cable anymore, the cutout on the grip that holds the cable end broke at some point.


anyone have any experience with this style of throttle grip?
Kawasaki-Kx-80-85-100-125-250-500-Assembly-CNC-Aluminum-Dirt-Bike-Throttle-Grip.jpg
 
Hey GW, Sounds like the build is coming along fine except for the ocasional Chinese quality control issue. I've had a few of those cheapo throttles break at the cable attachment. I cant say I've ever used the grip you have pictured. It's gotta be better than the stock one though.
fatdaddy.usflg
 
I ended up trying a motorsports shop nearby, bought an ATV twist grip.
then I finished up what I was trying to do today.
gonna have to take it all back apart once I get the new handlebars on, but who cares.

I put the fuel line to the new carb, but I'm not so sure it's the best right now. too dark to ride anyway so I get to fiddle with it more tomorrow.

the new throttle had it's own cable, it sort of doesn't fit in the threads on the top of the carb, I think one is coarse threads and the other is tight. it fits together, but won't screw in any more than that, it's pretty tight though. I got the Schwinn rubber grip on the twist grip, yay!.

the double brake lever is really nice, the bottom cable binds up unless I twist the end before putting it in. not sure why that is but it's fine now I did it.

the choke is a little ugly, but pretty accessible. the bolt on the end of the choke cable bound up once, but then I couldn't make it happen again.

And yes, that is the stock kill-switch clamped to the middle right..
 

Attachments

  • IMG_1377.JPG
    IMG_1377.JPG
    247.8 KB · Views: 194
  • IMG_1378.JPG
    IMG_1378.JPG
    143.2 KB · Views: 190
  • IMG_1379.JPG
    IMG_1379.JPG
    250.6 KB · Views: 194
  • IMG_1380.JPG
    IMG_1380.JPG
    278 KB · Views: 180
new carb is running really nice, new throttle has a little bit of slop in it but works niceley otherwise.

bought spark plugs today, still in the bag though. no boot yet (the store didn't have them)
talked to a guy about getting some brackets made for the handlebars, going back next week.

and I was stopped by another cop today.
he really did just want to look at the bike, he thought it was really cool. he wanted to give me a warning about not wearing my helmet (I know I'm dumb) and when he went to check how much the fine would have been he ended up reading up on mopeds in ontario.

it turns out they are totally illegal in the most backwards way possible. you need to get a motorcycle/moped license to use one (when I got my drivers license the full permit counted as a motorcycle license, but they changed it since then) and now mopeds need to be registered and insured, which is impossible.

you can't get the plate without valid insurance, and you simply cannot get insurance for mopeds, home-made or not.

he told me that if it was up to him that would not be the case. he also told me to lie about the displacement if I get pulled over again. (I might be buying that clutch cover with 49cc stamped on it)

also it turns out that main roads count as highways legally in ontario, so it's against the law to ride a moped on the road.

yay!
 
I forgot to mention, I think my freewheel is crapping out. some kicking to the pedals towards the end of my ride today.
 
took the freewheel mostly apart (don'y have any of the special tools needed so the back half is still on the rear wheel)

I learned two things: firstly, this bike does not have a captive bearing in the freewheel.
Secondly see attached picture.
 

Attachments

  • IMG_1381.JPG
    IMG_1381.JPG
    161 KB · Views: 180
took the freewheel mostly apart (don'y have any of the special tools needed so the back half is still on the rear wheel)

I learned two things: firstly, this bike does not have a captive bearing in the freewheel.
Secondly see attached picture.

Not the greatest picture bro, Are those supposed to be bearings? If so I think yer gonna be needing a new freewheel.:-|| Sorry. But poo poo happens. Yer local bike shop can remove the freewheel for ya. Mine does it No Charge. Here is where I put in a plug for Bicycle Express in San Jose. A great bunch of people.
fatdaddy.usflg
 
I will probably be buying a new freewheel (might buy a freewheel tool as well if it's not too many dollars)
even if all the ball bearings were still ball-shaped, this freewheel only has two palls inside it.

hopefully gonna replace it with one with at least three palls and a sealed bearing.

in other news, I should be picking up a pair of ammo cans tomorrow.
 
no word yet on the ammo cans (hopefully soon)
took the rear wheel to my local bike shop and they didn't have a freewheel tool that could remove mine (or a pipe wrench either) it seems the one I have is not designed with maintenance in mind.
took it home and wrenched it off gonna go back tomorrow maybe. (I've started a different thread about what freewheel to buy)

I started working on fitting my chain tweekers a bit better by filing the back of the dropouts from round to flat. did one side then noticed my pedals are touching the exhaust again, went to tighten the exhaust studs some and found one of them was snapped.

when it rains, it pours. I guess I need to hit up the hardware store now...

oh well, at least once it's rolling again it will be better than it is now.
 
It might of got snapped from the pedal hitting it, But it would have to hit it pretty hard to do that. At least now ya got a chance to buy a better grade stud. Might as well do all the studs while yer at it. The Chinese stuff is CRAP as you just found out.
fatdaddy.usflg
 
getting myself together for a walk to the hardware store right now.

probably just going to replace the exhaust studs, but I am not sure if i'm coming back with a bag of bolts or a couple of feet of threaded rod yet (depend on what is cheaper) either way, as things break I replace them with better.

eventually I will probably make an effort to replace all the studs but for now I'm worrying about other things.
this way I'll have stuff to do next month!
 
Bought the bag of bolts, got some other bits and bobs too.
put the back wheel back on, I need to drop a link or two from the pedal chain now. :p

I put the new spark plug in and indexed it but it could be tighter, probably needs a washer. put the new boot together, no longer rattles. I turned the fuel adjustment a half turn richer. The old plug I pulled out was slightly lighter brown. (I have to take the plug back out to put the washer in so I am going to check it again soon.)

I still need to cut out the exhaust gasket, don't really have the right tools so it's not done yet.
 
okay instead of shortening the pedal chain I did this
first picture is the idea (I took the kit tensioner and cut it off where the bulge starts)
second and third pictures are the mockup after I cut the tensioner.
fourth pic is the plate bolted on.
fifth picture is it running.
 

Attachments

  • IMG_1386.JPG
    IMG_1386.JPG
    301.4 KB · Views: 174
  • IMG_1387.JPG
    IMG_1387.JPG
    241.4 KB · Views: 191
  • IMG_1388.JPG
    IMG_1388.JPG
    254.8 KB · Views: 170
  • IMG_1389.JPG
    IMG_1389.JPG
    270 KB · Views: 178
  • IMG_1390.JPG
    IMG_1390.JPG
    241.3 KB · Views: 193
chopper.jpg
this is my occ chopper it did 40 mph before I backed off its still in the break in period but it has a solid motor from bicycle motor works
 
Ro$$, I hope you can get that picture fixed, I wanna see your bike.

Okay so I cut the gaskets out, it really needs a spacer cut out instead of a stack of gaskets, and I had to bend the exhaust to get it to fit. I used the very technical method of laying it on the ground over a bit of wood and standing on it.
Got a five minute drive in just before the sun set, the new plug is awesome!
The 18 tooth sprocket is working great, the only pedaling I do is right in the power zone on this thing, that said, if I have to pedal it anywhere it's going to take all day.
 
so I did some tuning using half a pot-scrubber down the exhaust!
much quieter now.

also I did a temporary light kit so I can be allowed to ride it (just kidding, I still need way more stuff for the law)

and the last picture is of the one bolt that I hate. there's not enough room between the frame and the sprocket for the lock-nut to go on the inside, so I am stuck with having to pull the chains and remove the rear wheel every time I want to mess with that bolt.


my stack-o-gaskets it holding up great too!
 

Attachments

  • IMG_1399.JPG
    IMG_1399.JPG
    303.5 KB · Views: 159
  • IMG_1398.JPG
    IMG_1398.JPG
    210.3 KB · Views: 160
  • IMG_1401.JPG
    IMG_1401.JPG
    268.3 KB · Views: 185
  • IMG_1402.JPG
    IMG_1402.JPG
    125.7 KB · Views: 185
  • IMG_1400.JPG
    IMG_1400.JPG
    251.8 KB · Views: 185
Last edited:
I got the ammo cans yesterday, it may be some time before those are attached.
Been riding it around, she's been real nice. took her out today for a true trip of around four miles, each way. With about an hour cool-down in the middle. everything was perfect until right before the last turn onto my street.
A loud bang and sudden grinding noise.
Pics when she's cooled down enough to touch.
.kick2
 
okay I put the pictures in an album because there are many of them.
Album of my failure
just noticed that the order I uploaded the pictures in was backwards, oh well.

as of now I am more or less certain that I need a whole new upper and piston. possibly a whole new motor.
any of y'all experts out there wanna tell me the obvious of what I did wrong here? please.
 
Back
Top