
You are using an out of date browser. It may not display this or other websites correctly.
You should upgrade or use an alternative browser.
You should upgrade or use an alternative browser.
Hi from the UK - INDIAN Board Tracker tribute, my first build
- Thread starter PeteMcP
- Start date
PeteMcP
Well-Known Member
EXHAUST/MUFFLER thoughts...
First up, thanks to those folks watching and offering encouragement on this build.
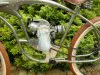
Been musing over my DECOLINER's exhaust. Happy to stick with my choice of mini-moto engine but it turns out there are very few exhausts on the market for this motor, ie with a flange featuring fixing studs 38mm apart. The few pipes that are available all feature an expansion chamber and only ONE (the one I purchased shown in the pics) fits my particular application. ALL other mini-moto exhausts are designed to hang vertically down UNDER the motor, locating the expansion chamber right where my one-off motor mount is located.
Pics show the engine and exhaust loosely mounted in the DECOLINER's frame. As supplied however, the exhaust won't work for me 'cause the muffler is right where I intend to hang a 1 or 1-1/2 litre fuel tank concealed in a leather tool bag suspended from my Brooks saddle. Looks like I'll be modifying the exhaust to suit. I already purchased a much larger stainless muffler for the look I'm after. Just need to buy-in a few mandrel bends to make up the pipe aft of the expansion chamber.
(Before anyone asks why I'm not using TRM's tank to store fuel, I did originally intend to do just that using a collapsible i/v type fuel bag concealed within the tank's confines, but there's not enough room in there for a big enough bag to give the bike a decent range. 300-400 mill of gas at best).


First up, thanks to those folks watching and offering encouragement on this build.
Been musing over my DECOLINER's exhaust. Happy to stick with my choice of mini-moto engine but it turns out there are very few exhausts on the market for this motor, ie with a flange featuring fixing studs 38mm apart. The few pipes that are available all feature an expansion chamber and only ONE (the one I purchased shown in the pics) fits my particular application. ALL other mini-moto exhausts are designed to hang vertically down UNDER the motor, locating the expansion chamber right where my one-off motor mount is located.
Pics show the engine and exhaust loosely mounted in the DECOLINER's frame. As supplied however, the exhaust won't work for me 'cause the muffler is right where I intend to hang a 1 or 1-1/2 litre fuel tank concealed in a leather tool bag suspended from my Brooks saddle. Looks like I'll be modifying the exhaust to suit. I already purchased a much larger stainless muffler for the look I'm after. Just need to buy-in a few mandrel bends to make up the pipe aft of the expansion chamber.
(Before anyone asks why I'm not using TRM's tank to store fuel, I did originally intend to do just that using a collapsible i/v type fuel bag concealed within the tank's confines, but there's not enough room in there for a big enough bag to give the bike a decent range. 300-400 mill of gas at best).
Last edited:
PeteMcP
Well-Known Member
FRAME NOW PAINTED...
Made the decision to paint/clear coat the frame in Nocciola Bronze metallic to match the TRM tank.
Motor mount and polished alloy side panels now permanently attached to the frame. Mini-moto engine now mounts to frame via anti-vibration rubber pads. See pics.
Went with a cnc'd alloy rear hub adapter and marked/drilled the 54 tooth sprocket to match. Works a treat.
Happy with my choice of handlebars and quill stem. Fitted 'pre-loved' vintage Brooks saddle. Nice colour match for the tyres.
Busy fabricating new exhaust system - pics to follow soon.
PeteMcP
Well-Known Member
OPTIONS & DECISIONS...
Maybe some folks out there are also considering using one of these mini-moto engines in a future project? If so, you might like to be made aware of the options when it comes to mounting the 3.25:1 reduction gearbox to the motor.
Pics show two different options - and it's time for me to make a decision which I prefer. Aesthetically speaking, I prefer the gearbox installed horizontally - but I much prefer the look of the chain's lower location when the gearbox is mounted vertically. In this latter position, I definitely need to fit sufficiently short pedal crank arms to clear the gearbox. To this end, I've already fitted a 'Truvativ' US-to-Euro bottom bracket conversion and ordered a 32T chainwheel with 130mm long taper-fit cranks and suitable crank axle. Seem like short cranks? Bear in mind with a pull start motor used on this build I plan on doing very little pedaling - other than activating the rear coaster brake.
Attachments

Last edited:
PeteMcP
Well-Known Member
Ludwig,
Good point. I hear what you're saying. I did fit a torque stay as an afterthought to my Indian tribute build and I can confirm it made a MASSIVE difference, both cutting down vibration, mounting the engine very much more rigidly and eliminating any tendency for the motor to twist on its mounts - particularly noticeable when yanking on the pull start.
Take a glance at the two attached pics. In the large pic, notice the cnc'd black clamp affixed midway down the Indian's seat tube, (visible just above the chain) through which a high tensile steel bolt passes and fastens securely into the right side engine case. In the smaller pic showing the right side engine case, no-one would ever guess the cap head bolt at far left is merely cosmetic, only the bolt head itself being secured in its hole with double sided adhesive tape.
On my DECOLINER build, I guess I'll have to wait until after I fire her up to see how things go. And then yes, if necessary I'll somehow figure a way to make and fit a torque stay. Watch this space.
PeteMcP
Well-Known Member
DECOLINER's PEDALS INSTALLED...
Those 130mm (actually stamped 127mm) crank arms, 3R crank axle and rubber pedals I ordered showed up today and they fit my DECOLINER perfectly, providing just enough clearance (4mm, but who's counting?) to prevent the pedals fouling the gearbox casing's lower edge. Result!
Work resumes tomorrow on the reworked exhaust. Pic to follow. Stay tuned...

PeteMcP
Well-Known Member
Yeah, but mounting the gearbox at 45 degrees gets me back into a situation where the chain-line is raised and my preference is to try and keep the chain-line as low as possible. That Humber illustration is a corker though - and it's exhaust has some minor similarities to what I have planned on the DECOLINER.
Speaking of which...
FITTING DECOLINER's EXHAUST
These latest photos show work proceeding on the bike's exhaust system. I've posed the parts loosely on the bike for these pics and I'm not yet certain if the tail-pipe's length will be cut down or not. I'm pleased with how the flexible part of the system allows me to curve the pipe to compliment the lines of the TRM tank.
I started by cutting off the manifold's flange then removed an inch from the manifold so it didn't foul the motor mount. Because of the manifold's tight radius bend, access space was tight and I didn't want to risk getting a bad weld bead that would prevent the fixing bolts snugging down correctly (which was exactly how the Chinese welds were on the factory-fresh pipe!!!) so I re-attached the flange using silver solder. Next I removed a small amount of material from the tail-end of the expansion chamber so one collar of the flexible stainless Polylock pipe was a snug fit into it. Incidentally, that 400mm long x 32mm dia Polylock pipe was sourced from a UK eBay seller. Custom-made and delivered within 48 hours at a cost of £14 including postage. That's surely excellent service and a great deal in anyone's opinion.
The 35mm dia. tail pipe was an off-cut I had lying around from when I built my replica Morgan 3-Wheeler a couple of years ago. Moral: never chuck anything. And by sheer good luck, the fish-tail end cap was a tight interference-fit into the tail pipe. Worth me saying the fish tail is nothing more than one of three alternative nozzles supplied with my hot air gun. Always think outside the box, right?
Baffles...? We don' need no stinkin' baffles...

This afternoon I'll re-paint the expansion chamber section of the exhaust. Then when a couple of brackets I've ordered from eBay arrive, I'll be able to attach the exhaust system permanently.


Speaking of which...
FITTING DECOLINER's EXHAUST
These latest photos show work proceeding on the bike's exhaust system. I've posed the parts loosely on the bike for these pics and I'm not yet certain if the tail-pipe's length will be cut down or not. I'm pleased with how the flexible part of the system allows me to curve the pipe to compliment the lines of the TRM tank.
I started by cutting off the manifold's flange then removed an inch from the manifold so it didn't foul the motor mount. Because of the manifold's tight radius bend, access space was tight and I didn't want to risk getting a bad weld bead that would prevent the fixing bolts snugging down correctly (which was exactly how the Chinese welds were on the factory-fresh pipe!!!) so I re-attached the flange using silver solder. Next I removed a small amount of material from the tail-end of the expansion chamber so one collar of the flexible stainless Polylock pipe was a snug fit into it. Incidentally, that 400mm long x 32mm dia Polylock pipe was sourced from a UK eBay seller. Custom-made and delivered within 48 hours at a cost of £14 including postage. That's surely excellent service and a great deal in anyone's opinion.
The 35mm dia. tail pipe was an off-cut I had lying around from when I built my replica Morgan 3-Wheeler a couple of years ago. Moral: never chuck anything. And by sheer good luck, the fish-tail end cap was a tight interference-fit into the tail pipe. Worth me saying the fish tail is nothing more than one of three alternative nozzles supplied with my hot air gun. Always think outside the box, right?
Baffles...? We don' need no stinkin' baffles...
This afternoon I'll re-paint the expansion chamber section of the exhaust. Then when a couple of brackets I've ordered from eBay arrive, I'll be able to attach the exhaust system permanently.
Last edited:
MEASURE TWICE
Well-Known Member
First to say amazingly nice work! The flex tubing I have similar of stainless I think. I have not tried welding it to muffler or header. It was a thought but when I could not get smaller diameter tube I have to use adapters. On your bike I see a screw head on the end of expansion chamber if that is right. Is it just slip fit and screwed together? If weld or brazed, was wondering what are necessary steps with flex tube to get it right. I use a Hobart MIG 130 with AR 75 CO2 25 mix for steel work.
PeteMcP
Well-Known Member
First to say amazingly nice work! The flex tubing I have similar of stainless I think. I have not tried welding it to muffler or header. It was a thought but when I could not get smaller diameter tube I have to use adapters. On your bike I see a screw head on the end of expansion chamber if that is right. Is it just slip fit and screwed together? If weld or brazed, was wondering what are necessary steps with flex tube to get it right. I use a Hobart MIG 130 with AR 75 CO2 25 mix for steel work.
DECOLINER's 4-piece exhaust was built with the intention of it all being slip-fit. Everything is a nice tight interference-fit, so I don't need to weld anything. Where/if necessary I'll use stainless clamps. When the time comes to permanently fit it all in place, I'll be using a smear of exhaust paste to seal the flexible Polylock's 30mm long collar into the expansion chamber. The pair of captive bolt heads you spotted on the expansion chamber are where the pipe's original factory-fitted heat shield bolts onto. Yesterday I re-sprayed the modified expansion chamber with silver hi-temp paint and the heat shield is now bolted in place. See pic.

PeteMcP
Well-Known Member
FENDERS FITTED...
Ducktail fenders ordered from Classic Cycles in Germany showed up today. These type of fenders were unobtainable in the UK and I couldn't justify the cost of import duty and taxes if I ordered them from the US. They were pricey enough from Germany - but now they're installed I reckon they were worth it and they definitely add to the 'deco' look I'm aiming for.
I've also marked and drilled the exhaust's fishtail tip to make it a little more 'period' looking.
PeteMcP
Well-Known Member
As much as I like your 'Indian', the Decoliner is a true work of art!!
Do you keep a drip pan under it to catch all the coolness that just oozes off of it?
Good tip. Wondered what those stains were on my garage floor...
")

