Hi from the UK - INDIAN Board Tracker tribute, my first build

Plan B? Phah! Who needs a plan B?, Yep if it don't work the first time rework or remake it till it does. May have a pile of scrap, but scrap is usable sooner or later. LOL

Sometimes have to start all over to get it right ..............Curt

You said it, Curt.
Even though this bender was plainly not the right tool for the job, I got there in the end and learned it's limitations along the way.
And to be fair, the bender's instruction leaflet did say practice forming a few bends on scrap tube first. Unfortunately I had no scrap stock of 1" aluminium tube to hand, so my 'learning curve' ate into my frame stock. Should have bought sufficient extra tube anyway, rather than just enough for the 3 x frame tubes I needed. Another of life's lessons learned...
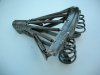
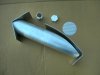
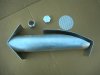
 
LOL! Think we will ever learn, thinking maybe a tube roller would of been better for the aluminum. Rolls through and bends a little at a time, Anyhoo you got it, that's the main thing.......Curt
 
Quite literally, 'The Learning Curve'.
The evidence...

FSCN3717.JPG
 
6061 is good stuff!
6061T6 (T = temper) is the standard for aircraft construction, easy to weld, light weight and strong!
 
JIGGED-UP ALUMINIUM FRAME COMPONENTS DROPPED OFF AT THE WELDERS TODAY.
Now it's just a waiting game till I get the call saying the assembled frame is ready to pick up...
 
BEGUN THE 'PATINA-ING' PROCESS - STARTING WITH THE WHEEL RIMS...
This build No.3 will sport my first patina'd finish. Aiming for a well used 'oily rag' vintage look - with a few modern twists thrown into the mix.
While the frame parts are away at the welders, I figured I may as well kick-off the patina-ing process on the wheel rims. These were spray primed, then top-coated with RAL 7024 Graphite Grey. The rim edges were suitably distressed, removing some paint back to bare metal, then clear coated. The front wheel's SRAM roller brake hub will get a similar treatment next.
Sourced a really beat-up and heavily rusted sprung seat frame which I've cleaned-up, de-rusted and clear coated. Nicely patina'd pitted bare metal look. If I thought my butt could put up with riding it without a cover I'd go for it, but I reckon I'll have to look for a suitably careworn pre-loved cover. Shame to hide the seat's internals.

FSCN3726.JPG FSCN3727.JPG FSCN3728.JPG
 

Attachments

  • FSCN3731.JPG
    FSCN3731.JPG
    59.8 KB · Views: 330
  • FSCN3732.JPG
    FSCN3732.JPG
    70.2 KB · Views: 359
Last edited:
ANOTHER ENGINE SCORE....
Scored this 98cc Villiers Midget engine on UK eBay yesterday. I'll stash it for an upcoming project. Listed as 'New(other)' by the seller. Bought by his father years ago for a project that never saw the light of day. My guess is it doesn't look new - but it's in considerably better shape externally than most Midgets that've popped onto my radar on eBay. Surprisingly, I was the only bidder, so I won it for the auction start price. Definitely worth a punt at a mere 22 UK pounds....!

villiers midget 98cc.jpg
 
What a KOOL find always good to have spares on hand ........Curt
Thanks Curt.
Parts stash keeps growing. I just scored a second Villiers Midget for another future build on eBay. Love the cylinder barrel on this motor...

Villiers Atco engine.jpg
 
Last edited:
Pete I too admire the little Villiers & you are wise to snag any item you fancy as it becomes available. I've no doubt you learned this trait long ago building and restoring various motor vehicles. If you go searching for items they become rarities to those possesing them, but if they're tripping over them in the shed it's junk to be rid of. Most things are priced accordingly.

I tend to lean readily into "future builds" & I'm sure others view this with either amusement or annoyance...perhaps both, yet it's a part of the allure of creating something special that was nothing really. If you can imagine it then it's possible and once you lay hands to the task it becomes very probable. I'd advise always to keep projects lined up & life will be fuller.

Rick C.
 
WHAT is the rear part with the spring from?

Butch,
Scroll back to page 5 of this thread, and check out post #92. There you'll see a pic showing the new 24" alloy and steel frame I purchased so I could donate its steel rear suspension triangle to this project. The frame was an eBay purchase. No details of the manufacturer.
 
Last edited:
This may or may not be of interest, as it is also Villiers propelled; I am wary of using the word "powered".

http://www.icenicam.org.uk/articles6/art0102.html

Ludwig, Thanks for the link. Interesting read - and what a lovely looking drivetrain.
Need to read up on the various Villiers Midget variants to find out exactly what I've just purchased.
Given your seemingly endlless range of knowledge on small motorcycles and powerplants, can you help identify them? I'm pretty certain the second Villiers is a '30s era Midget from a vintage Atco mower - but I'm always happy to be corrected.
 
I know little, but I find I have a nerdish ability to research. I suggest going to Farcebook and the page of Moped Autocycle & Cyclemotor Collector. These lads have immense depth of knowledge of what the years and models are, and the variations available. Beware though, you may fall into the heathen clutches of Autocyclists!
 
ALUMINIUM FRAME BACK FROM WELDERS ... AND ALLOY TANK PARTS START TO TAKE SHAPE
Picked-up the freshly pro-welded aluminium ;) section of build No. 3's frame earlier today. Welder Paul did a great job. Said the jig I made to hold the parts securely in alignment made the job super easy. Thought I'd bolt-up the aluminium and steel frame parts together and shoot a few pics showing how it turned out - complete with the under-construction gas tank sellotaped between the top tubes.
Wheelbase on this build is a stretched-out 54".
Pics also show the progress I'm making with this project's alloy tank. Pretty pleased with how it's coming along. Took the tank with me when I went to pick up the frame today and had welder Paul tig the baffle inside the tank with a few tack welds. With luck, I hope to spend a few hours this coming weekend doing final shaping on the tank's two sheet metal panels and cutting the hole for the filler neck. Once that's sorted, I'll braze together the alloy tank parts myself - using the same process I described when building DECOLINER's gas tank.

FSCN3746.JPG View attachment 97576 RSCN3747.JPG View attachment 97580 View attachment 97581 FSCN3742.JPG
 

Attachments

  • FSCN3744.JPG
    FSCN3744.JPG
    171 KB · Views: 436
  • FSCN3740.JPG
    FSCN3740.JPG
    60.5 KB · Views: 391
  • FSCN3741.JPG
    FSCN3741.JPG
    62.5 KB · Views: 340
Last edited:
Back
Top