You are using an out of date browser. It may not display this or other websites correctly.
You should upgrade or use an alternative browser.
You should upgrade or use an alternative browser.
Excelsior V Twin build
- Thread starter DareDevil
- Start date
harry76
Well-Known Member
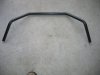
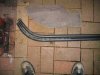
I really loving this build. Love those bars. How did you get those bends? Have you got a regular pipe bender like mine? If so was it tricky to do in one piece? Ive often thought of bending up bars but havent tried yet. Yours look great.
http://www.safetyculture.com.au/images/pipe_bender.jpg
http://www.safetyculture.com.au/images/pipe_bender.jpg
DareDevil
Member
Hi Harry...I have the same pipe bender....had it for over 40 years...What I have done is made a hack saw mark in the center of each mandrel so when your do your bends your bend mark on the pipe is in the correct position....when doing bends like handle bars ..make a line the full length of the pipe...so it can be repositioned in the mandrel square....if you dont do this.. the bends will come out twisted and not square with the other side...use an adjustable square for doing angles...dont over bend each time you are making something...better to do the bend 3 or 4 times to get it correct.....DD
harry76
Well-Known Member
Hi Harry...I have the same pipe bender....had it for over 40 years...What I have done is made a hack saw mark in the center of each mandrel so when your do your bends your bend mark on the pipe is in the correct position....when doing bends like handle bars ..make a line the full length of the pipe...so it can be repositioned in the mandrel square....if you dont do this.. the bends will come out twisted and not square with the other side...use an adjustable square for doing angles...dont over bend each time you are making something...better to do the bend 3 or 4 times to get it correct.....DD
Thanks DD, i used the lines down the pipe when i did a downtube to keep it straight, but didnt make marks on my mandrel bends. I will do this. Cheers as i didnt think it was possible to bent a small pipe with so many different bends. I just imagined the bar bender itself would get in the way. Great to know. Cant wait to see more of your bike, and get more good ideas off you.
DareDevil
Member
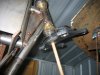
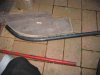
Hi Harry....the pipe for the handlebars is 22mm.about 7/8" ..just need to have the thinking cap on and take your time when making the bends...I have marked out the steering head fork supports and pilot drilled them....I have to find some heavy channel iron to make a jig to hold the forks in place when welding them together....DD
Attachments

DareDevil
Member
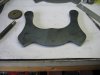
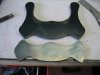
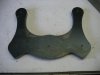
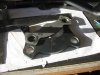
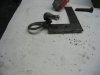
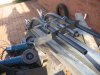
Hi ....The steering head plates have been drilled except for the head stem mount hole....I will have to borrow a 1-1/10" drill for this...To much money just to buy for the one job and wouldn't prob ally use it again.... I have got drills each side of it....didn't want to machine off any more than necessary off the steering tube to maintain strength where it is attached....the leaf spring is right underneath where this is fitted into the fork head...I will do a setup of the forks so I can get the spring maker to get the right amount of set in the arch where it comes of the fork head.....
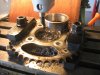
Have made a spacer where the hub has been machined off to make up the distance where the chain sprocket sits on the hub ... where I have reduced the width of the hub it is alloy and the sprocket would ware it through very quickly ...so to get over this I made a spacer to fit over the hub and it has a shoulder for for the sprocket to sit on..Had to bore the sprocket out to suit.... this is all held inplace with a large c circlip and the sprocket bolts has inserts in the hub to hold the sprocket in place....I will have to replace this sprocket and I'm only using for the setup.....DD
Have made a spacer where the hub has been machined off to make up the distance where the chain sprocket sits on the hub ... where I have reduced the width of the hub it is alloy and the sprocket would ware it through very quickly ...so to get over this I made a spacer to fit over the hub and it has a shoulder for for the sprocket to sit on..Had to bore the sprocket out to suit.... this is all held inplace with a large c circlip and the sprocket bolts has inserts in the hub to hold the sprocket in place....I will have to replace this sprocket and I'm only using for the setup.....DD
Attachments

Last edited:
DareDevil
Member
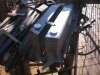
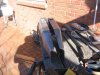
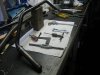
Hi.. Have done some work on the left tank.....Have welded the outside shape and drilled the filler cap hole.. ed in the internal spacers...squared the back edge of the tank....as explained before ..this tank will be used to hide the electrics....made several other parts for the handlebar twist grips...these are the small levers to be welded onto the twist tubes ... stops for the twist grips to position the the handlbars....there are a lot of small parts to be made...DD
ed in the internal spacers...squared the back edge of the tank....as explained before ..this tank will be used to hide the electrics....made several other parts for the handlebar twist grips...these are the small levers to be welded onto the twist tubes ... stops for the twist grips to position the the handlbars....there are a lot of small parts to be made...DDAttachments

DareDevil
Member
Hi Harry....Hi.. Crazy Horse.....Have been trying to find some one local with a 1-1/10" drill...with no luck....so I have drilled it 1-1/8" and used the indexable boring bar to machine it out to size...just a nice press fit...wont weld it up till I have cut the fork tubes and bent them to shape...have drawn up a full size drawing for the fork radius for when I bend the tubes..... finished up with a 3-1/2" trail.....getting near to tacking it all together and see what it looks like sitting on the ground?.......DD
Attachments

truckd
Well-Known Member
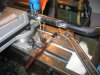
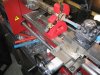
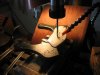
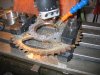
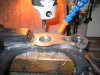
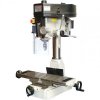
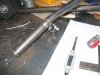
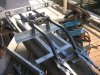
That little blue thingy provides a cutting and cooling solution to help the cutting bit stay cool,sharp and give a clean cut, back in the old days a light weight oil and water was used creating a white solution comming out of the tube, my Dad was a class AA machinest for the Movie industry and I spent some time with him in machine shops when I was a kid, but am sure a lot of stuff has changed since then.
JohnThomas Sorrels
New Member
I know this is going to make me sound dumb, but what is that machine you are using in the photos with the blue thing and the liquid?
Everything is looking good dd, how do you plan on bending the fork legs?
I could be wrong but that looks like a vertical mill to me.
DareDevil
Member
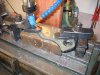
Hi Lurker..truckd...JTS....Its a mill drill...I've had it about 40 years and they are still available to day ..it is 16 speed has a X-Y Table 2-1/2 foot long and 10 inch's wide....has an adjustable up and down head about 15"...a #3 Morse taper in the head..with locking a rod for the taper head tool holders.... has a locking device so the head can be used as a mill and screwed down in thous of an inch increments or unlock it and use a arm to drill with.....The blue thing with fluid coming out it is water soluble oil ..it keeps the tool cool.. hopefully sharp and stops the tool from jambing..the fluid pump is an extra..really cant do without it if you are milling anything....very versatile machine and heavy duty....if you look on Ebay they are there under several different brand names but would all come out of the same factory..the HT32 is the size of my machine there is a smaller one which is #HT25 its 12 speed ...they are cheap these days around $1500...I paid that 40 years ago...as I said very versatile....it weights about 1200 lbs..DD
Attachments
Last edited:
DareDevil
Member
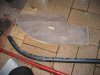
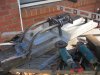
Hi Lurker....I cut a wooden profile to bend the curve....cut the pipe over length as I can trim it off at the top....the pipe is about 1"...the profiles worked out good......DD
Attachments

harry76
Well-Known Member
There are some seriously nice builds going right now, this is one of um!
-Kirk
Yeah i agree, DareDevil, John Thomas Searles and Lurker are spoiling us boardtrack fans with some seriously top notch builds right now.
Its a pity you guys dont live a lot closer to each other or maybe you guys could revive some boardtrack racing, bikes all handbuilt by the owners. And while on the subject of handbuilt bikes how could we forget our new member Rebuilder and his Flying Merkel.
DareDevil
Member
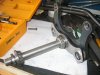
Hi....Wet and cold here today....have done a little with the handle bar twist grip lever controls..made up the sleeve arms ..cut a couple of retainer sleeves...drilled and taped the sleeve arms for the threaded swivel pivots...I have some 5mm rod to make the pull rods...these need to be threaded to suit the swivel joints...I will just over length these and cut to size when fitted up...to stop the twist grips falling off ..I will mill a slot in them and use a set screw into the handle bar to retain them in place..still have a few more parts to complete this lever setup...had a look at some small clevis pivots to do this job..but they were expensive and didn't have the amount rotation the ball pivots have...The lower end of the handle bars will tilt forward more than they are sitting on the bench.....DD
Attachments

Last edited:
DareDevil
Member
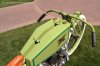
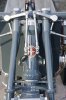
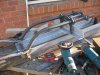
Hi... Have set up the front forks on a temporary jig that I will weld up when I get it in the right position to hold every thing in place to braze the forks together...I need to set the full bike frame up in the jig and do all the final measurments... make sure the trail is correct on the steering....
Was going to use second hand chrome 21" wheels I brought ...these have steel rims...I've ordered new 21' Alloy rims and new spokes....the alloy rims will scuff up better and be easy to paint....once I get the forks tack welded with a wheel sitting it I will be able to get the leaf spring made up...The spring will be 2-1/4" wide and have 3 leaves and the pivot point where the buggy spring returns is about 9" from the front of the fork....would make the spring myself out of a second hand spring....BUT when you heat them and bend it they crack and you cant see it..there is a special process for springs and I'm leaving this part for the specialist....last thing I would want is for it to break scooting along at 100 KPH or more....DD
Was going to use second hand chrome 21" wheels I brought ...these have steel rims...I've ordered new 21' Alloy rims and new spokes....the alloy rims will scuff up better and be easy to paint....once I get the forks tack welded with a wheel sitting it I will be able to get the leaf spring made up...The spring will be 2-1/4" wide and have 3 leaves and the pivot point where the buggy spring returns is about 9" from the front of the fork....would make the spring myself out of a second hand spring....BUT when you heat them and bend it they crack and you cant see it..there is a special process for springs and I'm leaving this part for the specialist....last thing I would want is for it to break scooting along at 100 KPH or more....DD
Attachments
DareDevil
Member
Hi ....Have cut the grooves in the handle bars for the mounting points on the steering head...this all needs to be done at the same time as the forks, so every thing bolts together..before I braze it....I will cut the grooves for the lever mount tubes as well.......DD