Excelsior V Twin build

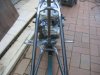
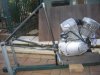
Hi ..stocksucks...They will be set same as the original ..leaf spring..I going to have this made ...as spring making is a art in it's self...heating springs and welding them is not wise as they crack when they cool...you can't see the cracks and will break at any time....there are several heat process for springs and I would rather leave it to the pro's on a motor cycle....
 

Attachments

  • excelsior_motorcycle_1919 1aa.jpg
    excelsior_motorcycle_1919 1aa.jpg
    118.5 KB · Views: 408
  • DSC01479-1.jpg
    DSC01479-1.jpg
    53.3 KB · Views: 397
Yep.. you right.. and at the kind of speed you can go you don't wanna screwup..
I'm lookin forward for your updates.
Keep it up.
 
Hi .... Had some time to work on the Excelsior today....set the rear frame triangle up in a simple jig and tack welded the lower fork arms.. have to make the double sleeve for the top pipes that fits in the seat tube....have to work out how to attach the seat....from some of the photos I've seen it has a nut sleeve welded just under where the top rear forks meets the top tube..a brace looks like it supports the rear of the saddle..still have made a decision whether I going to make a saddle or buy one.......dragged the motor out and set it in front of the rear frame...need to do the top tubes to work out the height it will fit in the frame...I can then make some rear engine mounts and see how far forward I can set the motor in the frame....made a little jig and set up the steering head angle and tacked the frame tubes in place....
 

Attachments

  • m_IMG_3161.JPG
    m_IMG_3161.JPG
    37.2 KB · Views: 394
  • m_IMG_3162.JPG
    m_IMG_3162.JPG
    45.6 KB · Views: 484
  • m_IMG_3163.JPG
    m_IMG_3163.JPG
    38.9 KB · Views: 417
  • m_IMG_3164.JPG
    m_IMG_3164.JPG
    40.5 KB · Views: 411
Last edited:
Hi ....stocksucks... silverbear ...theres a long way to go ......Has any body made their own saddle....what did you use for the base..where did you get the shape of the seat from....any body !!!!
 
Wow! dd your build is really coming along. I have been on vacation for the past week and I have missed a lot. I must say your fabrication skills are top notch. That Yamaha engine looks right at home. What hubs do you plan to use?
 
Hi Lurker...I'm using Honda XL 175 front and XL 125 rear hubs mounted on 21" rims....looking at new rims and spokes..but theres is no hurry for them as they already have 21" rims...I was wondering what your rear fork opening finished up at...mine is 7 7/8"....The Yamaha is going to have the plastic smooth cam dress up covers removed and I will black out the cylinders....the heads have inspection screw in plugs and are OHC so they look a bit old skool....What have you done for a seat ..I need a few dimentions...thinking of making my own...
 

Attachments

  • m_IMG_3165.JPG
    m_IMG_3165.JPG
    59.3 KB · Views: 296
Sounds good dd. I used a brass wire wheel on my angel grinder to polish my engine, you might consider that. It was quick and easy but looks really good. My rear end is 6 7/8" if I remember correctly. I used a Sach moped rear hub which in hindsight might not have been a good idea, I don't know if it will be able to handle the power of the v-twin. Oh well only time will tell.
 
Nice project!

It's a shame gubment regs get in the way of creative people.

..anyhow, if equipped with electric start, I would take full advantage of that feature!

Best
rc
 
Hi Lurker....Thanks for the measurement and the tip with the brass brush...I think when building something like this does need some lateral thinking...its capable of speed .... it needs to be safely constructed...it needs brakes ..as it will not be raced on a board track....
I would like to build just with plain hubs but its not practiable..so it comes down to using motorcycle parts for safety and reliability in the hub and brake department...looking at the another build of a Cyclone with a Briggs V motor ..he was using a Workman's hub and the Briggs stripped the sprocket of the hub first time out...carefull consideration needs to apply in the engineering of the drive train.....have you finished painting yet??
 
Hi culvercityclassic....Thanks for the link....looks excellent...what are the measurements...lenght- width...and the approx radius around the back...I can work of your photos from there.....DD
 
Hi rustycase......Bureaucracy really sucks....the fun police and do good-ers are always there to make our lives a misery..but some times they are looking the other way and we get to have some fun...I have the electric starter for it....I will just wait and see if I can set up the pedals as the way to do a start...this bike has twin tanks ..so it would allow me to conceal the CDI battery and any other electrics in it ..the tank would have a hinged bottom....DD
 
Hi... Have cut the rear engine mounts in ply to to get the engine position correct..I will play with a bit more later have a few chors to do cut the grass and prune the roses....once I think its sitting OK I will profie out of 3mm plate....
 

Attachments

  • m_IMG_3166.JPG
    m_IMG_3166.JPG
    30.7 KB · Views: 273
  • m_IMG_3167.JPG
    m_IMG_3167.JPG
    46.3 KB · Views: 290
Hi .... I didn't get back to it today...I have put the bolts through the plywood mounts...plenty of clearance .. simple mounting..easy to mount up...just have to check chain clearance on frame....DD
 

Attachments

  • m_IMG_3169.JPG
    m_IMG_3169.JPG
    54.7 KB · Views: 365
  • m_IMG_3170.JPG
    m_IMG_3170.JPG
    53.1 KB · Views: 308
Hi ...Have moved along a bit more...have cut the temporary engine mounts for the jig and got the engine sitting in place....I think...I feel it has to go back another 1 1/2" and off set the engine sideways 3/4" to get chain alignment with the rear sproket...I dont really want to build a jackshaft setup to realign the rear sprocket an inch.....once its all set up maybe I wont have move anything...I need to fit the rear hub in the frame and put a chain on to check the alignments....
Have cut the forward frame pipes ...bent the top one in the pipe bender and set it up with a few clamps to hold it in place before I do a final cut of the lenghts...all the measurements are working out very close to the Excelsior photo I sectioned for measurements....DD
 

Attachments

  • m_IMG_3171.JPG
    m_IMG_3171.JPG
    46.1 KB · Views: 448
Holy cow D.D., I hope the previous owner used some of the money he saved on chains and sprockets to keep the engine oil changed!
 
DD, looking good! If i may inject my $.02 worth that straight front down tube just doesnt look right it needs a little more distanace between bar and head and a slight curve or to wouldnt hurt the looks either. Other than that I give it 2 thumbs up it oughta be a BEAST
 
Back
Top