

You are using an out of date browser. It may not display this or other websites correctly.
You should upgrade or use an alternative browser.
You should upgrade or use an alternative browser.
Dogtown Mustang Project
- Thread starter Dogtown Burner
- Start date
Venice Motor Bikes
Custom Builder / Dealer/Los Angeles
You need to make sure that sprocket spins a perfectly straight as possible or you'll have lots of problems with the chain!
Dogtown Burner
New Member
Thanks. Will do!
Dogtown Burner
New Member
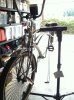
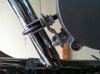
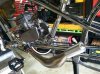
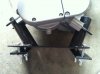
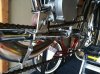
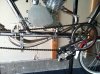
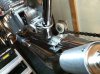
well, it's been a few days experimentation between work. today i made a little headway. the front motor mount may be temporary, but its super tight and solid. Also- so hard to remove the rubber from the engine mounts- but I did some reading. The expansion chamber header pipes seem awful long straight outta the kit, but I dont wanna go chopping them down and lose potential low end torque before I run it. i'm 6''3" 200 lbs and may need the low end power for acceleration. also- didnt find out about sprocket orientation until the wheel went in. OOPS! gotta re do it. damn that was a *****. not looking forward to THAT again. anyway, here's today's shots
Attachments
Dogtown Burner
New Member
and here are a few earlier mockups that didn't make it. notice the black one-piece mount. the thing is ALMOST worth the try. unfortunately the pipe was about 8 degrees steep. The manufacturer responded with "you make the rubber shim for go there. not possible make perfect angle engine". Soooo...according to VMB and red666's posts, the fit was off too much for the correct strong solid fit. I sent it back as there wasn't enough length to torch and bend. i used SBP front mounts for both sides of the engine. ( took some spacers and a rubber hammer but strangely enough the front is solid). The early mock up is a hilarious no-no in basic physics! haha. just needed to make something to stabilize the engine real quick while mounting the rear to the seat pipe., but then I turned it around all "proper style" and BAM! kicked it up a notch. But VMB's front mounts look way beefier than my final front mount though, so I'll have to bring the bike over and have him take a pro's look;.also gonna buy some brakes from him. Another thing-- i'm still stuck on the exhaust conundrum. I really wanna shorten the **** out of that thing, but again, I like torque. especially from a 66cc engine. And I of course want to find the high rpm powerband sweetspot as well. if anyone has found a balance with the RAW 66 and stock Carb, any thoughts from experience would be greatly appreciated!
Attachments
Last edited:
Dogtown Burner
New Member
You need to make sure that sprocket spins a perfectly straight as possible or you'll have lots of problems with the chain!
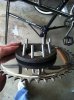
realized today when i put the wheel on that I had the sprocket on backwards. no chain/frame clearance. Stoked...:-/
Dogtown Burner
New Member
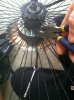
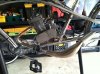
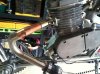
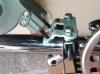
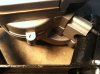
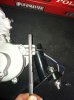
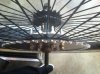
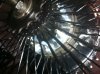
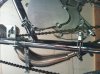
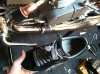
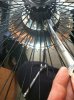
here are randoms i missed. getting to be a habit... the straw on the engine mount is a visaul guide to the bad angle, since the black tube was shadowed. also notice that the tube is STILL bigger than the engine spacer bracket diameter. and Ah the wheel... just LOOK at ALL THOSE bolts through (just a couple) spokes that this antsy bonehead has to completely re-do. and of course; the day one mock up...
Attachments
Venice Motor Bikes
Custom Builder / Dealer/Los Angeles
I would get rid of the rear 'U' bolt mount & bolt the engine to the frame with the stock mount.
wayne z
Active Member
it's not very hard to drill and bolt the stock sprocket to a Micargi hub. you will need to add a machine washer spacer(1.375 id, 1.75 od I think) from hdw store, under the sprocket to keep it clear of the spoke ends at the hub. bolt it on with four 6mm chamfered head screws and locknuts, after chamfering the drilled sprocket holes. I've done this to several builds, no need to buy Pirate's custom sprocket for a good mounting.
If you flip the sprocket, you may have chain/tire clearance issues.
If you flip the sprocket, you may have chain/tire clearance issues.
Last edited:
Dogtown Burner
New Member
it's not very hard to drill and bolt the stock sprocket to a Micargi hub. you will need to add a machine washer spacer(1.375 id, 1.75 od I think) from hdw store, under the sprocket to keep it clear of the spoke ends at the hub. bolt it on with four 6mm chamfered head screws and locknuts, after chamfering the drilled sprocket holes. I've done this to several builds, no need to buy Pirate's custom sprocket for a good mounting.
If you flip the sprocket, you may have chain/tire clearance issues.
at this point i think i put the sprocket on flipped to begin with. looks like the chain is gonna rub the frame if i dont flip it back... look at my posted picters and let me know. I have the conCAVE side out.
thats a tremendous idea about drilling new, wider diameter sprocket holes. WHT DIDN'T I THINK OF THAT?!
wayne z
Active Member
at this point i think i put the sprocket on flipped to begin with. looks like the chain is gonna rub the frame if i dont flip it back... look at my posted picters and let me know. I have the conCAVE side out.
thats a tremendous idea about drilling new, wider diameter sprocket holes. WHT DIDN'T I THINK OF THAT?!
No, I didn't mean a wider bolt pattern, I meant smaller bolt battern with 4 bolts to the hub.
There's already two pilot holes in the hub to get started. And you can buy a machine washer at Ace ect that will fill the space between the spoke ends and the hub, to keep the sprocket off the spoke ends.
It takes very carelul measurement and centerpunching to get the 6mm holes to land in the narrow washer and narrow space between the spoke ends and
the hub.
Best to drill the sprocket first, but don't chamfer the holes yet. then carefully clamp it and the washer in place, centered on the hub to use as a drill guide. I think I used paper card shims in the sprocket hole, to center the sprocket snugly on the hub.
It's a good idea to drill the holes undersize first,same size as the pilot holes is good.
First drill thru the sprocket holes that are perpindicular to the original pilot holes and secure assy with 2 bolts, then drill the other two thru the pilot holes. Put centerpunch marks on the sprocket and hub, so it can be placed back in the same positon when it's re-installed after chamfering the sprocket holes and de-burring all holes.
Well, I do cheat a little, I bought a custom sprocket that fits from Pirate's, and after looking at it, I saw that it was easy to do the same with the stock sprocket and a washer. So I saved Pirate's sprocket to use as a patternFor the next few builds I did with 68 spoke wheels.
Can you use a chain idler to keep the chain off the frame?
Hope this helps somebody
Last edited:
Dogtown Burner
New Member
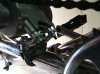
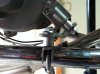
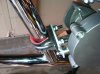
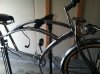
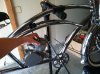
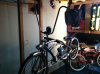
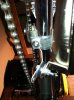
Well, today a few big steps were accomplished: flipped the sprocket to be convex IN for chain clearance; used the kits' chain tension wheel as a stock chain railer to keep it away from the case, (later to incorporate it into a pipe hanger bracket). Was sctrathin my head for a while, then made a two-for-one mount. pretty cool. then spent a few hours fudging with pipe clearance, planning for space to allow for the engine's chain, size 13 pumas, and the front engine mount. I don't want to lose low end torque by shortening the headpipe assembly from the expansion chamber kit. but it looks better shorter (I'm used to motocross bikes :-/ ) Also VMB suggested shorter. According to the online instructions from SBP - fire up the engine with the stock pipe, dial in the Carb. (most likely dropping the needle jet to lean it out from stock) and THEN put on the expansion chamber kit, making it shorter a 1/4 inch at a time until peak perf is aquired. Still got a lotta work and $ to dump into it, but it's fun to have a project to obsess on. So as it sits in "almost there' stage, I realize i am fortunate to live on the same block as a welding shop, plumbing supply, auto parts store, and a mercedes mechanic shop with hydraulic tubing benders. bonus!! Anyway, here are todays photos. see initial exhaust setup and thin holy-hanger.
Attachments

Dogtown Burner
New Member
here are some more shots after I realized the pipe could be shortened and tucked up under the frame better. the supplied urethane tubing to join the expansion ch. now aligns perfectly with the engine mount, so it will act like a bumper until it rubs through and needs replacing. I will have the whole thing welded up asap and ditch all the urethane sleeves from the kit anyway. The new chain guide mod for the stock kit is too cool. the motor kit should come with two of them!! lol. ( but I guess not EVERYONE has a stretch.) so now i realize. oh S***, I need an idler pulley. anyone got one left over from a kit?
Attachments
Dogtown Burner
New Member
and for the beginner, here's a step by step of how I first did the rear sprocket.
Step one. Mounting the driven sprocket:
I have a Micargi mustang GTS, and it came with 68 spoke wheels. very challenging to mount the sprocket.
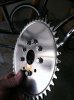
The sprocket mounts with the recessed dull-finish side facing inwards as follows:
1.) Reomve the rear wheel from the bike
2.) remove the coaster brake arm and axle, loosening the pedaled right-sprocket side and sliding it out of the hub. keep it all together.
3.) cut one of the rubber mounting donuts and slip it between the forks and then spread and put on the hub. shiny side inward.
4.) put all the bolts with washers through the sprocket, (from out side) and then massage into the other rubber donut (not cut) onto the bolts, making a one-piece aseembly.
5.) now do your best to get the bolts to push between the spokes so that the sprocket&donut pad line-up and are centered on the axle, banging gently with a big rubber Mallett. dont put them all the way through, as the angle of the bolts ging thru the spokes gets more exaggerated the deeper into the wheel they go. making it harder for the next step.
6.) reaching your fingers through the spokes, massage the inner cut donut onto the bolts. lots of wiggling will be needed (expect a good half hour)
use a phillips to pull and stretch over the bolts, and a big flat head helps push the rubber donut down over the holes.
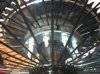
with the bolts as straight as they will get, its time for the crescent shaped silver plates.. BTW The engine torque will be delivered to the wheel via the bolts wedged against the spokes as well as the clamping of the sprocket to the spokes, so this is an important (and difficult) step if you have fancy, multi spoked wheels.
so now that your trying to finagle the plate on, making sure that the middle of the plate bridges the gap of the cut part of the donut, its time to realize you shoulda bought grade 8 bolts and nuts for this step. lol
hold the wheel in your lap vertically with the sprocket side left, so you see the bolts popping through. I used teflon thread sealant paste in the nuts, so when I put them in the box wrench they kinda stayed in the wrench and didnt fall to the floor on this tricky step. a happy accident. by using a 1/4" drive socket wrench extender in the same hand as the wrench like chopstix I was able to hold pressure on the nut and get it to thread. So now tighten by about 2 threads, then move to next bot/nut assembly until theyre all on a few threads (this is easier if you haven't pushed the bolts ALL the way through the wheel assembly yet.)
now get wiggling. repeat until all are through and threaded,, and tighten in alternating pattern like a drum procedure. (do not over tighten as the cheap ass hardware will strip easier than an alabama trailer park queen.)
when starting to push the bolts through the plates, its easiest to start on a bolt at one end, then grab the other end and work inward. a phillips screwdriver is good for aligning the holes. and a big flat head helps push the rubber donut down
I found that on the last 2 bolt holes it was necessary to cut the spokes between them for clearance by simply drilling through the aligned holes. Maybe not a great idea, but I was frustrated, and figured that 66 spokes would probably hold me…
remember that this is a 3 hour deal, take your time, have patience, and try to enjoy the trip…its a very difficult step.
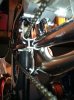
these pictures show the INCORRECT sprocket side. this was when I did it reversed. the reason its important is chain clearance on your frame. also note the wrench photo- i mentioned the chopstix method earlier. so use the socket extender to sit into/atop the nut laying on the wrench and apply pressure as you twist from underneath on the bolt. its also a chinese kit, so you'll feel right at home. haha. good luck
Step one. Mounting the driven sprocket:
I have a Micargi mustang GTS, and it came with 68 spoke wheels. very challenging to mount the sprocket.
The sprocket mounts with the recessed dull-finish side facing inwards as follows:
1.) Reomve the rear wheel from the bike
2.) remove the coaster brake arm and axle, loosening the pedaled right-sprocket side and sliding it out of the hub. keep it all together.
3.) cut one of the rubber mounting donuts and slip it between the forks and then spread and put on the hub. shiny side inward.
4.) put all the bolts with washers through the sprocket, (from out side) and then massage into the other rubber donut (not cut) onto the bolts, making a one-piece aseembly.
5.) now do your best to get the bolts to push between the spokes so that the sprocket&donut pad line-up and are centered on the axle, banging gently with a big rubber Mallett. dont put them all the way through, as the angle of the bolts ging thru the spokes gets more exaggerated the deeper into the wheel they go. making it harder for the next step.
6.) reaching your fingers through the spokes, massage the inner cut donut onto the bolts. lots of wiggling will be needed (expect a good half hour)
use a phillips to pull and stretch over the bolts, and a big flat head helps push the rubber donut down over the holes.
with the bolts as straight as they will get, its time for the crescent shaped silver plates.. BTW The engine torque will be delivered to the wheel via the bolts wedged against the spokes as well as the clamping of the sprocket to the spokes, so this is an important (and difficult) step if you have fancy, multi spoked wheels.
so now that your trying to finagle the plate on, making sure that the middle of the plate bridges the gap of the cut part of the donut, its time to realize you shoulda bought grade 8 bolts and nuts for this step. lol
hold the wheel in your lap vertically with the sprocket side left, so you see the bolts popping through. I used teflon thread sealant paste in the nuts, so when I put them in the box wrench they kinda stayed in the wrench and didnt fall to the floor on this tricky step. a happy accident. by using a 1/4" drive socket wrench extender in the same hand as the wrench like chopstix I was able to hold pressure on the nut and get it to thread. So now tighten by about 2 threads, then move to next bot/nut assembly until theyre all on a few threads (this is easier if you haven't pushed the bolts ALL the way through the wheel assembly yet.)
now get wiggling. repeat until all are through and threaded,, and tighten in alternating pattern like a drum procedure. (do not over tighten as the cheap ass hardware will strip easier than an alabama trailer park queen.)
when starting to push the bolts through the plates, its easiest to start on a bolt at one end, then grab the other end and work inward. a phillips screwdriver is good for aligning the holes. and a big flat head helps push the rubber donut down
I found that on the last 2 bolt holes it was necessary to cut the spokes between them for clearance by simply drilling through the aligned holes. Maybe not a great idea, but I was frustrated, and figured that 66 spokes would probably hold me…
remember that this is a 3 hour deal, take your time, have patience, and try to enjoy the trip…its a very difficult step.
these pictures show the INCORRECT sprocket side. this was when I did it reversed. the reason its important is chain clearance on your frame. also note the wrench photo- i mentioned the chopstix method earlier. so use the socket extender to sit into/atop the nut laying on the wrench and apply pressure as you twist from underneath on the bolt. its also a chinese kit, so you'll feel right at home. haha. good luck
Attachments
Dogtown Burner
New Member
here are randoms i missed. getting to be a habit... the straw on the engine mount is a visaul guide to the bad angle, since the black tube was shadowed. also notice that the tube is STILL bigger than the engine spacer bracket diameter. and Ah the wheel... just LOOK at ALL THOSE bolts through (just a couple) spokes that this antsy bonehead has to completely re-do. and of course; the day one mock up...
turns out I was right in the beginning. anyhow, gonna buy alloy 36 spoke wheels and a driven rear sprocket from VMB. also the front disc brake kit for the springer.
Dogtown Burner
New Member
waiting on custom in-frame tank from my friends fab shop now, so no real progress this week.
Cant wait to get rollin!
Cant wait to get rollin!

")
Dogtown Burner
New Member
Ok. just got some great feedback regarding expansion chambers and pipe lengths, etc...
9 to 11 inches is a good balance between good low-end torque and top-end HP. Don't include the header in your measurement. You should measure from the end of the header and 1/4'' before the chamber starts. thanks!!
9 to 11 inches is a good balance between good low-end torque and top-end HP. Don't include the header in your measurement. You should measure from the end of the header and 1/4'' before the chamber starts. thanks!!
Dogtown Burner
New Member
it is never easy doing a stretch
your project is looking good so far tho
I am glad to see you upgraded the wheel (stock bearings are crap)
thanks AZBill
Dogtown Burner
New Member
this was a rookie post and no longer relevant
Last edited: