Dave's Tech Service-PA

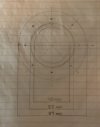
Finally stumbled onto a bracket with dimensions! 98.7 is about 3.877, the measurement for same adaptor was about 80mm is about 3.149! So, I sent text to the vendor, what size is it? I doubt they even know, just a part in a warehouse with generic diagrams.
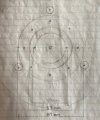
Again, “presumed” all 3-hole adaptor are the same!
13.7mm is a huge difference!
IMG_1097.jpeg
IMG_1096.jpeg
 
Last edited:
I have to say, I’m a bit disappointed that no one can chime in on vendors and product information?
Isn’t this what this forum is all about?
 
I have to say, I’m a bit disappointed that no one can chime in on vendors and product information?
Isn’t this what this forum is all about?
From the several who've used them. They said they had to drill a hole in them so that they could be pinned. This prevents them from slipping.
 
From the several who've used them. They said they had to drill a hole in them so that they could be pinned. This prevents them from slipping.
The 2-speed hub wouldn’t function if the adapter were pinned. Even so, can’t find an adequate adapter to fit well enough to pin! lol
Seems every turn there’s a component issue. Engineering comes into play.
I kinda hoping more parts would be readerly available
Thanks
 
The 2-speed hub wouldn’t function if the adapter were pinned. Even so, can’t find an adequate adapter to fit well enough to pin! lol
Seems every turn there’s a component issue. Engineering comes into play.
I kinda hoping more parts would be readerly available
Thanks
I personally like using a 3 speed internal geared hub that has a disc rotor mount to mount the sprocket. Then you can use rim brakes for the rear wheel
 
I personally like using a 3-speed internal geared hub that has a disc rotor mount to mount the sprocket. Then you can use rim brakes for the rear wheels
(Hub diameter is 40mm/1.68 so a 1.5 adapter would need machined) Or bolt the sprocket to the left flange of the hub, or even both Just get sprocket 40mm ID
The drill site for 6-bolts is .2200 diameter
The one sprocket comes 57mm ID and the 3 countersunk holes for the (adapter/adaptor)?
 

Attachments

  • 475477037_122211539642019221_5941448391586595084_n.jpg
    475477037_122211539642019221_5941448391586595084_n.jpg
    39.7 KB · Views: 46
  • 475464842_122211539660019221_1085337460668902196_n.jpg
    475464842_122211539660019221_1085337460668902196_n.jpg
    40.7 KB · Views: 48
  • IMG_1113.jpeg
    IMG_1113.jpeg
    182.5 KB · Views: 41
Last edited:
(I came up with 8 bolts)
77mm-diameter bolt pattern
40mm-hub id
57mm-sprocket bore
89mm-hub flange diameter

May need a slight rotation on the 3-hole positioning, or reduce bolt holes to -7
 

Attachments

  • IMG_1115.jpeg
    IMG_1115.jpeg
    96.7 KB · Views: 46
  • IMG_1118.jpeg
    IMG_1118.jpeg
    201.9 KB · Views: 42
Last edited:
Finally prepared the rear brake boss for weld, measured three times with two different 26” wheels for reference
 

Attachments

  • IMG_1152.jpeg
    IMG_1152.jpeg
    194.6 KB · Views: 45
  • IMG_1153.jpeg
    IMG_1153.jpeg
    218.2 KB · Views: 50
Tig
Very close tolerance for cantilever, v-brakes will not fit this position at all
 

Attachments

  • IMG_1157.jpeg
    IMG_1157.jpeg
    182.4 KB · Views: 44
  • IMG_1158.jpeg
    IMG_1158.jpeg
    236.1 KB · Views: 43
Decided to changeover to the single speed coaster brake S 7 wheel.
(Opened up the 1.5-1.69)
This allows a good 6/1000th of material running 52T-415 chain sprocket
Loosely fit here, looks to be just about right!
IMG_1200.jpeg
IMG_1199.jpeg
IMG_1201.jpeg
 
The machining process was simple enough keeping things square & true.
(Helps having a friend with a lathe)
IMG_1217.jpeg


Additional support via a set bolt is next
IMG_1213.jpeg
The shims make the difference in getting a square three-point fit and true .6-th gap
IMG_1214.jpeg
 
Last edited:
The “Mock-up”
IMG_1271.jpeg

Centered there’s plenty of clearance for the wide pedal crank
IMG_1270.jpeg

The front profile looks awesome!
IMG_1273.jpeg

The sprocket alignment off the “Death Row” CVT is dead on
IMG_1275.jpeg

Not liking this “bolt in” motor mount!
Going to fabricate a 1/4” steel plate and Tig
IMG_1272.jpeg

Looking down its intimidating Ducar 212cc!
IMG_1274.jpeg
 
Last edited:
The mark up for rear fender & fuel tank/rack
IMG_1315.jpeg

The rear view with shut-off
IMG_1316.jpeg

The fender cut away keep that pesky chain from chewing on it!
IMG_1319.jpeg

The chain route to the CVT
IMG_1320.jpeg

Top view fuel tank/rack
IMG_1318.jpeg

This is loose “adjustment phase”, may need to come forward on the rack.
 
Roughed in the 1/4” steel plate, fits “good & tight”
IMG_1339.jpeg

Notice the cut away for the chain
IMG_1340.jpeg

The adjustable mount makes alignment a breeze
IMG_1334.jpeg

Repurposed the old medium fenders
IMG_1341.jpeg

Then double check clearance, literally almost non-existent!
IMG_1338.jpeg
 
Back
Top