Back from the dead

GoldenMotor.com

wrenching4fun

Active Member
Jun 6, 2016
98
105
33
North Carolina
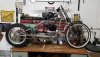
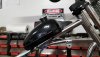
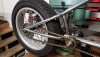
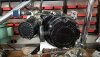
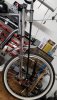
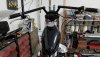
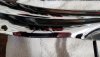
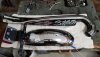
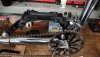
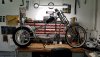
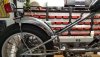
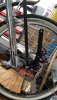
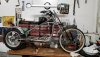
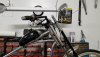
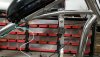
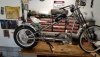
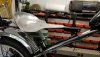
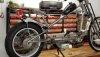
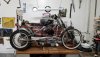
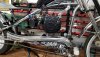
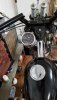
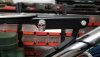
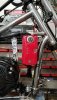
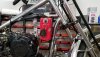
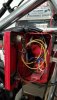
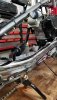
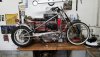
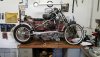
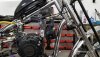
Okay, bicycle motorheads. I've been out of the game since Hurricane Florence destroyed all of my bikes, including my Harley. During the cleanup I disassembled the bikes and put everything on shelves thinking I'd give everything away or trash it. The Harley was totaled so they showed up and hauled it away. Meanwhile, I Laid low, then got into building archery bows and other stuff, eventually buying two electric bikes that are reliable and easy, but not the same. Last month the bug crept back and bit me in the butt so I started taking everything down and laying it out. I had multiple engines but only one frame since I had to throw two out, keeping most salvageable components. Wheel bearings were toast from the salt water as were brake calipers, aluminum rims and connectors. As the photos show, the stainless Stiletto frame held up real well and with a ton of elbow grease and a bottle of metal polish it came back to life. I went to work replacing bearings, gears, and chains, then repainted parts that had rusted. I started getting exited when parts from three projects started coming together like Frankenstein. I decided to improve on everything I had done before, so this one will have all LED lighting driven by a rectified stator I fabricated for the Predator engine. The front wheel is a 26er, double walled Mavic, with a 203mm disc and bicycle speedo drive. The rear wheel is a welded Orange County Chopper rim with .12 gauge SS spokes and a motorcycle tire. It, too, is sporting a 203 disc. Both have Avid mechanical calipers that are simple to maintain and will stop a bike on a dime. The Predator spins a Hilliard centrifugal clutch installed backward for better sprocket alignment. I'm using a set of BMX bars locked on the Stiletto triple tree and a Whizzer heavy duty stand to handle the weight. When my local shop finds replacement bearings for my Shimano Nexus hub I'll probably swap out the fixie OCC rear wheel for the 3 speed. I used the Shimano on my other bike and it worked like a charm. It is geared at 75% in first for a quick start and third it 125% you get a little more top end. I fabricated the exhaust for the Predator today and can't wait to hear how it sounds. My Sachs 3-speed motorbike tops out at 40 and I'm thinking this one will do better with the Predator. Will follow up as the build progresses.
 

Attachments

wrenching4fun

Active Member
Jun 6, 2016
98
105
33
North Carolina
Didn't have much time today, but made a little progress. Got the original BMX bars that came with the Stiletto painted and installed. I'm using a left brake lever with built-in switch for the brake light. The bike is heavy, so I'm using scooter brake cables instead of bicycle ones. The kit type twist grip works well with the throttle lever on the Predator. Can't decide if I want to keep the choke manual or hook to a cable for ease of use. Pulled the chain guard and rear fender from the parts bin and polished them up with Turtle Wax chrome polish. I'm surprised at how well they came out. The chain guard will need some surgery because I put two locking nuts on the jackshaft for safety and they extend into the guard. Tomorrow my rotary tool and cutting disc will get a workout to make a small recess for the end of the jackshaft (see the magic marker outline in the photo). I like the contrast between the chrome and black, so I'm going to stick with it. Snapped a close up of the motor mount for those of you who are wondering how the Predator will attach. I attached two braces to the original engine mounting plate, then attached the braces to the frame using chrome steel clamps (1 inch diameter, I think) I bought on Ebay. They are expensive, but they are rock solid and go into place with one bolt. To minimized vibration, I will attach a rigid aluminum brace from the top of the engine to the top tube on the frame. The proximity of the brace to the stator wires make it a perfect mounting point for the rectifier. I will show all of this in my next post. Finally, not sure about the peanut tank so I might invest in restoring the HD Sprint tank I used before the storm. It's starting to rust inside so I'll need to clean and cream before I can use it. That's one benefit of 2-strokes and premix fuel, your tanks last longer. Any tips on restoring a rusty tank?
 

Attachments

wrenching4fun

Active Member
Jun 6, 2016
98
105
33
North Carolina
Thanks, Tyler. I'm trying to upgrade what I did originally. No use doing the same thing over. No progress today because I had to retrofit my smoker for ribs I promosed my wife tomorrow. Like the moped guys say, "if it ain't smokin, it's broken." My reward today was fried green tomatoes using an old Justin Wilson recipe (it's a southern thang).
 

wrenching4fun

Active Member
Jun 6, 2016
98
105
33
North Carolina
Was able to turn a wrench or two today between stoking the fire on my smoker and turning the ribs. I can feel my arteries clogging as I type, but man it was worth it! Converted a conventional tail light/brake light to LED and mounted on the rear fender which as you can see in the photo is now on the bike. One of my brake levers has a built-in switch, so it will power one of the LEDs for the brake light. The other LED will run straight from the DC side of the rectifier just like the headlight and horn. Took some steel off the seat bracket to save weight and painted it with all-weather Krylon. I threw in a close-up of the springer front end I copied from a Harley. It's fully extended since there's no weight on it. Normally, the front end will be 2 to 3 inches lower. (Building the front end was the hardest part so far).A quick tip for you builders----don't build a bike on your workbench if it's going to take more than a week because you will need the bench a hundred times and can't get to it. Plus, I have to get the sucker down at some point!
 

Attachments

wrenching4fun

Active Member
Jun 6, 2016
98
105
33
North Carolina
Did a little tinkering today. Got the brake cables installed, painted the seat frame between showers, and converted the vintage bullet headlight to an 1165 LED setup and bolted it on. Finally, I bolted the upper engine brace and rectifier in place. I'm trying to decide how to design a terminal for B+ so I can connect my DC accessories to one spot. I'm thinking about a small metal box to serve as a junction point and a mounting point for the ignition key. I have to admit I don't enjoy painting because I'm impatient by nature and don't like to wait for it to dry. Plus, I'm not very good at it because as soon as I get a piece looking decent, I whack it with a wrench or some other sharp object and screw it up. I was thinking about the custom exhaust while I was painting and decided I needed to add a self-threading screw on the muffler connecter so it doesn't back off from vibration. I remember flying down the street on my first suicide build when the muffler fell off and before I could get stopped ( poor clincher brakes) the exhaust burned a big black spot on my rear fender. A 66cc Chinagirl howls pretty good with no muffler! Tomorrow I'll install the hard pan seat and Whizzer speedo. I have a working chrome tachometer that matches the speedometer, but I'm not sure it belongs on a chopper style bike. I might wait until I get the parts to restore my 3 speed Shimano hub that I hope to install on this build, then install it and the tach down the road. Once I get the engine on, I can tie wiring together and bench-test everything before I see how she rides with all the upgrades and design improvements. Sorry for the poor photos. It's hard to make out details with all the clutter in my shop.
 

Attachments

wrenching4fun

Active Member
Jun 6, 2016
98
105
33
North Carolina
Had to work through my honey do list today so I wasn't able to spend a lot of time on the bike. I did get the seat installed. The pan is made from a skillet from my deceased father-in-laws Cajun & Creole restaurant. It looks rough, but it's surprisingly comfortable to sit on. Between the springer front end and the springer seat you get a pretty cushy ride. I used conventional porch swing springs on both the front end and the seat. They are cheap and seem to be sprung for just the right tension. The rest of the seat is made from junk I had in my parts bin or from parts I salvaged. The stem of the seat, for example is from a flat-screen TV mount. I wanted to install the speedometer today, but I couldn't find the small button light that plugs into the unit for backlighting. It's probably in one of my parts boxes on the shelves. I'm off to the hardware store tomorrow for a couple of locknuts for my jackshaft. I hope to get my electrical connection box installed to get the wiring tied up. The box is the battery compartment for an old ever ready flashlight and it will hold the rectifier and B+ terminal for my wiring. Things are coming along nicely, but this is a **** of a lot of work for a motorized bicycle.
 

Attachments

wrenching4fun

Active Member
Jun 6, 2016
98
105
33
North Carolina
Spent some time in the Skunk Works this afternoon. Got the Stiletto chain guard installed after cutting around the jackshaft with my Dremel tool. Fits perfectly, nothing drags. Threw the engine on after elongating the mounting holes to adjust the engine forward/backward for chain tension. I had a tensioner on it before, but that's just extra weight and friction. I also cut the jackshaft axle from 10" to 8" for a cleaner look. Bought new locknuts for jackshaft and springer front end since old ones were ruined by saltwater. Threw the Whizzer speedo on even though I couldn't locate the backlight for it. Will have to order one on Ebay before I connect all the wiring. Now that the chain guard is in place I need to make an adjustment to my custom exhaust, a little more bend to clear everything and dump the exhaust in the open. Put a little chrome Agent of Pain on the seat frame for effect.
 

Attachments

wrenching4fun

Active Member
Jun 6, 2016
98
105
33
North Carolina
Getting closer and closer on this rebuild. Today I installed a connection box for the electrical components. It's the dry cell box for a vintage Eveready flashlight that contains the key switch that's connected to electronic ignition for cut-off and security, the two outputs from the electric coil that goes to a two-phase bridge rectifier, and a fuse that connects the DC output on the rectifier to an insulated hot post. The LED headlight, tail light, horn, and brake light will all tie into the B+ hotpost. This wiring scheme took almost as much work as the rest of the bike, but it came out pretty well. The box is a salvage part from one of the bikes that was ruined in the storm and I think I'll keep it red for that reason. Also got my custom exhaust finished and installed. The drive chain from the engine to the jackshaft will straddle the manifold allowing the pipe to dump on the opposite side so it's inside the bike frame away from body parts. A little bitching is due here. Did you know Krylon Fusion paint melts in gasoline? My exhaust has a crinkle finish as a result. I guess that's okay since it will get hot and flake anyway. Second, I never realized how incompatible chains are with humans. I had a challenge getting the drive chain to work after it rusted up in several spots from the saltwater even though it is stainless steel. I'll need to finish the edges of the teeth on my sprockets in order for it to run smoothly. My last complaint is my tendency to drop things when I'm wearing latex gloves for protection. It's just darn hard to hang onto small things like nuts and washers when you can't feel through the gloves. I spend hours on my hands and knees groping under my workbench or my garden tractor looking for dropped parts! I guess that's part of the fun. Things are coming along. Check the pictures and let me know if you have any ideas for improvements.
 

Attachments

Nightster

Well-Known Member
Mar 3, 2021
735
1,738
93
61
Texas
Getting closer and closer on this rebuild. Today I installed a connection box for the electrical components. It's the dry cell box for a vintage Eveready flashlight that contains the key switch that's connected to electronic ignition for cut-off and security, the two outputs from the electric coil that goes to a two-phase bridge rectifier, and a fuse that connects the DC output on the rectifier to an insulated hot post. The LED headlight, tail light, horn, and brake light will all tie into the B+ hotpost. This wiring scheme took almost as much work as the rest of the bike, but it came out pretty well. The box is a salvage part from one of the bikes that was ruined in the storm and I think I'll keep it red for that reason. Also got my custom exhaust finished and installed. The drive chain from the engine to the jackshaft will straddle the manifold allowing the pipe to dump on the opposite side so it's inside the bike frame away from body parts. A little bitching is due here. Did you know Krylon Fusion paint melts in gasoline? My exhaust has a crinkle finish as a result. I guess that's okay since it will get hot and flake anyway. Second, I never realized how incompatible chains are with humans. I had a challenge getting the drive chain to work after it rusted up in several spots from the saltwater even though it is stainless steel. I'll need to finish the edges of the teeth on my sprockets in order for it to run smoothly. My last complaint is my tendency to drop things when I'm wearing latex gloves for protection. It's just darn hard to hang onto small things like nuts and washers when you can't feel through the gloves. I spend hours on my hands and knees groping under my workbench or my garden tractor looking for dropped parts! I guess that's part of the fun. Things are coming along. Check the pictures and let me know if you have any ideas for improvements.
I don’t really think looking for dropped parts as part of the fun, LOL

coming along nicely
 

wrenching4fun

Active Member
Jun 6, 2016
98
105
33
North Carolina
Nearly there! Got the tank on today with a vintage settlement bulb I had in my parts bin. Installed the high flow filter, 19mm carb, and custom manifold then finished the rectifier installation and wiring in the connection box after I painted it black to match the cowling on the Predator. I started thinking about the jackshaft and decided to pull it and drill both ends for cotter pins just in case an Allen screw comes loose on a sprocket. The tank won't spin because it's mounted on a 1/8" strip of aluminum screwed to threaded bungs in the top tube the original faux tank was mounted to. I talked to my bike guy and he's going to rebuild the bearings in the Nexus hub that was flooded out. I might swap that 26" wheel out for the fat one to save weight and give me 3 gears. Can't imagine how it will look, I'll just have to try it. Other than that, the only things left are modifying the mount for the tail light, installing the drive chain guard, and installing the speedo. If I'm lucky I'll have it done by Christmas ( which year I don't know).
 

Attachments

wrenching4fun

Active Member
Jun 6, 2016
98
105
33
North Carolina
Waiting for my bike shop guy to locate rebuild parts for my Nexus 3-speed hub. The plan is to lace it to a new Rhino Lite double-walled allow rim that will take a 3" wide tire. While I wait, I've been fabricating an adapter ( lots of grinding and drilling) to angle the exhaust through the frame instead of off to the side where it might fry dangling body parts. Though the Affordable Go Cart exhaust is free flowing, it's so quiet you can hardly hear the engine running. I hope to get 40 MPH out of the setup so I can keep up with my wife's Vino which has one speed-----wide open. If I get 40-45 with the gears, I'll keep the Predator stock and keep my wife in my mirror. Otherwise, will tinker with valve springs and a slight compression bump. You can push these things way beyond stock HP, but like with most engine mods, it's at the expense of durability. Would rather roll into the driveway behind my wife's scooter than walk in an hour later.