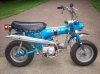
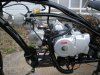
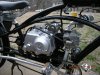
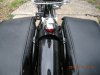
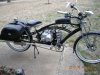
I am absolutely blown away by this bike!!! Seriously, there are Motorbicycles, and then there's that! Um, I can't give enough compliment. You've got some skills man, along with anyone who's doing custom work such as this. I know the simple 2 stroke kit, that's all. I want to explore getting a stretch cruiser, but as I have seen it won't be a simple task, and that's just using a basic kit. For you to be adding these engines, these looks, and fabricating and designing these parts to make it work... I'm not sure you really realize how good you are! This bike looks like a factory prototype! You could literally sell these on a lot somewhere if you were to finalize it with weatherproof features and finished, polished paints. I'm completely impressed, and I can only hope that some day I'll be able to do these things to an everyday bicycle. Good job. Respect.
Addicted.


")
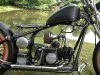
") Good F'n job man! Wow. If you can get a video of the ride, I'd love to see it! I'm sure a lot of others would too!
Good F'n job man! Wow. If you can get a video of the ride, I'd love to see it! I'm sure a lot of others would too!