Fat Tire Bicycle Chopper

graucho

New Member
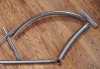
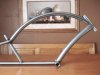
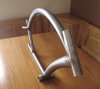
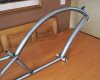
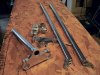
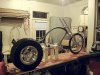
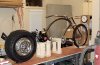
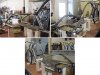
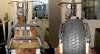
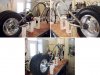
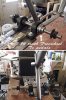
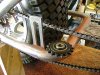
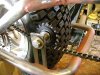
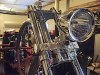
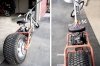
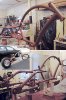
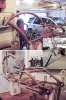
I loved this style of frame from the good people at Home - Choppers U.S., LLC which I bought and chopped it up as a template. I altered the shape slightly for my specific project. They really have beautiful quality frames if anyones interested.
 

Attachments

  • 01_begining_frame_parts1.jpg
    01_begining_frame_parts1.jpg
    140 KB · Views: 3,961
  • 02_frame_welded1.jpg
    02_frame_welded1.jpg
    107.4 KB · Views: 1,748
  • 03_frame_welded_front1.jpg
    03_frame_welded_front1.jpg
    113.8 KB · Views: 1,514
  • 04_frame_welded_rear1.jpg
    04_frame_welded_rear1.jpg
    120 KB · Views: 9,371
I collected a front wheel/rim and fork parts. Then found a 10" wide 22" tall rear tire. 12" rim. Also a drawback handlebar.
 

Attachments

  • 05_fork_parts.jpg
    05_fork_parts.jpg
    178.6 KB · Views: 3,403
  • 06_24in_rim_wheel.jpg
    06_24in_rim_wheel.jpg
    137.6 KB · Views: 1,232
  • 08_right_frame.jpg
    08_right_frame.jpg
    191.7 KB · Views: 1,571
  • 10_tire_compare.jpg
    10_tire_compare.jpg
    169.1 KB · Views: 1,867
  • 11_rear_right.jpg
    11_rear_right.jpg
    485 KB · Views: 2,846
Collected Axle parts. Combined with the tire to take a look.
 

Attachments

  • 13_handlebars.jpg
    13_handlebars.jpg
    147.6 KB · Views: 1,339
  • 12_rear_left.jpg
    12_rear_left.jpg
    182.6 KB · Views: 2,621
  • 14_bike_axle_setup.jpg
    14_bike_axle_setup.jpg
    72.6 KB · Views: 1,919
  • 15_tire_axle_setup.jpg
    15_tire_axle_setup.jpg
    68.6 KB · Views: 1,804
Had a lifan engine shelved from a few years ago from a smashed minibike. Set the tire an engine in close adjustment to take ruff measurements.
 

Attachments

  • 16_02_engine.jpg
    16_02_engine.jpg
    79.7 KB · Views: 1,642
  • 17_03_engine.jpg
    17_03_engine.jpg
    79.4 KB · Views: 1,490
  • 18_04_engine.jpg
    18_04_engine.jpg
    86 KB · Views: 2,292
  • 19_07_engine.jpg
    19_07_engine.jpg
    74.1 KB · Views: 17,401
Built the rear frame to wrap around the fat tire. Built the motor/jackshaft mounting plate. Found a headlight from a kids electric chopper.
 

Attachments

  • 20_side_rear_frame.jpg
    20_side_rear_frame.jpg
    211 KB · Views: 2,962
  • 21_rear_frame.jpg
    21_rear_frame.jpg
    184.1 KB · Views: 1,226
  • 22_rear _with _engine.jpg
    22_rear _with _engine.jpg
    165.2 KB · Views: 1,522
  • 23_headlight.jpg
    23_headlight.jpg
    153 KB · Views: 1,166
Came up with a jackshaft setup with a freewheel to the pedals. Built a chain tentioner bracket and positioned. I found a kickstand from my old stock.
 

Attachments

  • 24_jackshaft_1.jpg
    24_jackshaft_1.jpg
    151.2 KB · Views: 2,825
  • 25_jackshaft_2_With_engine.jpg
    25_jackshaft_2_With_engine.jpg
    167.4 KB · Views: 1,471
  • 28_idler_braket.jpg
    28_idler_braket.jpg
    349.2 KB · Views: 1,592
  • 29_idler_mounted.jpg
    29_idler_mounted.jpg
    293.6 KB · Views: 2,003
  • 31_ikickstand.jpg
    31_ikickstand.jpg
    140.8 KB · Views: 1,353
Found a embossed flame seat. Which I will be using that color sceme to paint the bike. Found a disk brake and mounted it to take a look. Checked motor mount position. Rebuilt the headlight to handle my 12v set up. Welded a license plate/tail light set up. Welded up a battery tray for my 12v rechargeable setup. Then "fished" all electrical wiring through the frame.
 

Attachments

  • 32_iseat.jpg
    32_iseat.jpg
    186.8 KB · Views: 935
  • 33_irear_disk.jpg
    33_irear_disk.jpg
    269.1 KB · Views: 1,376
  • 34_iprimer.jpg
    34_iprimer.jpg
    174.6 KB · Views: 1,563
  • 35_iheadlight-1.jpg
    35_iheadlight-1.jpg
    288.4 KB · Views: 1,283
  • 36_ilicense_plate_side_view-1.jpg
    36_ilicense_plate_side_view-1.jpg
    237.2 KB · Views: 1,564
Pulled the bike down to good old mother earth for the first time to check the tracking and ballance. PERFECT! Peddals like a dream. A few chain links need to removed. Handle bar head neck needs to be spun forward. Handled excellent for being 7ft 11in long. (Wider turns of course) I pulled it next to my daughters car to get a peek what 7ft 11in looks like. After the engine test run is done it will be unassembled completely for painting. Im sure ill need to fine-tune my sprocket ratios for speed concerns. More to follow.
 

Attachments

  • 39_ibattery_box_side-1.jpg
    39_ibattery_box_side-1.jpg
    141.5 KB · Views: 1,415
  • 41_ifront_right_view-1.jpg
    41_ifront_right_view-1.jpg
    100.9 KB · Views: 3,374
  • 42_iright_side_view-1.jpg
    42_iright_side_view-1.jpg
    104.4 KB · Views: 4,505
  • 43_ijackshaft_view-1.jpg
    43_ijackshaft_view-1.jpg
    116.7 KB · Views: 2,100
  • 44_irear_right_view-1.jpg
    44_irear_right_view-1.jpg
    185.8 KB · Views: 7,567
Last edited:
holy crapamoly! thats some pure magnificence sitting right there! my last thought was, braking? any idea? if i rode that thing tbraking would literally be the last thought i had!lol
 
Re: A few updates/additions

Thank you guys for the nice complements! Other than working on it in 0-10 deg. weather its been a fun build. (finally in the 35-40 deg now)

Found some braided stainless casings for the throttle and brake cables. Then welded on tabs to thread them through heading to the disk brake and engine throttle. (Not using zip ties this time like my other store bikes) All electrical wires will pass through inside the frame. Everything is in the raw stages and not adjusted for sagging or final cable lenght. Just a few quick shots.

Then found a set of caps to go onto the threaded rear axle ends. There very dangerous because of the pointed ends. I may have to shave 1/8 off of them so I dont stab myself. (It will happen) LOL. I have to keep them, im diggin the look.
 

Attachments

  • cable_tabs_rear.jpg
    cable_tabs_rear.jpg
    157.5 KB · Views: 581
  • cable_tabs_front.jpg
    cable_tabs_front.jpg
    129.6 KB · Views: 551
  • rear_chrome_thread_caps.jpg
    rear_chrome_thread_caps.jpg
    75.2 KB · Views: 658
Last edited:
Alright Graucho, I hate you.
Is inertia a problem with that massive rear tire?
Is stopping OK also?
Righteous machine!
I hate you. :D
 
Howdy graucho. Man thats purty work. The rear wheel really looks BA.
Great link, they have some great stuff.


Alright Graucho, I hate you.
Is inertia a problem with that massive rear tire?
Is stopping OK also?
Righteous machine!
I hate you. :D

Snork, snork. me 2
 
Last edited:
Re: Ready for paint

Thanks very much for the Kudo's.

We had a little warmer temps the last 4 days so I totally disasembled the bike. Then I finished the bodywork and took it to primer. Now she sits to cure and waits for a 70 deg. day to paint. (Automotive sandable red oxide scratch filler primer. Sprayed with a wide nozzle airbruch pen)
 

Attachments

  • left_front_rear_primer.jpg
    left_front_rear_primer.jpg
    237.3 KB · Views: 472
  • front_right_left_primer.jpg
    front_right_left_primer.jpg
    243.5 KB · Views: 493
Still in the mid 30's here so no paint yet. I've been putz'in on the fuel tank and lighting issues. Here's what I came up with for the tank. It's only 34oz. I hope to get an hour out of it. I have room to expand if its a problem.
 

Attachments

  • tank_rear_open.jpg
    tank_rear_open.jpg
    220.6 KB · Views: 439
  • tank_right_front.jpg
    tank_right_front.jpg
    83.2 KB · Views: 512
  • tank_right_rear.jpg
    tank_right_rear.jpg
    104.1 KB · Views: 544
Last edited:
Back
Top