
You are using an out of date browser. It may not display this or other websites correctly.
You should upgrade or use an alternative browser.
You should upgrade or use an alternative browser.
Any tips for mounting a 70cc on a Schwinn Jaguar?
- Thread starter DoLLeRMaN
- Start date
Hey Bikeguy Joe, they are exactly what I used but they did not work right and I ended up stripping the bolts on the tensioner so I just gave up on it and shortened the chain.
TJBunch look below at my delight for this thing, it is superb and it knocked the pin right out with hardly any effort.
Ok first let me say....BUY BUY BUY This chain tool Chain-A-Part Motorcycle chain cutter tool pick the "Model B-5035 for Metric sizes 415-520 Series Roller Chains". This thing kicks ass and makes life a heck of a lot easier. I popped the pin out in under a minute compared to like 20 min struggling with the other tool.
Now I had to work 4 hours overtime so i am a bit tired right now but I used the new chain tool, got the chain to the correct size, skipped chain tensioner all together and GOT HER RUNNIN!!!!
I was zipping up and down my street, looking at every part, making sure everything was ok. I must say I was very nervous something was gonna go bad or a chain was gonna fly up and destroy my leg. She ran great and started right up every time i kicked the clutch out. So many people were looking at me and making comments and wanting to know where I got it. Very cool!
The gas cap leaks when I make hard turns Im not sure what im gonna do about this but it is a minor detail. Also the engine now has a brown tint to it. Not sure if this is burnt paint or whatever, just something i noticed.
The engine runs smooth at higher rpms but lower it kinda put put PUTS around.
All in all I must say it was a successful build and thank you to all that helped out. I now just have to figure out how to get the dam chain guard on and I am 100% complete. (Any tips?)
For everyone waiting for pics I plan on making a very detailed post including many pics to help anyone interested in building the JAG. I was gonna start today but I was forced the 4 hours overtime and now I have to sleep a few hours and go work again
Look for the post some time between tomorrow and Monday.
Last edited:
Bikeguy Joe
Godfather of Motorized Bicycles
One question, what are 'ya gonna do when the chain stretches a country mile like they are known to do? There can't be that much adjustment on the drop outs.
Tips from Bikeguy Joe's Garage....chain gaurd- mount it inside your closest garbage can.
That brown tint to your engine can be removed with brake or carb cleaner if you don't have a painted engine. It's a coating of 'preservative' like cosmoline or something. I spray all mine before mounting so it doesn't bake on.
Do NOT use EZ Off oven cleaner on your engine unless you want a nice dark charcol color to it....which is not always a bad thing-
Attachments
Last edited:

Bikeguy Joe
Godfather of Motorized Bicycles
The chains that come with the china kits (or the sprockets, or both) wear in for a long time and the chain (on the three I've built) need constant adjusting for a couple hundred miles....hopefully your chain will do better.
Bikeguy Joe
Godfather of Motorized Bicycles
Technically, I don't think they stretch as much as the moving parts all seat and wear and that makes the tolerances looser, thus making the chain longer ie- stretching.
Here is my mega description on how to install an engine on a Schwinn Jaguar.
Note: Click all images for much bigger ones.
First thing I did was make sure the bike was built correctly and make sure everything was nice and tight.
After that I sized up the engine by sitting it in different positions until I found the one I liked. I ended up taking off the bikes chain guard so I could get the engine to sit nice.

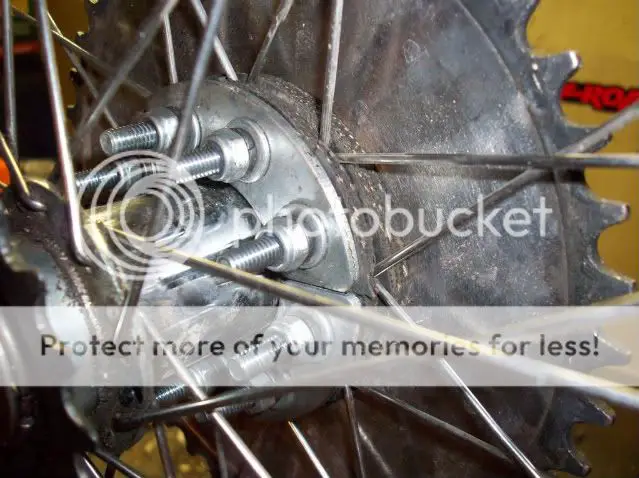
The only other problem was the front studs were too short and as you can see I could barely get the nuts on.

So I went on a mission to find an all thread rod that was M6X1.0. I tried Home Depot and they had rods but none were metric So I tried Lowes, Advanced Auto, Pep Boys, Auto Zone.... No one had metric. So I searched online and found a great site. Fastener Mart
Here is what I bought from them.
MRD160-1452 M6-1.0 x 1 meter Threaded Rod DIN 975, A2 Stainless Steel, 1 pc 1 $6.76
These lock nuts kick ass! It is tough getting them on so no way they are coming off
MNT169-9912 M6-1.0 Hex All Metal Prevailing Torque Lock Nut DIN 980V, Class 10, Zinc Plated, 100 pcs 1 $5.83
MWS109-6992 M6 Split Lock Washer DIN 127, A2 Stainless Steel, 100 pcs 1 $3.06
MWS109-6972 M6 Flat Washer DIN 125A, A2 Stainless Steel, 100 pcs 1 $2.63
Sales Tax: $0.00
Shipping: 2nd Day Air: $14.91
You obviously dont have to do 2nd day air but I wanted everything fast!
Order Total: $33.19
While I was waiting for my parts I found a great PDF file that guides you step by step through the building process. http://www.livefastmotors.com/pdf/two_cycle.pdf
When my parts arrived I began by cutting the all thread rod. I cut 2 pieces 2 and a quarter inches and they worked perfectly for the front studs. To remove the old studs I put one nut half way on the stud and then tightened another nut to the first nut then I just began turning the first nut to loosen it and the stud began coming out.
When I mounted the engine I used the factory nuts and then the lock nuts I purchased.


Note: Click all images for much bigger ones.
First thing I did was make sure the bike was built correctly and make sure everything was nice and tight.
After that I sized up the engine by sitting it in different positions until I found the one I liked. I ended up taking off the bikes chain guard so I could get the engine to sit nice.

The only other problem was the front studs were too short and as you can see I could barely get the nuts on.

So I went on a mission to find an all thread rod that was M6X1.0. I tried Home Depot and they had rods but none were metric So I tried Lowes, Advanced Auto, Pep Boys, Auto Zone.... No one had metric. So I searched online and found a great site. Fastener Mart
Here is what I bought from them.
MRD160-1452 M6-1.0 x 1 meter Threaded Rod DIN 975, A2 Stainless Steel, 1 pc 1 $6.76
These lock nuts kick ass! It is tough getting them on so no way they are coming off
MNT169-9912 M6-1.0 Hex All Metal Prevailing Torque Lock Nut DIN 980V, Class 10, Zinc Plated, 100 pcs 1 $5.83
MWS109-6992 M6 Split Lock Washer DIN 127, A2 Stainless Steel, 100 pcs 1 $3.06
MWS109-6972 M6 Flat Washer DIN 125A, A2 Stainless Steel, 100 pcs 1 $2.63
Sales Tax: $0.00
Shipping: 2nd Day Air: $14.91
You obviously dont have to do 2nd day air but I wanted everything fast!
Order Total: $33.19
While I was waiting for my parts I found a great PDF file that guides you step by step through the building process. http://www.livefastmotors.com/pdf/two_cycle.pdf
When my parts arrived I began by cutting the all thread rod. I cut 2 pieces 2 and a quarter inches and they worked perfectly for the front studs. To remove the old studs I put one nut half way on the stud and then tightened another nut to the first nut then I just began turning the first nut to loosen it and the stud began coming out.
When I mounted the engine I used the factory nuts and then the lock nuts I purchased.


Last edited:
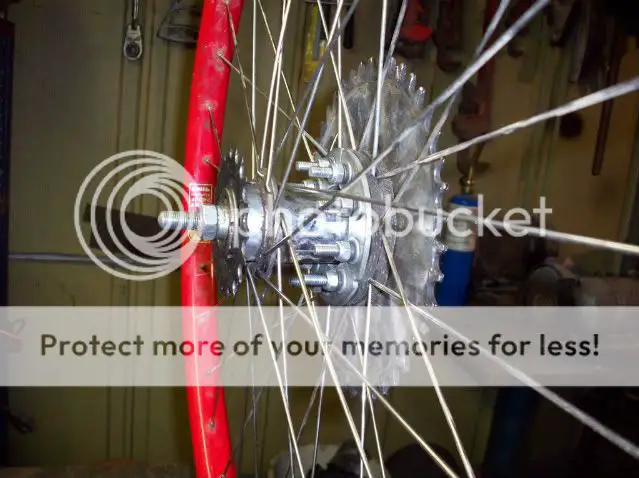
After the engine was nice and mounted I started putting on the rear sprocket. Now the PDF instructions say you may have to file away the inside. I did not have to do that and neither should you. The sprocket fits just fine. Getting the sprocket bolted on was a bit of a pain for me because I do not have any kind of bike stand and I did not have any help. I found it to be easiest by sitting behind the bike so i could reach either side with my hands instead of trying to fit them through the spokes.


The next step in the PDF is to mount the engine but you should already be done that.
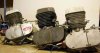
The next step is the clutch. Now the pdf clutch looks different but in general its all the same. At first I kinda went through this step pretty quick but when the clutch did not seam right I went back and looked closer at the directions. Be sure and get the big spring on before you slide it through the hole in the engine and then put the little spring on the open cable part after the hole in the engine.

The top one is the clutch and the bottom one is the brake.


The next step in the PDF is to mount the engine but you should already be done that.
The next step is the clutch. Now the pdf clutch looks different but in general its all the same. At first I kinda went through this step pretty quick but when the clutch did not seam right I went back and looked closer at the directions. Be sure and get the big spring on before you slide it through the hole in the engine and then put the little spring on the open cable part after the hole in the engine.

The top one is the clutch and the bottom one is the brake.

After the clutch is set up its time to size up your chain. Follow the instructions in the pdf and when it comes time to remove some links use this tool Chain-A-Part Motorcycle chain cutter tool (The Model B-5035 for Metric sizes 415-520 ).
I ruined the chain that came with the kit by using a Park CT-5 chain tool. Do not buy these they are junk. Oh and the chain I am using I git from Northern Tool found at this link here. Drive Chain #41 | Chains + Sprockets | Northern Tool + Equipment
If you can get the chain tensioner to mount correctly I would suggest doing so. I could not because the bar we have to mount to is too small. I tried using the bent washers but they did not work for me. So what I did is I just used the chain tool to get the chain as small as I could go and still get it to fit on the bike. There is still a good amount of play (maybe 1/2 inch-3/4 inch) but from what I am told this may increase over time and you should be careful.
The next step in the PDF shows you how to construct the carb and cable. The carb should already be wired to the cable so you can kinda skip through this step a little but if you want or you can take the cable out of the carb and make sure everything is done right (thats what i did).
Before you mount the throttle you have to take off the factory rubber grips. Try pulling them off and enjoy the pain and frustration") Then get some wire cutters and start snipping away at the rubber.
Then get some wire cutters and start snipping away at the rubber.

When mounting the throttle they tell you to measure to get the hole lined up right. I tried that and it didnt work very well. So I then dabbed some elmers glue on the nipple on the inside of the throttle, I then put the throttle on and placed the nipple exactly where it was going. The spot where the elmers glue was on the handle bar was where I drilled and it was perfect!.

Next mount your ignition box. I mounted mine right below the gas tank on one of them smaller bars. I also used a piece of one of the old grips to make it a tighter fit.

I ruined the chain that came with the kit by using a Park CT-5 chain tool. Do not buy these they are junk. Oh and the chain I am using I git from Northern Tool found at this link here. Drive Chain #41 | Chains + Sprockets | Northern Tool + Equipment
If you can get the chain tensioner to mount correctly I would suggest doing so. I could not because the bar we have to mount to is too small. I tried using the bent washers but they did not work for me. So what I did is I just used the chain tool to get the chain as small as I could go and still get it to fit on the bike. There is still a good amount of play (maybe 1/2 inch-3/4 inch) but from what I am told this may increase over time and you should be careful.
The next step in the PDF shows you how to construct the carb and cable. The carb should already be wired to the cable so you can kinda skip through this step a little but if you want or you can take the cable out of the carb and make sure everything is done right (thats what i did).
Before you mount the throttle you have to take off the factory rubber grips. Try pulling them off and enjoy the pain and frustration
Then get some wire cutters and start snipping away at the rubber.
When mounting the throttle they tell you to measure to get the hole lined up right. I tried that and it didnt work very well. So I then dabbed some elmers glue on the nipple on the inside of the throttle, I then put the throttle on and placed the nipple exactly where it was going. The spot where the elmers glue was on the handle bar was where I drilled and it was perfect!.

Next mount your ignition box. I mounted mine right below the gas tank on one of them smaller bars. I also used a piece of one of the old grips to make it a tighter fit.

Last edited:
In the pdf they talk about the wires after this, their wires are a little different then the wires I had. My throttle had 2 wires. I wired the black one to the front motor mount (Ground) and the 2nd one I wired to the blue wire from the engine. The Ignition is easier, just blue wire to blue wire from engine and black wire to black wire from engine. The white wire coming from the engine is supposed to be used to power things like lights etc... I did not use it (yet).
After the wiring was done I used electrical tape to secure the wire to the bike frame as well as give it extra protection from the hot exhaust less then an inch away.

Next is the gas tank which was pretty easy but you may find it a little tough to get some of the nuts on due to the short length of the studs. I just put a nut on one side and them pressed REAL hard on the bracket until it bent enough to get the other nut on.

Next is the chain guard .... I skipped this step and after that is the exhaust which is 2 bolts and your DONE!!!
Now step back and marvel at your new JaG!!

If you have any questions or suggestions please feel free to post away.
.
Last edited:
ebmvegan
New Member
After the engine was nice and mounted I started putting on the rear sprocket. Now the PDF instructions say you may have to file away the inside. I did not have to do that and neither should you. The sprocket fits just fine. Getting the sprocket bolted on was a bit of a pain for me because I do not have any kind of bike stand and I did not have any help. I found it to be easiest by sitting behind the bike so i could reach either side with my hands instead of trying to fit them through the spokes.
The next step in the PDF is to mount the engine but you should already be done that.
The next step is the clutch. Now the pdf clutch looks different but in general its all the same. At first I kinda went through this step pretty quick but when the clutch did not seam right I went back and looked closer at the directions. Be sure and get the big spring on before you slide it through the hole in the engine and then put the little spring on the open cable part after the hole in the engine.
The top one is the clutch and the bottom one is the brake.
Although this set up works well, you could simplify the brakes by installing a dual brake lever on the right and have only one lever on the left for the clutch. I found this and was able to integrate into my jaguar build. It's $10.99 from Amazon. I guest it becomes a personal prefferance but I believe it makes it look cleaner. You do have to tune your brake to match however.
Attachments

I believe that is only if I do not have gears. Thats what I understood anyway. Please some one else shed some light on this.
Also, if anyone knows When I drive sometimes it feels like the chain pops a bit and my rear tire kinda jerks. It does not happen all the time just sometimes. I am guessing it is because I do not have a tensioner.
EDIT: fairracing31, Look at page 7 of this PDF. http://www.livefastmotors.com/pdf/two_cycle.pdf
It shows the way I have it. Although that does not make it right. Anyone else wanna shed light?
Thanks for trying to help though, it does not go unappreciated
Last edited:
") What I'm I missing ?
What I'm I missing ?Dave31
Active Member
I have always thought that the rubber was to keep the spokes and sprocket from touching
that's how i built all of my bikes so far (until I switched to downhill disc rear wheel)
I have mounted several multi-speeds and that's how I did them...I don't like the ideal of the sprocket right up against the spoke's....just wondering if I have been doing them wrong?
I also checked here Instruction Manual - Gas Powered Bicycle Engines and they show it the way I have it.
It cannot really slip much considering the bolts but then again the way with rubber on both sides does make sense.
But them rubber things are not cut evenly so if I did put on on the other side wouldn't it throw the sprocket off?
To ebmvegan: That thing looks cool I am really considering it THANKS!!
Last edited:
Norman
LORD VADER Moderator
Where you have the big gaps on the frame you can use JB weld 5 min. epoxy to fill in the gap mask off the bottom of the mount with tape so the epoxy won't run out loosen up the mounts bolts or nuts a little but no snotty loose mix up a batch and put the epoxy in from the top until full in 5 minutes the epoxy will set up you can trim off the excess with a sharp knike when the epoxy is in the rubbery state and after a few hours say over night retghten the mounting bolts and you should be good to go.
I didn't tell you that you might want to clean off the engine mounts and bike frame with brake cleaner before you start pourng the mounts and where the epoxy will touch the frame a very light smear of grease or engine oil to keep the epoxy from sticking to the frame will help.
What you are doing by doing this is bedding the engine to the frame. industrial engine and compressor are done this way helps with the vibrations and helps support the engine/compressor and should help to keep your engine from shaking off your bike.