Another Board Tracker Built by a Mistake

GoldenMotor.com

ZipTie

Active Member
Jan 8, 2016
750
82
28
Mpls Mn
I've been away since last winter as I remember, do to being extremely busy with other projects. My last build here was the Copper Board tracker, built using a Schwinn Panther frame. I had another bare panther frame laying around so I thought I should get it started so I got a hold of a gas tank and rear wheel tool box for powder coating. I brought every down to the coaters and picked out a light moss colored willow green.
I was going to do a Indian tribute build using brown and cream for accents. I went to pick it up and it was all coated a bright yellow... Oh crap they made a little mistake.

if you know anything about powder coating they cant put green over the yellow or it would just bleed through. so they offered to somehow remove all the coating using high heat and start over... I felt bad at that point and just said it was OK mistakes happen, Ill just take the parts as they are as removing the coating with high heat might damage the frame anyways. They then offered me a generous 75.00 discount and I was on my way even though I really wanted the willow green bike.
So i was off to a bad start but decided on a new accent color scheme, look and went with the flow.

The bike is almost done except for the chain and graphics but I will post this thread as if I am doing it real time.
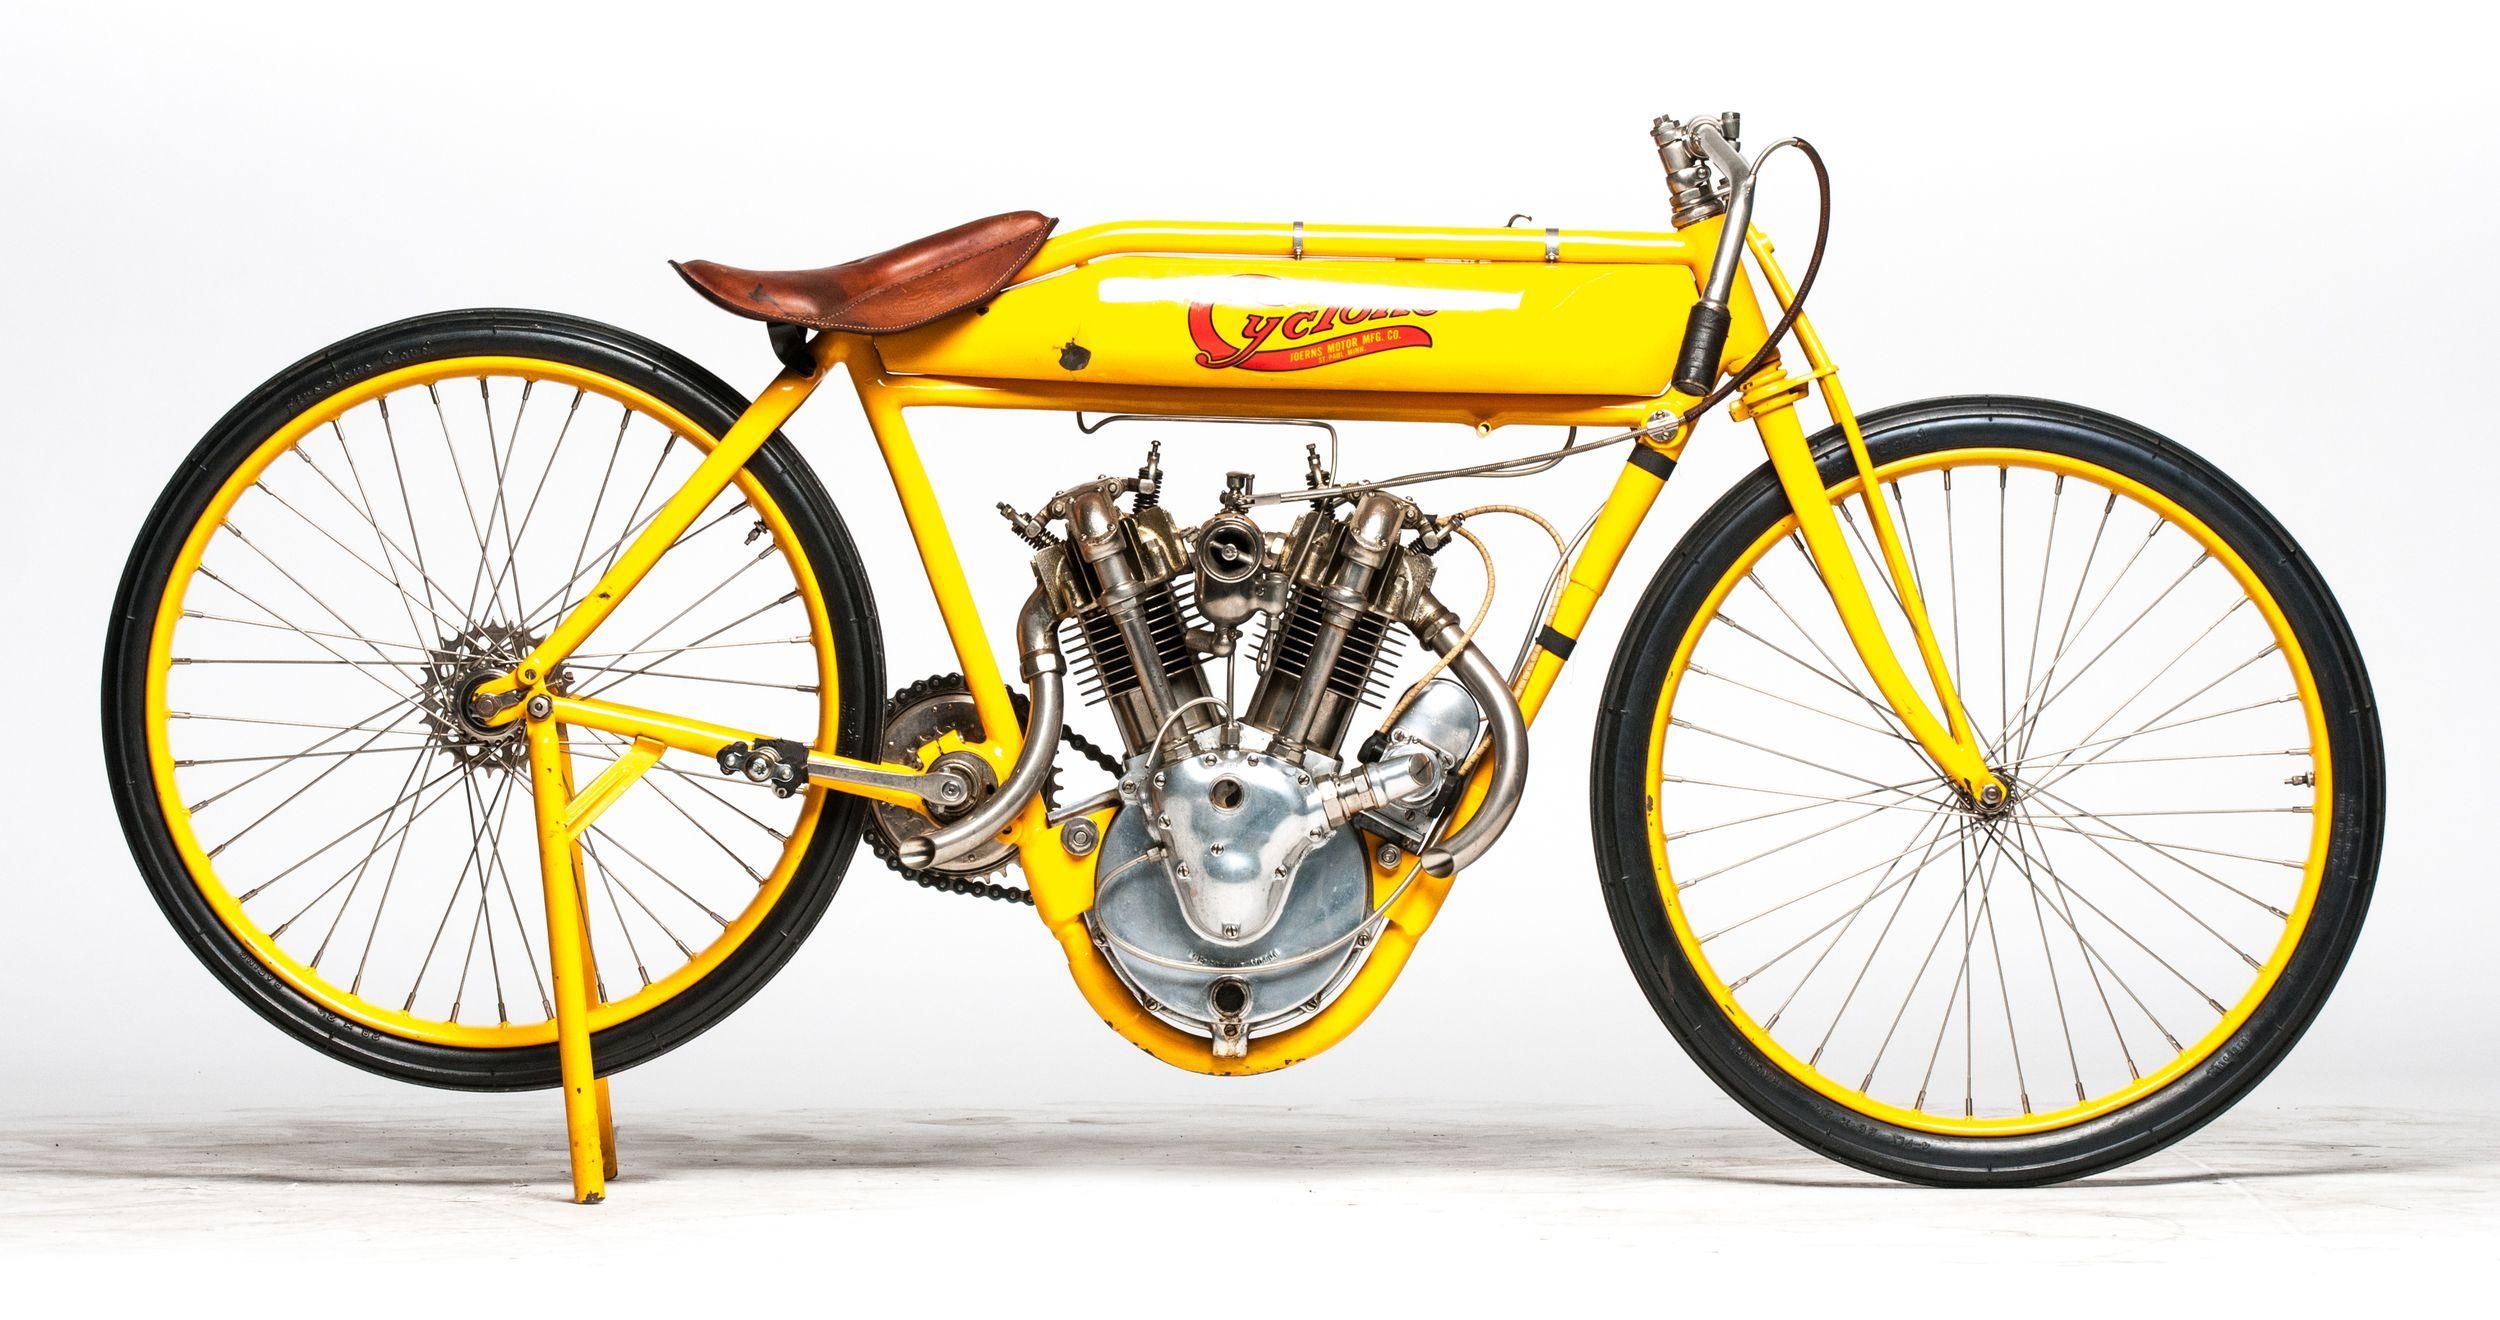
perhaps it will inspire some aspect of somebodies build in the future or component handling as I did a few unique things to it. This is maybe my last and final build. The color is a light yellow with a tad a brightness
like a early 80s corvette yellow.

My 13 year old daughter AJ wants to help her Dad every step of the way in attaching and fabricating every part and I think its awesome that she will be learning a ton about tools, drilling, cutting, grease, motors, ball bearings, graphics, style and mechanics, and the satisfaction that comes with building something from almost scratch.Something many kids never experience nowadays. At only 13, she has a keen eye and is a good artist and is a joy to be around.

Here is the color and some of the components and a painting she expertly painted as our plan of what it will look like.
IMG_0380.JPG
IMG_0499.JPG
 

ZipTie

Active Member
Jan 8, 2016
750
82
28
Mpls Mn
IMG_0393.JPG
IMG_0395.JPG
IMG_0385.JPG

As many do I used wheels from a nostalgic Nel Lusso, they are brown with cream tires and have heavy duty 12 gauge spokes. For 119.00 , I get wheels tires, a chain guard I can customize by cutting it down, fenders, and handle bars. The rest I sold for 20.00. so for 100.00 I have old style wheels.and a few of the components
including pedals that match the wheels. we are not going for authenticity just a nostalgic bike that looks like it was factory built.

First step is to pound in american style bottom bracket cups. A cool Tip to making this super easy with nothing but a leather hammer is to wash them in dawn dish soap and dry them so they have no oil on them, even from your hands and they grip perfect as you pound them in gently, with no popping back out. My daughter did the whole process herself.

We then greased up together all the bracket components and she installed all the washers and bearing some old instructions. We now have pedals and a daughter that understands all about GREASE and bearings and how the two things ...totally changed the World in a big way.
 
Last edited:

ZipTie

Active Member
Jan 8, 2016
750
82
28
Mpls Mn
Cool picture Ludwig. A Cyclone build crossed my mind, but the panther frame isn't a drop loop or close enough to do it Justus I believe Cyclone was made in my home state of Minnesota and was truly an amazing motorcycle design in its symmetry.
 

ZipTie

Active Member
Jan 8, 2016
750
82
28
Mpls Mn
Prepping the triple tree fork and painting the springs the same color as the wheels using a carmel color and cleared with
clear krylon triple thick was next on the list. My daughter did the assembly with my help on the 1 1/8 threadless headset. The yellow dogbone I had left over in one of my many bins.
IMG_0391.JPG
IMG_0390.JPG

I added these fork decals after install
IMG_0398.JPG

we made a stationary bracket for the headlite that will fit the steer tube.so I can center the light out of thin and soft polished stainless steel from a local hardware store. added an aluminum Harley head badge Painted the headlight mount caramel. The front fender fab is next. using the Nel Lusso fender as it is already a light yellow. We have to design our own brackets and bend them up, test fit and paint. We took the
front Basket bracket and bent it in a flowing curve for a unique vintage look support bracket. It already matched the rims in color. It will go under the front hub nuts eventually.
IMG_0451.JPG

b
IMG_0453.JPG
..
IMG_0431.JPG
 
  • Like
Reactions: Nightster

ZipTie

Active Member
Jan 8, 2016
750
82
28
Mpls Mn
Next is mounting the gas tank with the bottom hardware which is not strong enough to hold the tank on firmly so I made a strong top mount bracket and added chrome and thin rubber spacers. It took hours using cobalt drills to penetrate the the Gas tank with two holes That is some of the hardest stainless I have ever drilled out.
IMG_0414.JPG

Painted the Gas cap brown and clear coated it.
IMG_0419.JPG
IMG_0435.JPG
IMG_0416.JPG
added the hand grip, throttle, clutch and painted the red plastic clutch insert dark brown by hand using acrylic paint. Added stainless steel bar ends. Its starting to look like a bike now.
IMG_0408.JPG
 

ZipTie

Active Member
Jan 8, 2016
750
82
28
Mpls Mn
Thanks Butch and Hud, Here are some more assembly picts and descriptions. Ill save the full bike shots for Thursday or Fri. Time to test fit and install the 2 stroke engine but first it needs tons of filing of the cooling fins and painting it High gloss two tone Brown and silver.
We also painted the air cleaner and the head nuts and test fit the motor to see how it rests on the engine pedestal.
Started install of the wiring using these new Motorized Bike electrical Junction box. They are made with a
curved back so it looks like it melds with the down tube. It will hide all the wires and protect them from water and bumping. wires will then be covered. Link

http://www.ebay.com/itm/Motorized-B...ash=item3d4763f551:g:Cs0AAOSw2RdZgfKi&vxp=mtr
attach with double face auto tape or zip ties

Bolted the painted engine up without hassle but needed to shim the front pedestal so the engine was solid front and rear before securing the studs front and rear. Ill add engine decals later. We added a Vintage style LED Tail light also from ebay. It matched the third world leather hairpin seat wires perfect in style.

I made my own vinyl graphic design in Photoshop and printed on good 3M material and laminated in a high gloss and precision cut them so they look like paint in a cream and matching brown.

Made a much smaller chain guard using the Nel Lusso one and chopped it way down with aviator shears and trimmed it off with chrome trim.

Fit the seat using a CNC seat post, and a custom CNC made 22 mm seat post clamp for a clean look.
added a CNC 40 tooth sprocket also.

Next is installing the Graphics... Here are some detail picts

IMG_0481.JPG

IMG_0483.JPG

IMG_0503.JPG

IMG_0413.JPG


IMG_0484.JPG

IMG_0523.JPG

IMG_0516.JPG

IMG_0470.JPG
 
  • Like
Reactions: Hud

ZipTie

Active Member
Jan 8, 2016
750
82
28
Mpls Mn
I capped off the top of the black fork adjuster plugs with chrome conchos. Then did the one step I enjoy the most and installed the custom tribute graphics late last night. This morning painted one more bracket and installed and tested an analog speedometer after just painting the needle brown. It was florescent Pink...and that wasn't going to work.

I made a coaster brake clamp from scratch out of polished stainless. I am adding a front cantilever squeeze brake sometime today and will make an adapter for the odd vertical hole seat bridge so I can add a rear squeeze brake to the rear also just so the coaster brake never has to be used!

Next..my least favorite activity I dread every time.... is to shorten and install the Wax coated greasy #41 drive chain and then the much easier pedal chain and I am pretty much done with this build except for some minor details I want to do yet. I will be using a Duluth Cycle CNC engine side mounted spring chain tensioner from ebay, to take up any chain slack and have the drive line be trouble free. I ordered one with a black wheel but may swap out that wheel with a yellow wheel I have left over from anther build.

I may also make a clutch side engine shroud to fill in the lower gap on the left side of the Bike, This shroud I would make out of 1/4" aluminum I guess that is... if I get motivated to deal with engineering one. Ill post some more picts when it is 100 percent done.

Even though the powder coaters made a huge mistake on the color, I do like it and has turned out better than I thought and looks like a fairly clean build to me at least. It will look pretty good parked in the garage next to my Seafoam green and copper Indian.
IMG_0535.JPG
IMG_0536.JPG
IMG_0541.JPG
IMG_0553.JPG
 
  • Like
Reactions: Nightster

indian22

Well-Known Member
Dec 31, 2014
4,722
7,697
113
Oklahoma
Pretty bikes both, but I'm taken by your gifted daughters quite artistic interpretation of the bike...wonderful work that I'd hope is now framed and hanging in a place of honor in the home. It's something that can be treasured by the family and friends for generations. A father and daughter project captured for the ages...you're a blessed man & that little yellow fellow is now more than just a bike! Rick C.
 

ZipTie

Active Member
Jan 8, 2016
750
82
28
Mpls Mn
Thanks to everyone ( HUD,, Butch, Curtis, Chaz, Steve and Rick c, who took the time to comment. Big thanks to Rick for the painting comments, it will mean much to her when she reads this tommorow, as she works hard each day to improve her art skills. My daughter has truley blessed me everyday and has grown into not only a fine daughter but also a great companion for fishing, camping, interests and now bike building. The painting will be framed soon and grace the home wall.

Today we installed a front pull brake and installed the chain tenioner is all, that dang greasy chain battle is soon. My back is groaning already just thinking about it.
 

ZipTie

Active Member
Jan 8, 2016
750
82
28
Mpls Mn
I Just added Front Pull Brakes and had to devise a number of shims.\ but they work well now. I don't think it hurts the look of the bike?
Painted the tool box clamps with brown centers. Added the Chain Tensioner and Yellow wheel to match the frame.I now
IMG_0572.JPG
IMG_0576.JPG
IMG_0574.JPG
IMG_0573.JPG
Cant put those chains off any longer.
 

ZipTie

Active Member
Jan 8, 2016
750
82
28
Mpls Mn
Many use The Schwinn Panther frames to build board trackers also many other vintage bike have a vertical hole in the seat bridge so rear pull brakes wont work.

i want them though, so i do not not have to solely rely on a coaster brake, but they are out of the question...at least without a somewhat complex adapter. I couldn't find one so Ive drawn one up on paper but do not know if it will function. At any rate it needs to be machined to both hug the curve of the seat bridge but also has to be convex to hug it. Then a stud is needed to be drilled and tapped and inserted to fit into the verticals hole of the frame. Next a 12 mm hole needs to be drilled through it for the pull brake shaft to be attached .
Ill post a picture of my brake adapter later. Like I said I don't know if it will work, but I'm gonna try anyhow as I detest coaster brakes for more reasons than I can list.
 

ZipTie

Active Member
Jan 8, 2016
750
82
28
Mpls Mn
Here Is the Finished "Vertical hole to Horizontal hole" rear brake adapter part I made on a Haus CNC machine. I'll test it tomorrow hopefully and see how it works. I cannot foresee why it wouldn't...famous last words maybe... Good bye coaster brake.
IMG_0765.JPG
IMG_0761.JPG