212 build

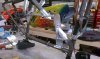
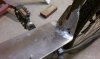
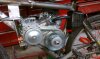
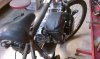
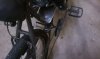
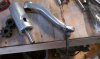
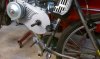
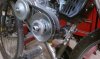
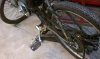
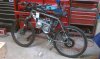
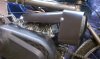
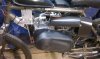
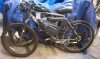
Had plates welded in place. I fit motor and will dressed the installation some.
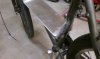
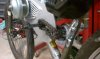
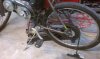
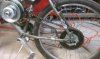
It feels strong and solid. One pedal fits and the other needs 2" cut off or moved out?!
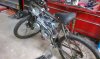
Going to try to just get it running today just to see vibrations.

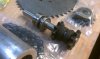
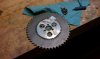
When parts arrive I'll start jack shaft project.
 

Attachments

  • imag0563x.jpg
    imag0563x.jpg
    103.4 KB · Views: 226
  • imag0573e.jpg
    imag0573e.jpg
    101.4 KB · Views: 228
  • imag0572r.jpg
    imag0572r.jpg
    130 KB · Views: 225
  • imag0576r.jpg
    imag0576r.jpg
    104.4 KB · Views: 258
Awesome work!

What are your sprockets going to be, drive and driven?

Can we get a look at your jackshaft?

Thanks 5-7HEAVEN. Don't have any parts for jackshaft yet. It's only purpose is to move the chain over 1 1/2" to align with rear. I'll need to fab a tube with bearings and a sprocket to mount behind the engine on the downtube somehow. Gonna start with a 10-48 for sprockets as I know the torque converter will start low and gear up a lot. Want to keep the revs low.

Today I re-welded the muffler and pipe, hooked throttle with gov., got it running and observed the torque converter. It seems to go all in even with the governor still in use. Sounds like a torque monster. Took a video with my phone, but don't know how to upload on this sight.

It starts so easy compared to the 2 strokes.
 

Attachments

  • imag0579k.jpg
    imag0579k.jpg
    169.9 KB · Views: 269
  • imag0580d.jpg
    imag0580d.jpg
    144 KB · Views: 235
I'm not real sure but I think that without any jackshaft reduction, you will need a sprocket nearly as big as the rim to get usable high end cvt gearing. Better do the math and be sure.

Awesome work! Looks very strong.
 
Thanks 5-7HEAVEN. Don't have any parts for jackshaft yet. It's only purpose is to move the chain over 1 1/2" to align with rear. I'll need to fab a tube with bearings and a sprocket to mount behind the engine on the downtube somehow. Gonna start with a 10-48 for sprockets as I know the torque converter will start low and gear up a lot. Want to keep the revs low.

Today I re-welded the muffler and pipe, hooked throttle with gov., got it running and observed the torque converter. It seems to go all in even with the governor still in use. Sounds like a torque monster. Took a video with my phone, but don't know how to upload on this sight.

It starts so easy compared to the 2 strokes.

Wow! You've got a LOT of room to work with.

Check out scotto's 212 build. He extended his Torq-Verter's driven shaft for his first jackshaft. Then he added a second jackshaft to lower his gearing to acceptable level.
 
Received the parts and materials for the jackshaft. Installed the SBP wide lower bracket. Getting ready to cut and install this weekend.
 

Attachments

  • imag0588l.jpg
    imag0588l.jpg
    127.6 KB · Views: 205
  • imag0589ee.jpg
    imag0589ee.jpg
    102.1 KB · Views: 193
  • imag0586u.jpg
    imag0586u.jpg
    126.8 KB · Views: 193
in my opinion you should get a different frame for this build the preditor is going to snap that thing like a twig.duh.
 
Worked on fabbing the jackshaft and mounting it. Notched the tubing to fit the downtube. Opened the hole to accept the bearings. fitted the clamps in the frame. Cut hole in rear cover for sprockets. Drilled, tapped shaft for retaining bolt. Installed on bike. linked on chain and added a roller bearing chain tensioner through rear cover. Bent and welded the left pedal crank to fit. So far everything works. now to get the rear sprocket mounted.
 

Attachments

  • imag0594e.jpg
    imag0594e.jpg
    123.6 KB · Views: 194
  • imag0590i.jpg
    imag0590i.jpg
    153.3 KB · Views: 205
  • imag0597c.jpg
    imag0597c.jpg
    142.4 KB · Views: 223
  • imag0602j.jpg
    imag0602j.jpg
    146 KB · Views: 232
  • imag0604l.jpg
    imag0604l.jpg
    105 KB · Views: 199
The smaller sprocket was adapted to the wheel (disc brake) mount. I'm going to just drill & bolt the one I'm using (#40) to it then back on the wheel. With it on the chain will hit 2 points on the frame. I'm using the chain tension-er to clear the bottom one and will weld in a section to clear the top one.
 

Attachments

  • imag0606.jpg
    imag0606.jpg
    158.4 KB · Views: 218
  • imag0607e.jpg
    imag0607e.jpg
    160 KB · Views: 196
OLD..
do you have a conduit tubing bender?
it might allow you to bent the struts just enough for the chain to clear
 
The smaller sprocket was adapted to the wheel (disc brake) mount. I'm going to just drill & bolt the one I'm using (#40) to it then back on the wheel. With it on the chain will hit 2 points on the frame. I'm using the chain tension-er to clear the bottom one and will weld in a section to clear the top one.

I guess you tried moving the jackshaft sprocket around, yes?

This is REALLY coming around quickly!dance1
 
Tonight I installed the chain tensioner and took a ride. Wow what smooth power!
Even with the gov. hooked up it's a grand powerful ride. The engine's wide and the exhaust pipe's hot, but a great ride, and nothing bent or broken.
With gov., it prolly does 30-35 mph. that's a 10-48 and torque conv. I have a 14t sprocket to try. Easier speed. Goodby 2 strokes!
 

Attachments

  • imag0619e.jpg
    imag0619e.jpg
    120.9 KB · Views: 235
  • imag0620u.jpg
    imag0620u.jpg
    106.2 KB · Views: 234
did you crush your frame to gain chain clearance??? ouch!!!
Yes I heated it and crushed it for clearance for now. (I know that's terrible)
I want to work out all the changes first then take it apart, clean it, then finish it. Sometimes I get a little junkyard.
I'll weld in a new section.

I saw yours and it looks perfect like a full custom build. Awesome!
 
Made some exhaust shields from aluminum to hold down the heat under left leg. They work well. Installed the trans cover. Had to make tabs to mount it. Changed sprocket from 10 to 14 to rear. I still have gov. in use so it cruises better now at lower rpm. The old china chain tensioner stripped. so I added roller bearings and a new bolt.
Going to run it more to work out bugs then finish it.
May not be pretty, but sure rides nice.
 

Attachments

  • imag0625t.jpg
    imag0625t.jpg
    114 KB · Views: 233
  • imag0624e.jpg
    imag0624e.jpg
    135.5 KB · Views: 218
  • imag0623.jpg
    imag0623.jpg
    149.6 KB · Views: 222
  • imag0622d.jpg
    imag0622d.jpg
    105 KB · Views: 249
  • imag0626.jpg
    imag0626.jpg
    116.4 KB · Views: 251
a build is never done as you will always find something that you can make better or look nicer. That said from where I? sit theres not much left but some polishing and paint left to do.


Paint what other people then me use
 
Back
Top