Build Thread: Dax IV w/Electra Coaster 1-spd

GoldenMotor.com

rangefinder

New Member
Oct 18, 2012
118
0
0
Des Plaines, IL
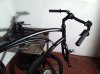
Finally getting my build started.

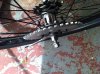
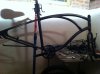
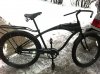
Electra Coaster (Aluminum, w/Coaster Brake).
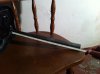
Handle bar has been swapped to the Surly Open Bar.
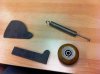
Primo Tenderizer pedals.
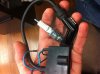
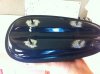
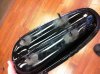
The engine is a Dax Gen IV.
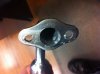
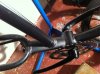
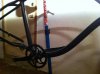
Building a knock off of Turbobuick's chain tensioner.
Ordered Manic Mechanic's Motor Mount.

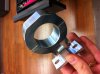
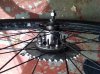
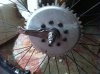
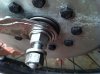
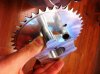
I took my time installing the stock rear sprocket. I did have to grind out the ID of the sprocket about 1/16" to make it fit over the dust cap of the CB110. I was able to mount it with very little wobble or bobble. Having built and trued wheels as a bike shop employee, I found it required those same skills. I may still throw down for Manic or Sportsman's sprocket adapter. The big splurge on this build, being my first since 2005, was the motor mount and the Dax IV.
 

Attachments

Last edited:

rangefinder

New Member
Oct 18, 2012
118
0
0
Des Plaines, IL
last of the photos, 5 limit hit.

I have tried to "port match". Did not want to get crazy. I'll have plenty of time for that. Ground out the muffler and the intake. Replaced the Boot and Plug (B6HS) with NGK stuff as directed on this site. Also the fuel line and filter are changed.

Next week I think I'll have more going on with the build itself. Waiting on the mount and making the spring tensioner.

Thank you for looking!

Rangefinder (Lee Roy)
 

Attachments

rangefinder

New Member
Oct 18, 2012
118
0
0
Des Plaines, IL
Forgot to mention earlier...
I got my hands on another fork with V-Brake mounts. It's from a Coaster 7 speed. And it has been installed. Eventually I will get a springer style fork and pair it up with a front drum brake wheel. But that is down the road.

I am not sure what fenders I will go with yet. I have two sets, both high quality from Electra. There is the Shorty Style on the front, and the Full Size on the rear (see first photo in thread). They both seem very good where they attach. I am going to still reinforce them once I decide which style to go with. Any opinions or experiences to share would be appreciated.
 

rangefinder

New Member
Oct 18, 2012
118
0
0
Des Plaines, IL
Here is my Rag Joint and Sprocket attached to the wheel.

I don't know for sure yet, but I don't think I need to bend out the brake arm. The sprocket is on real good from what I can tell. Don't let the installation of the Rag Joint discourage you. Try it before just getting the sprocket adapter.

I was able to get the ID of my sprocket ground out. Took off about 1/16" of material, and it just cleared the dust cap on my coaster brake. If your able to grind out the ID, and grind it close to the dust cap, it will go a long way to helping you keep the sprocket from bobbing up and down.

With the right tools you can make quick work of it. I used one wrench on the exposed side of the sprocket. And for the back side facing the spokes, I used a long socket extension paired with a deep socket. I say use a deep socket because of the length of the bolts.

Get it all slightly snug, off the bike. Once you got it together put the wheel up on the bike. Now you can spin the wheel and watch for the wobble and bobble. Crank it all down real tight, and then crank it all again.

There is a lot of talk about how difficult this part of the build is. I can see it being troublesome, but it is not impossible. Work carefully and do the best job you can. It takes time to get it right.

brnot
 

Attachments

rangefinder

New Member
Oct 18, 2012
118
0
0
Des Plaines, IL
I took the time to sand around the bolts to the gas tank. I am going to JB weld around them before the install. I am not sure if I am going to go for the double sided foam tape or not under it. But it sounds like a good idea. Removal of that kind of tape is difficult for sure though.

I'd love a different tank down the road for sure. But as I said, the pricier engine kit and the MM motor mount is the big splurge. So here is the photo of my tank waiting for JB weld.
 

Attachments

rangefinder

New Member
Oct 18, 2012
118
0
0
Des Plaines, IL
I am thinking of cutting this seat post down quite a bit.
But not sure if that is the thing to do....

My first thought was that it would go deep enough into the frame to reinforce the seat tube from the inside. The post is like 14" long and I have about 10" of it going into the bike now (need to measure how deep it will go, forgot to do that). Could this cause problems if I have to remove it? I have never seen a seat post bend inside the seat tube. Could that happen?

I expect next week there will be more progress on the build.
 

Attachments

maniac57

Old, Fat, and still faster than you
Oct 8, 2011
4,484
22
0
memphis Tn
On an aluminum frame? YES! Keep the post long enough to have several inches into the frame tube. At least two inches BELOW the point where the rear framestay meets the seat tube/top tube for safety.
Even a steel frame needs a couple inches of insertion to prevent bending both the seatpost and the seatpost tube on the frame.
They ABSOLUTELY can bend if not inserted far enough!
 
Last edited:

MysterySandwich

New Member
Jun 30, 2012
196
0
0
California
Looking good, I'm eager to see your "knock off of Turbobuick's chain tensioner." mostly because I've never heard of it before, maybe I'll do a quick forum search...
 

rangefinder

New Member
Oct 18, 2012
118
0
0
Des Plaines, IL
No major action on the build this week. It's Chicago, and it's freaking freezing!!!

Some progress on the spring chain tensioner though.
Found a scrap piece of 440c .250" x 6" x 9" lying around our shop.
Tossed it on top of another skid we had headed to our Aqua Cutter.
I have a relationship with our cutter, so it's getting done on the cheep (read freeee)!
-had some mixed feelings about not buying it from turbobuick.
-since it's for my personal use only, I can still sleep at night.

I have a Front Derailleur Rapid Fire shifter in my parts bin at home.
That is going to replace the clutch/brake lever from the kit.

Making a part that I saw someone else make for the clutch wire routing.
It's an adjusting barrel w/stem thingy, brass pully wheel, and some angle aluminum.
It mounts where one of the screws holding clutch cover on. It's neat.
It will make the clutch easier to engage/disengage, and take the severe angle away.
I'll post a photo once that part is complete too.
 

rangefinder

New Member
Oct 18, 2012
118
0
0
Des Plaines, IL
I stumbled across these guy's last night while surfing the interwebs...
http://www.ghettobike.com/

They have good looking tank making operation. The in-frame they make is a bit less than Sportsman's, and the behind the seat style is less than Phantom's.

There are two really cool items that I am thinking about.

First one, and I am pretty sure I am going to get it, is their rear motor mount for 1-1/4". It's the size of my seat tube on the Electra. I ordered the MM front motor mount. And it's perfect for my 1-1/2" down tube on the Electra. But they want another $30 for a custom bushing, which brings a rear mount to $80, with shipping. These guy's have it for $50 bucks shipped!!!

Don't think this will be bought soon though... They make this Cyclone Intake Manifold. Pretty spiffy and well thought out part. I am not doing any true performance upgrades for a while.

My stainless is at the Aqua Cutter, should have it back next week. Going to the skateboard shop down the road this weekend. They have used wheels and stuff on the cheap and free!
 

buba

Member
Jul 2, 2010
914
10
16
los angeles
ghetto bike is the man

need a tank -in frame or seat post mounted

he has it down!!! lots more goodies too -built to last!!!

his site/contact is on the left of the motorbicycling.com home page
red colored artwork- custom built gas tanks
 
Last edited:

rangefinder

New Member
Oct 18, 2012
118
0
0
Des Plaines, IL
I have decided that this build will not be rushed at all.
It's supposed to snow like another 9" here in Chicago. *groan*

Did some more reading, and the next upgrades to order are...
Throttle from SBP & Grips
#41 Chain -Diado brand on Amazon. Any other suggestions?
1-1/4 Rear motor mount from Ghetto
Sprocket adapter and sprocket/40T.
-heard good things about Sportsman's. Other opinions?

Once broken in, tune it some more.
I would consider these "Basic Performance" upgrades.
Expansion Chamber from SBP
Cyclone Intake from Ghetto
Dellorto Carb
Upgrade Air Filter from SBP
And maybe a real nice Gas Tank.

I am very unsure about these next two items. I value any input!
Lightning CDI???
MM or CR Head???

My goal with the build is reliability and longevity.
Will adding a High Compression head compromise that?
Not looking to do any porting work.
The port matching already done seems adequate.

I feel like a parts collector right now.
But it's exciting to think about once it's all goin'!

usflg
 
Last edited:

rangefinder

New Member
Oct 18, 2012
118
0
0
Des Plaines, IL
The build continues. I felt pretty confident in my mounting of the sprocket with the rag joint. But there is some time from when I intend to begin riding this. So, I broke down and bought the Manic Mechanic's Sprocket Adapter and 40T sprocket.

I felt a couple advantages in doing this. First I can now align the chain line more precisely. And second was for the peace of mind it brings knowing I have the right part to do the right job.
 

Attachments

rangefinder

New Member
Oct 18, 2012
118
0
0
Des Plaines, IL
Here is my revised list of things to buy...
Throttle and Grips -SBP
O-ring (set of 3) -SBP
JB weld -for tank studs
2-sided cushion tape

I am building a front drum brake wheel to replace the V-Brake setup.
It's on order now and parts should be in within the next week or so.
-Bringing a Front Rapid Fire shifter for clutch, instead of brake w/button.
-Finishing up my spring tensioner.
-Finishing up clutch roller doo-dad. I will make some photos of that to share.

I have put a lot of thought (and x-tra dollars than originally planned) into making this the most reliable build I am capable of.

If I need another mount, I will get another MM mount with a 1-1/4" bushing.
 

rangefinder

New Member
Oct 18, 2012
118
0
0
Des Plaines, IL
Here is my spring tension-er. I could have had the holes Aqua cut with the rest of the cutting, but I decided it's easy enough to just do it myself. Maybe I should have had it done, whatever... Got the wheel and bearings from a local skate shop for $2, they were used. Found the spring in the extras drawer in the tool room. Going to have to round off the arm at the top with a grinder. Did not think of that at first. But I think it is going to do the trick. Going to hit the Ace Hardware this weekend and find some "button top" bolts that are longer to mount it up. And get a bolt and nylock nut for the wheel. Plus a washer for between the two parts. I think that is all I'll need.
 

Attachments

rangefinder

New Member
Oct 18, 2012
118
0
0
Des Plaines, IL
This weekend I got some hardware for the Spring Tensioner.
No photographs of that yet. I'll get those when it's ready to mount up.

But I did get JB Weld. Here is my tank with the epoxy in place.
Did not take long at all. Very easy to use. I will note that it helps
to keep your fingers moist when working it together. It keeps it
from sticking to your fingers and gives you a bit more set up time.
This stuff sets up really quick. I surprised me for sure!
 

Attachments