CrimsonPrince
Member
Hi everyone, I'd like to introduce myself here by posting this thread concerning my goal to build a motorized BMX bike. You're probably thinking, "motorized BMX", is this guy crazy? I would agree and say yes, but I'm not that crazy. Like, think of all the other crazy things I could be doing, like building an 80cc engine powered unicycle, or riding a non-engine powered BMX. Now that's crazy. I'll update this post with new ideas, objectives, help requests, and pictures as I go along. Please feel free to throw some insight my way! It would be greatly appreciated.
NOTE: This is a collaborative build with @5-7HEAVEN! He is my sensei and I am the novice bike builder in training
2., A standard pocket-bike engine will be placed in the mid-frame of the bike. Yes, this means I'll have to get several custom parts made, including a custom exhaust, a custom freewheel crank-arm set, and perhaps even custom mounting hardware.
3. I will try to maintain an 18:1 gear ratio if possible.
4. I would like this build to be helmet worthy
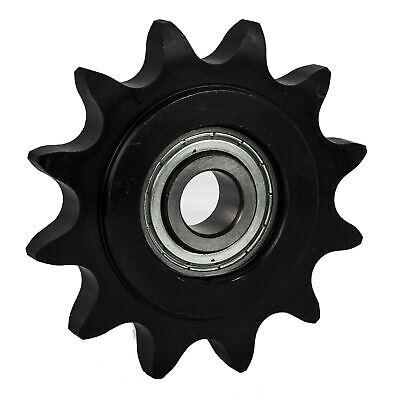
[21SEP20]: We are going to have an idler sprocket mated to a larger sprocket to allow for the engine to run without forcing pedal spin (the idler is like a loos axle that, when mated to the new sprocket, will ultimately allow the engine to drive the left hub rear sprocket without spinning the spindle). We have 2 conditions to address now: Gearing Ratio with Engine: Idler : Mated Sprocket: Rear Sprocket ratio and the fact that it might be optimal to use a 25T or smaller sprocket in this assembly due to the design of the BMX frame. For those who know what the standard BMX frame looks like, the chain stay flares outward, which prevents larger sprockets from being integrated into the space that would align directly with a rear sprocket. Using a standard BMX sprocket fixes the issue, but now the gearing ratio might be a bit more difficult to achieve. I haven't even gone and though about the issues concerning matching a chain across all these gears . Check out Figure 3 for reference.
[21SEP20] [POLL]: Thanks to @5-7HEAVEN, I've been provided with an option to set up a rear engine mounting arrangement for the build. There are several advantages to doing this: its going to be cheaper, it's got a reduced learning curve, and is a bit more forgiving in terms of tolerances. However, I fear that stability may be an issue with regards to this, and ultimately, I would want to "upgrade" to a mid-frame mounting style. Essentially, the rear engine design experience would be a bit more comfortable for a novice, but would take time away from focusing on my objective goal, which is to build a mid-frame engine bike. I set up a poll to see what you guys think, and please feel free to leave comments in the thread!
[22SEP20]: This idea came to me just now, but it could be possible to sandwich an idler bearing (no teeth, same as the bearings you find in the bottom bracket of standard BMXs) and "clamp" the 1.5" adapter onto it, machining off the extruded bolt bosses, and sandwiching the outbound and inbound sprockets together, via bolt connection.
NOTE: This is a collaborative build with @5-7HEAVEN! He is my sensei and I am the novice bike builder in training
Objective List:
1. BMX is a standard 20" top tube bike. NO modifications will be made to the frame itself.2., A standard pocket-bike engine will be placed in the mid-frame of the bike. Yes, this means I'll have to get several custom parts made, including a custom exhaust, a custom freewheel crank-arm set, and perhaps even custom mounting hardware.
3. I will try to maintain an 18:1 gear ratio if possible.
4. I would like this build to be helmet worthy
Idea list:
[21SEP20]: Pocket-bike engines can run upside down. This means that I can run the engine upside down and have a left hand driven sprocket. This also means that I can use the bolt holes already machined into the engine for bracket mounts on the flat top-tube as opposed to the bottom down-tube.[21SEP20]: We are going to have an idler sprocket mated to a larger sprocket to allow for the engine to run without forcing pedal spin (the idler is like a loos axle that, when mated to the new sprocket, will ultimately allow the engine to drive the left hub rear sprocket without spinning the spindle). We have 2 conditions to address now: Gearing Ratio with Engine: Idler : Mated Sprocket: Rear Sprocket ratio and the fact that it might be optimal to use a 25T or smaller sprocket in this assembly due to the design of the BMX frame. For those who know what the standard BMX frame looks like, the chain stay flares outward, which prevents larger sprockets from being integrated into the space that would align directly with a rear sprocket. Using a standard BMX sprocket fixes the issue, but now the gearing ratio might be a bit more difficult to achieve. I haven't even gone and though about the issues concerning matching a chain across all these gears
. Check out Figure 3 for reference.[21SEP20] [POLL]: Thanks to @5-7HEAVEN, I've been provided with an option to set up a rear engine mounting arrangement for the build. There are several advantages to doing this: its going to be cheaper, it's got a reduced learning curve, and is a bit more forgiving in terms of tolerances. However, I fear that stability may be an issue with regards to this, and ultimately, I would want to "upgrade" to a mid-frame mounting style. Essentially, the rear engine design experience would be a bit more comfortable for a novice, but would take time away from focusing on my objective goal, which is to build a mid-frame engine bike. I set up a poll to see what you guys think, and please feel free to leave comments in the thread!
[22SEP20]: This idea came to me just now, but it could be possible to sandwich an idler bearing (no teeth, same as the bearings you find in the bottom bracket of standard BMXs) and "clamp" the 1.5" adapter onto it, machining off the extruded bolt bosses, and sandwiching the outbound and inbound sprockets together, via bolt connection.
Help Requests:
[21SEP20]: Do any of you guys know where I can get brackets for the mounting arrangement as shown in Figure 1? I went to my local hardware store and couldn't even find the right diameter long-bolts to screw into the engine holes itself, so I'll have to travel far and wide to get the appropriate bolt diameter and length to fit the mounting goal shown. Also, another thing is that I want the engine to be slightly offset to the left end of the bike to allow for exhaust pipe clearance and I would like it to be pushed up as close as it can to the front of the bike (in that case, that carburetor will touch the top and down tubes). Tentatively, I'm thinking of using a two-hole strap clamp extended with a mending brace to hold the engine to the top tube. So, as of right now, can anyone point me toward a place where I can find bracket mounts that allow me to maintain this offset AND securely keep the engine in this position, or will I have to get it machined out instead? Also, does anyone know of any anodizing services?Pictures
Figure 1: Target engine arrangement. Notice that the engine itself is upside down. The end result will have the engine pushed up further towards the bike a few more centimeters to provide clearance for the pedals |
|
| Figure 2: Top Down view of the engine mount. The brackets would secure the engine to the top-tube. There may be need to secure the bottom half of the engine with another set of brackets to the down-tube. |
| Figure 3: Potential Mounting arrangement for the idler sprocket assembly. This is just a standard 25T that hasn't been mated to an idler (I haven't bought it yet). Notice the native 25T sprocket on the right hand side. Pedals for the win, baby. | |
| Figure 4: 25T sprocket with pre-drilled holes that were previously designed to affix a guard attachment, but can be repurposed to accept the bolts that would connect the 25T to the 54T in the fabricated "reduction" hub. | |
| Figure 5: Reduction Hub. 54T outbound sprocket. Freewheel Idler sprocket, and 25T BMX sprocket. The 54T will be chained out to the default 6t sprocket on the pocket bike engine with the #25H chain, whereas the inbound 25T BMX sprocket (Bolted to the idler sprocket and 54T sprocket) will be chained out via a 415 chain to a 50T rear wheel sprocket (hub mounted). |
Last edited: