Cannonballs Back Into It With A BT 80

cannonball2

Well-Known Member
Finally had a little cool weather making me think its time to stop the hunting/ fishing(which was fantastic) and get back into the shop on some projects.
Need to finish the 98cc Villiers build and the B&S build which are about 85% done. As usual I got side tracked this time with the BT80(70ccs of course).

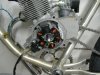
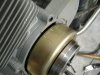
I had followed KCs build and the guy down the road in Jacksonville. That got one on the way from BB. Got it today and wow! Its like a parts department in two boxes. There is even a very nicely made HD puller I'm assuming fits the mags rotor. Everything is quality and well packed. Even the chain guard that I normally fold in half and throw in the scrap bin is HD. Wont be folding it! A quick look down the ports shows I believe a chrome bore, its very shiny. There is only maybe .080" of piston left in the port when the crank is at BDC and nearly nothing in the intake when the crank is at TDC. Absoutely NO trash any where!

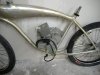
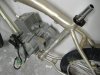
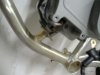
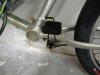
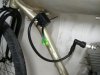
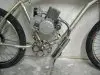
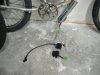
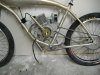
Have been trying to use an early Grubee style aluminum frame in a build. It fits (as shown in one thread) using the lower 2 of the 4 mounting studs. Doesn't appear to offer major challenges(cant believe I said that!)

Plan to ditch the SLA in favor of a trusty 5ah 4s Lipo for starting. Havent figured if I want to charge the lipo from the charging system or not. The system would never fully charge the 4s which is 16.8v fully charged still it should keep it in the 14+v range which is enough to start. May just run it total loss and charge once in a while. Plan to ditch the box and mount the pieces individually around the frame.
 

Attachments

  • DSCF1965.JPG
    DSCF1965.JPG
    387.4 KB · Views: 660
  • DSCF1967.JPG
    DSCF1967.JPG
    231 KB · Views: 643
  • DSCF1966.JPG
    DSCF1966.JPG
    281.6 KB · Views: 508
Thinking out side the box. This bike will run some sort of rear stand so the normal KS area can house the solenoid and the V reg. The bolt spacing is exactly the same on both so they can be clamped together there. The V reg is potted and a few coats of PlastiDip for the solenoid will water proof it. The cdi will mount to the down tube with a nicely fabbed U bolt and some spacers. will shorten the plug wire. This is a utility build to see how this engine works out. Esthetics may improve later in the from of some faux oil tank or something. This is a rough out. Ignore the cable ties.
 

Attachments

  • DSCF1968.JPG
    DSCF1968.JPG
    406.2 KB · Views: 435
  • DSCF1969.JPG
    DSCF1969.JPG
    352.3 KB · Views: 430
This bike will have pedals. Came with a special wide crank set so will use it. Toyed with the idea of running a 3speed rear hub through the BB but it would require modding the cases radically to achieve the primary chain line.

Looking at the pics of the internal parts in the included manual I can see nothing in common with the CG type engine. Seems to be a fresh purpose built engine. Similar but different. It does use the NT carb. I had said years back in a post I would be willing to pay double the CG cost for an updated redesigned engine. This one cost $269 to my door. Hope this is the one!
 
Last edited:
LOL. You always made it work in the past, go for it. Welcome back, i am sure i am not alone when i say you have been missed. Be good to here how good these engine are...................Curt
 
Thanks Curt!! I never really go away just get side tracked at times. There is so much to do in this area even with the heat and bugs.

Trying to figure the ratios on the single speed.
Manual indicates a 16:1 overall ratio and a 44t rear sprocket is supposed to be supplied. I got a 48t. Guess I need to count the reduction in the engine to see what the primary is and then choose a rear sprocket. Don't really want to go lower numerically than a 16:1. If the primary reduction is around 4:1 like a CG then the sprocket should be a 40T. Have to check it out.

So have decided to mount all the electrics on a board behind the seat post shaped like the usual board tracker oil tank. Also hopping to ditch the springer front for a MTB front suspension I have. Will have to bush the MTB front from 1" to 1 1/8. Details details.
 
Last edited:
Hey Scratch, its been awhile!

The electric start/charging is a bonus. My only real interest in this engine is hoping maybe its properly engineered and built. I'm hoping its a good smooth reliable runner. If so it should be a real contender for a long term MB. We will see.

Been in bed with the flu for the last 6 days, miserable stuff. Hope to be up and about next week then maybe get some work done on it. Just had to get out of bed when it got here to see if it fit the frame. Looks promising.

BTW Scratch since you have taken to building interesting, innovative and creative builds I was able to relax this summer while you held the fort down.

Thanks
 
So feeling a bit better today at least have been out of bed. Gave me some time to ponder the build with a clearer head. Conclusion: this is about the engine not the build so I have decided to do the least necessary to get the engine up and running

I sorted out the wiring and found it can easily be run using only the coil. In fact the standard CG CDI works. I say at least it fires. I am assuming the timing will be the same. The CG coil makes mounting much easier.
Got the wide cranks mounted and the exhaust hung. The cranks in fact clear the engine. I had doubts just looking. I used the Bikeberry $10 BB conversion. Fit perfectly. Took a tweek to get the pipe out of the sprocket.
At this point its just whatever it takes to finish a normal CG build. If the engine is impressive I will just reverse build the systems back into the bike.

Will have to calculate ratios next. This bike is a 24" so will need a smaller sprocket thinking a 40t.

Pic show the CG cdi wired, its really PnP.
 

Attachments

  • DSCF1970.JPG
    DSCF1970.JPG
    462.3 KB · Views: 1,512
  • DSCF1971.JPG
    DSCF1971.JPG
    491.7 KB · Views: 434
Last edited:
So after due pondering I concluded I really don't want the complications of an electric start system for me personally. I think its a great thing, but I like simplicity.

I removed the starter and its drive chain. I left for the time being the driven starter sprocket mainly to keep the freewheel together. It will just go along for the ride for now. The starter was a nice unit. A geared version much like if not the same as the ones used on the horizontal Honda Cub clone engines.

The engine is very high quality in its castings. Much better than any CG I have seen personally. The starter cup on the engine is machined steel not cast aluminum. The engine pulls very easily much more so than a CG pull start.

So this will be a bare bones build. Will save the wiring harness for adding lights later. It all comes together in the throttle control. I switched to the common CG throttle with kill wire only. Nothing is altered permanently. Lights can be run with out a battery using a secondary V reg.

Waiting on parts as usual.
 
I will save the electric start for when I'm too old to pull it and build a trike to keep from falling over.

Yeah it has lighting/charge coils and runs the common pit bike style V reg.
 
Young man heck!

Still waiting on critical parts like handle bars so decided to pull the starter side again and remove the starter sprocket and freewheel and have a look at the electrics.

Used the really nice supplied puller. Works on the alternator rotor and also the clutch I assume. The rotor and in fact the electrics look once again like the Honda clone pit bike engine uses. If so pretty smart using proven off the shelf components. This engine is beautifully made. I have seen nothing but first rate design/manufacturing so far. Of course the proof will be in the running.

The rotor is complete with timing marks. Second 0 mark is when the trigger magnet reaches the trigger coil and the F is when it leaves Should fire between these two marks. T is TDC These markings are very Hondaish. The bigger black coil is for the CDI and the rest are lighting/charge.

Got both chain lines established with no idler necessary. Took a 1/2 link on the 415 to make it work. This engine has a bunch of rotational mass between the heavy rotor and the clutch. Should make it a smooth runner.

If the dang parts would show up I would be riding soon!
 

Attachments

  • DSCF1976.JPG
    DSCF1976.JPG
    306.9 KB · Views: 855
  • DSCF1978.JPG
    DSCF1978.JPG
    298.3 KB · Views: 1,286
  • DSCF1980.JPG
    DSCF1980.JPG
    432.1 KB · Views: 535
  • DSCF1982.JPG
    DSCF1982.JPG
    281.3 KB · Views: 412
No cylinder head, one piece jug. Would seem to have it origins in the chainsaw world, but looks like a purpose built or modded version especially for the BT engine. I like the one piece aspect. Sure it may hamper tuning bit it will also eliminate a bunch of issues associated with the CGs jug/head design.

My take on this engine is it was designed to be reliable/durable from scratch instead of a copy of an existing engine. Ill bet its detuned/limited by the exhaust. If its a chainsaw jug, with that type of porting/timing it would probably rip as is with a good exhaust.
This is conjecture on my part, but I do know the ports open more than a stock CGs I have seen. Only putting it on the road will tell.

The funny thing is the # of covers/cases it has each stacked on top of the next layer. All gasketed and fit well(with very thin gaskets). Looks like with a different set of "covers" it could be a pull start only for less $$. That would be my preference.
 
It's nice to start a well built engine. I agree on the head issue. I remember Kawasaki in the 70's came out with a 100 called , I'm thinking the centurion, it had a chrome bore and was a high revin screamer. I'm anxious for you!
 
Well its a mixed bag.

Engine is a great runner, smoother than any similar CG I have had. Starts super easy, clutch works great. Has a bit of gear noise like a CG but other wise quieter overall. Good power for not broken in.

Down side the recoil is a weak link. I was in lawn equipment for years. Believe me I know how to treat recoils. On the third ride the recoil broke. I took it apart and a cast in post in the housing broke away leaving the spring unanchored. I fixed that with a threaded post, rewrapped the spring and reinstalled. Quit working on the next ride. This time the starter pawl sheared off. I have requested a warranty replacement from Bikeberry. We will see what happens. I doubt the replacement will be any better. May try to make a metal pawl.

Its a shame the little engine works very well otherwise. May have to go the electric start route which I would rather not. Maybe I should take up knitting.
 
Back
Top