You are using an out of date browser. It may not display this or other websites correctly.
You should upgrade or use an alternative browser.
You should upgrade or use an alternative browser.
JD Themed GT2A-S, 4 stroke
- Thread starter knightscape
- Start date
knightscape
Member
Well I've got a handful of miles on it, it's nice to ride. Will probably swap handlebars out at some point, definitely the seat, but it's a fun bike. Had another minor setback today though, the throttle grip totally broke in my hand. I was planning on replacing it, but wasn't expecting to have to so soon. Thinking my kit was built on a monday... So I need to choose between the SBP twist throttle or a thumb throttle like I put on my 2 stroke.
Here's the failed grip:

Here's the bike as ridden today:


Aaaand, I managed to get a couple short clips of my nephew and neice riding before the throttle crapped out:https://www.youtube.com/watch?v=GSdzh-XFzn8
Here's the failed grip:

Here's the bike as ridden today:


Aaaand, I managed to get a couple short clips of my nephew and neice riding before the throttle crapped out:https://www.youtube.com/watch?v=GSdzh-XFzn8
runnermike
Member
That is one sweet looking ride my friend!!! Those SBP are some good throttles. I have one now on my current bike. No complaints at all!
KCvale
Well-Known Member
Sweet, nice job.Jackpot!!! CDI came in the mail today, swapped it out. Fired right up, first pull!!! Just did a few miles on her. Letting her cool down, gonna go over all the bolts and stuff again. If anyone needs me I'll be in my garage with a giant grin
Just a tip, when you get back with the engine warm/hot get your torque wrench and in a cross pattern tighten you head bolts down 5 lbs. at a time until all are 20 lbs.
The manual says like like 12 or 15 but I find 20 to be ideal on a 66cc, 15 on a 48.
rackemblue
New Member
Did you have any problem getting the paint to go on smooth on that plastic cover? I have had plastic panels to fish eye on me unless I used fish eye eliminator or flex agent in the paint. But I see that you used rattle cans. Is it enamel?
knightscape
Member
Did you have any problem getting the paint to go on smooth on that plastic cover? I have had plastic panels to fish eye on me unless I used fish eye eliminator or flex agent in the paint. But I see that you used rattle cans. Is it enamel?
I used a regular Rustoleum sandable primer, and then a few coats of X-O Farm & Implement spray enamel. It's a paint and primer in one, but I always prime anyway. The only thing I do special is wet sand with 1500 grit in between the last couple color coats, then 2 coats of clear enamel. I let each color coat sit a full 24 hours before sanding/recoating. I've done a few bikes this way and they come out great and last well. If you're going to clear coat, make sure the color coats are cured well before clear. Otherwise you risk puckering the paint up. On the cover specifically, make sure you wash it well to degrease it before painting, I noticed a fine film of machine oil on mine out of the box, that will screw with paint adhesion bigtime. I wasn't quite as fussy with sanding the engine cover as the frame itself and it looks fine, IMO.
runnermike
Member
Knightscape....do you have a pic of how you spaced your rear wheel from 110 to 135? What you used, how you did it and what not?
knightscape
Member
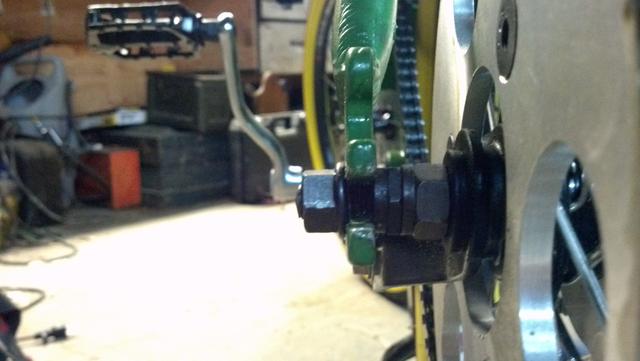
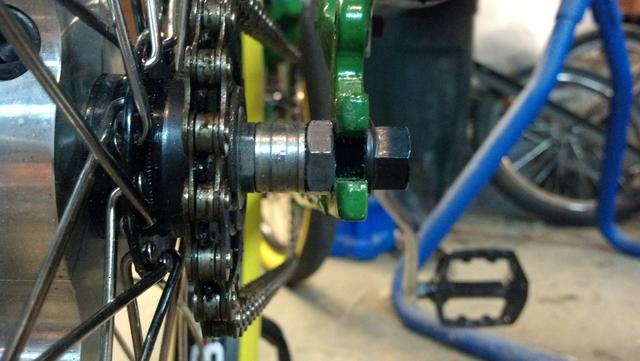
Sure, you just caught me in the shop. There's 2 versions of this when respacing an axle, the kludgy way, and the way you want to do it...
First, kludgy:
You can use any old axle spacers stacked up to make 12.5mm on each side. Here I used 2, and they are in between the locknut and the frame. This isn't preferred. I was leaving some adjustability here since I'm going to put a tugnut on this side and wanted to try to dig up another nicer spacer.

The way you want to do it... (Just ask Sheldon, he'll tell ya)
This side, I removed the inner locknut on the hub and put the spacers inside it, then put the locknut back on so it's cone, spacer, inner locknut, frame, outer locknut. The spacer is the silver colored piece, it's one solid piece despite it's appearance.

There are commercially available spacers you can get that are 12.5mm for each side, but you can also just raid old junk wheels for them, which is what I do, I keep a bin of them on my bike workbench. If using multiples, I just stack up different combos and measure with calipers. If you're within a mm or two, you'll be fine. Biggest thing is you want to be symetrical.
Edit: I'll just add that most coaster hubs I've ever worked with have long enough axles to allow spacing out to 135mm, but there are those out there that would need an axle to be swapped out to do it, but that's not that much trickier since you're already taking the locknuts off anyway. You've just got to take care to not lose your bearings if you remove the cones.
First, kludgy:
You can use any old axle spacers stacked up to make 12.5mm on each side. Here I used 2, and they are in between the locknut and the frame. This isn't preferred. I was leaving some adjustability here since I'm going to put a tugnut on this side and wanted to try to dig up another nicer spacer.

The way you want to do it... (Just ask Sheldon, he'll tell ya)
This side, I removed the inner locknut on the hub and put the spacers inside it, then put the locknut back on so it's cone, spacer, inner locknut, frame, outer locknut. The spacer is the silver colored piece, it's one solid piece despite it's appearance.

There are commercially available spacers you can get that are 12.5mm for each side, but you can also just raid old junk wheels for them, which is what I do, I keep a bin of them on my bike workbench. If using multiples, I just stack up different combos and measure with calipers. If you're within a mm or two, you'll be fine. Biggest thing is you want to be symetrical.
Edit: I'll just add that most coaster hubs I've ever worked with have long enough axles to allow spacing out to 135mm, but there are those out there that would need an axle to be swapped out to do it, but that's not that much trickier since you're already taking the locknuts off anyway. You've just got to take care to not lose your bearings if you remove the cones.
Last edited:
runnermike
Member
Thanks man!
runnermike
Member
I really cant see fromt the picture, but did you have any issues attaching your coaster brake arm?
knightscape
Member
Yup, I did need to give the brake arm a little english with a hammer in a bench vise to get it to align a little farther over for the frame. Just like you'd need to do to clear a sprocket on some hubs.
runnermike
Member
Ok cool...my brake arm is already pre bent...
knightscape
Member
OK, back in business. The SBP throttle showed up today, I really like this part. While waiting for the throttle this week, I messed with the seat, swapping out a Brooks B17 I had on another bike and slamming it down as far as I could with an inverted seat clamp. I still want a cushier seat, but this one at least looks better than the other placeholder. I may also cut some off of the seat tube top so I can get the post a little lower.
Old seat:

Brooks B17:

New controls from SBP, with Oury grips:

Now I just need some dry roads again.
Old seat:

Brooks B17:

New controls from SBP, with Oury grips:

Now I just need some dry roads again.
runnermike
Member
Sweet looking ride my friend! Great job!
Flying Dutchman
New Member
Your ride looks fantastic! If my bike looks half as good as yours when it's done I'll be very happy.
runnermike
Member
Knightscape, what issues, if any, did you have with chain line on the pedal side. How did you correct it? I'm asking because I have two options on my build....1. Space my current will from 110-135 like you did. I have the same wheel. Or 2. Lace up a 135mm disc brake hub I have, but that would require me purchasing a top hat adapter and sprocket...
knightscape
Member
The problem on the pedal side is that the kit crankset places the flat for the cottered crank about 1/2" outside of where the sprocket on the hub is. This actually has nothing to do with respacing the hub. If you respace your hub properly the rear sprocket will be in exactly the same place relative to center. 1/2" off is not too terribly awful and considering I'm only using the pedals for actuating the coaster brake, I haven't done anything about it yet. What I will do, is to carefully grind the flat a little bit inboard of where it is now and slide the cottered crank over to the proper placement, there's room to do this on the crank spindle. What I may or may not do long term is swap out the bottom bracket for the SBP sealed, one piece cartridge BB that's got a narrower spindle and a keyed slot for placing a chainwheel wherever I want it. The kit spindle is wider than it needs to be, so I think I can get away with moving it towards the center a bit. Haven't really measured that all out yet though. Also, I just don't trust that swaged chainwheel to hold up forever. It looks cheap, feels cheap, and is very slightly out of round. Having a chainwheel on a coaster hub "unswage" on you is a frickin scary feeling and I'm not interested in having that happen on a moto-bike.
Hoping to do some miles on it this afternoon
Hoping to do some miles on it this afternoon
knightscape
Member
Update for new bars, thanks to Sportscarpat! I've been looking for a set of bars like the old Harleys for years, these are a set of the ones he made for his Keystone Flyer build. I painted them black and mounted them with a new BMX stem, moved over the SBP throttle/kill switch and the grips I had on the other bars. Did 20 miles on them today out to the local swimming hole. I think I've got just shy of 150 miles on the bike now. I also made up a little handlebar mount for my old iphone to use with an app called simply "speedometer" (gps), and found that my max speed on the flats is 22mph (with an avg of 17mph), so I think I've got some figuring out to do, I thought there'd be a little more than that. I'm wondering if I have a rev limited ignition. I'm considering picking up one of those little trailtech tachs. Also need to check/adjust valves. It's a little peppier now with some miles on it, but I think there's more there waiting to be unlocked.
The bars:


The bars:


