
You are using an out of date browser. It may not display this or other websites correctly.
You should upgrade or use an alternative browser.
You should upgrade or use an alternative browser.
Getting all 3 Horse Power out of your GT-5 Sky? (tear down)
- Thread starter recon chris
- Start date
thats what i was talking about. i think the ports are lined up for a 48cc crank but they didn't think when they bored and stroked it. woulda been fine on a four stroke but they didnt think port timing. he musta been the owners son. you could raise the transfers a little cut the skirt and up the compression to make up for the volume loss [transfers] good luck dennis
recon chris
New Member
I measured it and a 3mm thick gasket would be an improvement. However it would take a 6.2mm gasket to make it perfect. I would also have to cut almost the entire top of the jug to make up for this. Meaning that ill have to shave it down to the first cooling fin. And trimming the piston skirt will also be more that a 2mm job like I originally thought. I can do all of these moods but I’m running into trouble finding a 6mm thick gasket. I went to an auto parts store today and the thickest gasket maker they had was 1.5mm, which by the way is probably twice as thick as the stock gasket.
Any ideas?
Any ideas?
Last edited:
recon chris
New Member
I have had the idea of cutting a plywood gasket and then covering the wood surfaces in a thin coat of RTV. That should work...right?
I’m waiting for more people to chime in on this before I move on it.
I’m waiting for more people to chime in on this before I move on it.
recon chris
New Member
I dont think i can machine an aluminum spacer. but i can definetly make a wood one. The question is would it fall apart over time or be afected by the jug heat.
Last edited:
truckd
Well-Known Member
Hey! Chris go to the thread Ol' Blue and check it out this is what your'e engine should look like when your done,did everything you did except bearings and piston as I bought a PK80/68.5 engine and everything was already installed, still needed some tweeks though.
Good job I'm going to book mark your thread and continue to fallow it as your engine progress's, good luck!!
Good job I'm going to book mark your thread and continue to fallow it as your engine progress's, good luck!!
recon chris
New Member
Thanks Trucked I saw your thread and that is a nice looking engine.
Well Skarrd….I think I might be able to make an aluminum spacer after all. It just so happens that I have a friend that works at an r and d military base in a machine shop. (Some guys have all the luck) I went over the dimensions with him tonight and he thinks he can do it. He should give me conformation tomorrow. If he can he will be making me a 4mm thick aluminum spacer made out of 70-75 space grade aluminum (ALL the luck). I’m making it 4mm thick because I will have a 1mm gasket on each side of it essentially raising the jug 6mm. He has also offered to mill the top of the jug down (where I was going to spend an hour and a half sanding it down on a plate of glass).
If he can’t then I’ll be stuck to making a 1.5mm gasket for the bottom end of the jug and taking .5mm off the top end of it (since the original gasket is 1mm thick). And since no one has suggested 6mm thick gasket material I’m assuming it’s hard to come by or it doesn’t exist. This will be an improvement but will not be anywhere near perfect.
Later on (assuming my friend can’t help me) I might dermal a spacer out of hobby aluminum that you can find at home depot, but that is going to be a lot of work. However this would be a suggestion for someone trying to copy what I’m doing and doesn’t have a machinist as a friend.
Last edited:
recon chris
New Member
I should be putting the case back together tomorrow. I’ll have to look at the engine schematics some more but I believe the only things that belong "IN" the bottom end is a crank shaft, and a clutch shaft. Don’t remember anything else I pulled out of it. Ill also be adding a grease nipple to the clutch shaft portion of the case like so


This will aid in me applying new grease directly to the clutch shaft. To go with the grease nipple on one end ill have a relief screw on the other so
1. I can keep adding grease without pressuring the case.
2. As the new grease goes in one end the old grease will eventually migrate out the other ensuring that the grease is "changed".
The idea here is that in this engines entire life span I’ll never have to open the crank case again, it’s rather time consuming.
Last edited:
recon chris
New Member
The bearings I’m using. How I’m using them and were I’m using them. Any further questions on my bearing choice and usage please PM me.
http://www.youtube.com/watch?v=0nCtJDssBCQ&feature=youtu.be
http://www.youtube.com/watch?v=0nCtJDssBCQ&feature=youtu.be
recon chris
New Member
So I’m a go for the spacer. It should be made in a week or so!!
For now (because college is starting and I need my bike for the commute) I have assembled my engine with the old (small end) needle bearing, original screws, original air filter, original exaust, and original intake. These parts are all on order but can be replaced without having to take the case apart so I’ll be replacing them as I get them.
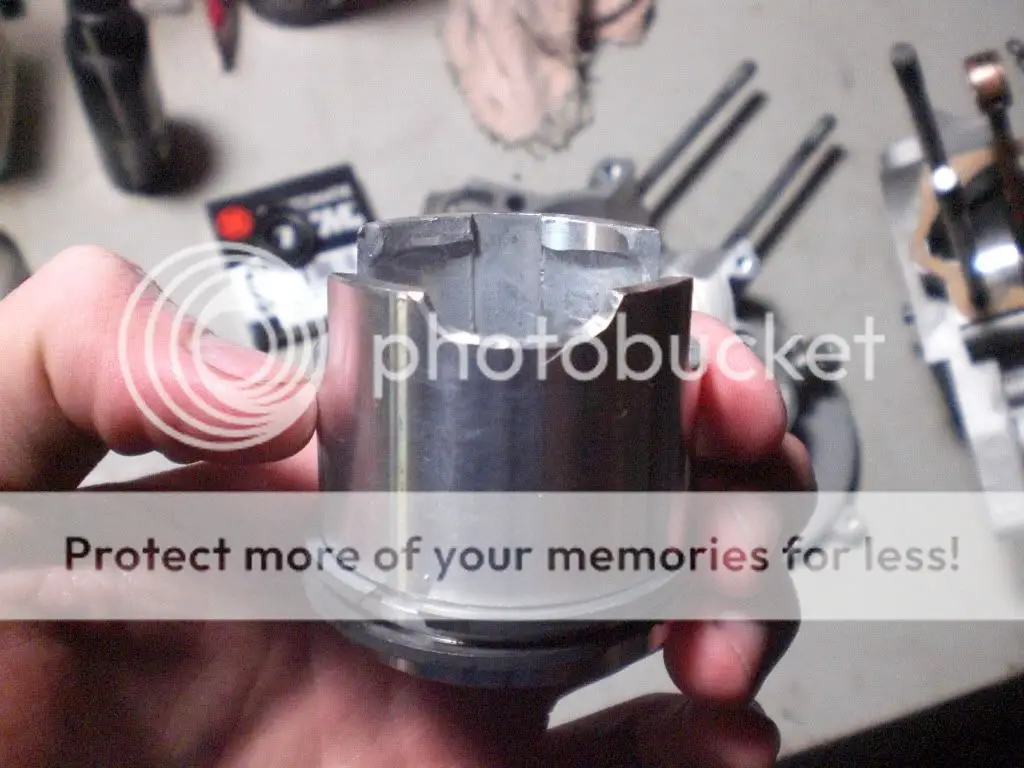
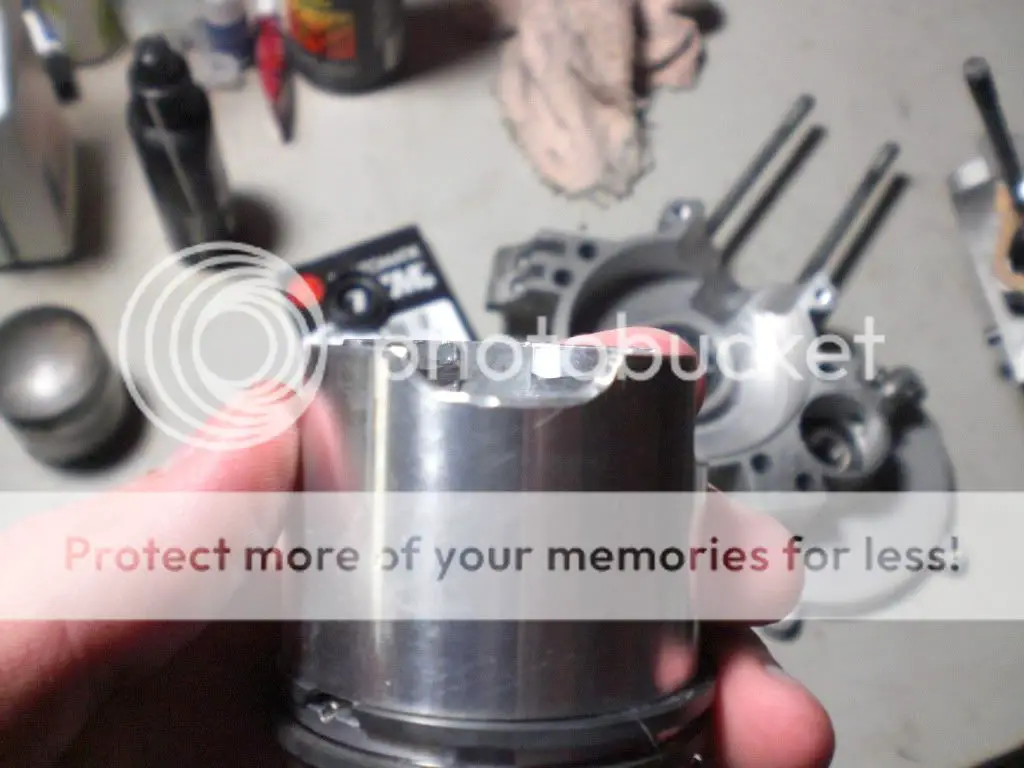
Here is a mod I did to the piston before I assembled the case tonight. Ill have to take more out of it once I get the spacer. But how it is now the intake port it perfectly open at TDC.
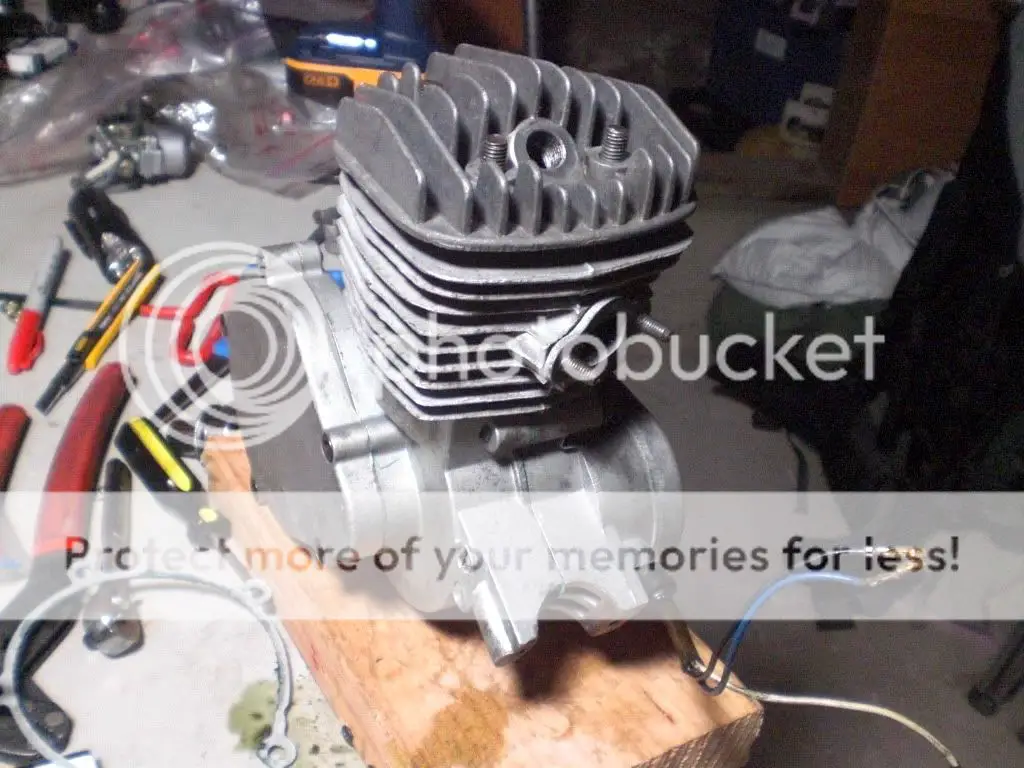
Here is a picture of the engine 90% assembled I just need to at the intake spout and carb tomorrow, along with exhaust and bolting on the head.
As I get new parts ill be able to install them one by one and let you know exactly how much power they really give me.
For now (because college is starting and I need my bike for the commute) I have assembled my engine with the old (small end) needle bearing, original screws, original air filter, original exaust, and original intake. These parts are all on order but can be replaced without having to take the case apart so I’ll be replacing them as I get them.
Here is a mod I did to the piston before I assembled the case tonight. Ill have to take more out of it once I get the spacer. But how it is now the intake port it perfectly open at TDC.
Here is a picture of the engine 90% assembled I just need to at the intake spout and carb tomorrow, along with exhaust and bolting on the head.
As I get new parts ill be able to install them one by one and let you know exactly how much power they really give me.
Last edited:
recon chris
New Member
Here is a time laps video showing me putting the engine back together.
http://www.youtube.com/watch?v=Pjsa5RnXAjI
This obviously does not give a clear view on how to handle every part of the rebuild. If you want that then watch these 4 videos they helped me a ton.
Part 1 http://www.youtube.com/watch?v=p6E0fLlsysk&feature=related
Part 2 http://www.youtube.com/watch?v=qRuCvAnl_TM&feature=related
Part 3 http://www.youtube.com/watch?v=3jM1iaNBO08&feature=mfu_in_order&list=UL
Part 4 http://www.youtube.com/watch?v=-1qFxuLQXTg&feature=related
Some of his methods can be considered “harsh/rough” but in the end he gets the job done.
killercanuck
New Member
Neat time lapse. I hate when I forget to put the jug gasket on before the jug 
recon chris
New Member
Ya I hear ya, because the only thing I like doing more that fitting the rings into the jug is doing it twice
recon chris
New Member
So I got the engine all back together and installed on my bike (it really looks sweet). Also I installed a "kings" top hat adapter and a 39 tooth sprocket to the new back wheel. I can not believe how true this thing runs, its literally perfect. After that I installed street tires to both back and front with heavy duty down hill Schrader tubes.
Then I started it.
To my surprise it came right to life! And now it has a much more prevalent "POP" during cycles. This thing now sounds like a healthy off the shelf chainsaw (and it still has the stock exhaust on it!)
Also the lighter crank gives the engine instant thottle response, I can rev it like a "braper" lol. But the balanced crank is what is really scary. Form 10-18 mph its a little choppy (and I mean a little) after 20mph it gets uncomfortably smooth, and the engine wants to rev forever.
After a few warm up rides I couldn't take it and went WOT for a block. I didn't hit its top speed it just kept getting faster and smoother but I would guess its new top speed is in the 35mph area.
I don't have and videos or pics yet because I finished installing the engine at 9:00pm yesterday night but you can expect some soon!
Last edited:
biknut
Well-Known Member
Good job Chris. I think balancing your crank, and cutting your piston will be what make your biggest improvements so far. The picture you showed of your intake port before cutting the piston, looks about the same as mine. I think you'll get a really big improvement now, after cutting your piston, from an expansion chamber.
Question, what size rear sprocket are you using?
Question, what size rear sprocket are you using?
recon chris
New Member
So i haven't posted anything so far because I am waiting for my spacer to be made. Then I can then measure the exhaust timing and make an appropriate expansion chamber for it. If anyone is interested in making their own ex chamber i would recommend downloading this software for 18$ http://www.buildandclick.com/html/tuned_pipe.html.
So far the ridding been great except for one thing.
The drive chain on the upper side were it returns to the engine vibrates from side to side during certain rpm ranges. Ill have to make a chain tensioner for that.
Also i thought I should tell you guys. After the first week of riding i was accelerating up a road and suddenly the engine RPMS skyrocketed and I lost all power to the rear tire. What had happened was that the woodruff key on the drive sprocket sheared off due to to much torque.
Woops
recon chris
New Member
So I messured the compression today with a proper compression gauge to see were I'm at and also to make sure there isn't a leak (maybe through one of the new seals or somthing). After a few tests the average grouping was 170psi. I hear normal compression is around 150 so Im guessing 170 is better is towards the higher end. This will be the compression that ill try to obtain again when I grind the head to compinsate for the spacer.
Last edited: