Vented Gas Cap

lostinidaho

New Member
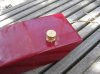
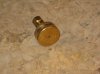
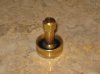
Here are some pics of my vented gas cap. It seems to work very well. I got the idea of the cap from Baridco.

The brass cap gives a great vintage look. It is a cap for a washing machine hose. Through the center of the cap I drilled 1/16” hole. That is the smallest I have. For the tube inside the cap I bought a copper washer, 1/8 X 1 ½” brass nipple and a 1/8” brass cap. I soldered the brass nipple in the hole of the washer. I then ground the washer down so it would fit in the inside of the cap. I drilled two holes in the side of the nipple and 2 holes in the cap. I then used some permatex gasket maker to secure the copper washer in the cap. I replaced the washer.. The washer probably will not last. But I can make a new washer from some gasket material.

I have rode with this cap about 25 miles on bumpy roads and in warm weather with no seeping. I have tried to slosh gas out the cap, but the brass nipple and cap prevent this from happening.

Of course the lawyers make say don’t follow any of my advice, ideas, plans, etc
 

Attachments

  • Tank.jpg
    Tank.jpg
    119.3 KB · Views: 415
  • cap 1.jpg
    cap 1.jpg
    90.2 KB · Views: 397
  • cap 2.jpg
    cap 2.jpg
    90.3 KB · Views: 446
that's a pretty good idea.

what i've been doing is cutting a circle of thick leather from a belt, big enough so you have to jam it into the cap, then i drill a tiny hole through the cap and the leather, then offset the two holes a little.

it'll drip if i flip the bike over, but other than that it doesn't leak at all.
 
Nice Idea with the leather Bairdco had not thought of that. Lostinidaho I like that too! (^) Thanks for sharing.. Can't wait to see the tank all mounted up!
 
Defo nice, works well and lookin' good (^)

Another tip for helping to prevent cap seep is to make a simple baffle, take an aluminum can & cut he top & bottom ofn' it - then slit it up the side. Roll it up to fit in the fill & trim the excess height off. When it unrolls it'll hold itself in place against the sides of the threaded part of the filler neck w/o even fasteners - tho you may need to take it back out & cut a small triangle of aluminum off the bottom to allow it to flow faster when filling.

That's a great tip BAWake, I must remember this. Here's what I'm using for a vent, we'll see how it holds up when I get the tank finished....


Defo nice, works well and lookin' good (^)

Another tip for helping to prevent cap seep is to make a simple baffle, take an aluminum can & cut he top & bottom ofn' it - then slit it up the side. Roll it up to fit in the fill & trim the excess height off. When it unrolls it'll hold itself in place against the sides of the threaded part of the filler neck w/o even fasteners - tho you may need to take it back out & cut a small triangle of aluminum off the bottom to allow it to flow faster when filling.

What happens if the sloshing gas and vibrating engine works the "baffle" away from the fill?
You have a half rolled up sheet of beer can rattling around in your tank!
Your gonna halfta empty several other beer cans before you get that sucker out!!
And the more you empty the harder it will be to get it out!! Kip.
[email protected]
 
Last edited:
What happens if the sloshing gas and vibrating engine works the "baffle" away from the fill?
You have a half rolled up sheet of beer can rattling around in your tank!
Your gonna halfta empty several other beer cans before you get that sucker out!!
And the more you empty the harder it will get to get it out!! Kip.
[email protected]

I'd say if it happened in a peanut tank....drink the beer and toss the tank. Then start over. Pretty simple really.laff
 
Dunno - been a couple few thousand miles & I've not had that problem *shrug* perhaps it's cause I didn't use a beer can lol

Srsly tho, if the rolled up can fits flush w/the bottom of the tank and the cap - it's "locked" in place. If the fuel manages to slosh hard enough to dislodge it... either it didn't fit well enough in the first place or... ya jus' hit something so hard the last thing yer gonna care about is a sheet of scrap aluminum in yer fuel tank laff
 
Last edited:
Dunno - been a couple few thousand miles & I've not had that problem *shrug* perhaps it's cause I didn't use a beer can lol

Srsly tho, if the rolled up can fits flush w/the bottom of the tank and the cap - it's "locked" in place. If the fuel manages to slosh hard enough to dislodge it... either it didn't fit well enough in the first place or... ya jus' hit something so hard the last thing yer gonna care about is a sheet of scrap aluminum in yer fuel tank laff

Maybe perforate the can a little and notch the bottom as well would help if filling up at the pump is required. And yeah, I don't see the can baffle moving any if it's locked in place like that. My rear rack/tank has baffles built in. I still like this idea.
 
I bet you I can take a rivet after installing it and just knock The backer buck out of it and ya get the exact same image.;):D

How a Rivet Gun Works | eHow.com

Working the Rivet Gun
# The rivet is loaded into the rivet gun head and placed into position where the metal is to be joined. The trigger is pulled and the rivet is forced by air through the metal. The backer buck squashes the tail of the rivet against the backside of the metal securing it in place. The rivet gun is then reloaded with the next rivet and the process is repeated.
 
Back
Top