Rail bike conversion finally finished w/pics

GoldenMotor.com

mountain80

Member
Aug 8, 2008
260
4
18
Red Deer, Alberta
Was able to get the bicycle out on the tracks for a few km only.Machining the new parts required as this was a prototype and now have realtime experience and deviations/measurements of the track. Full report and pics/video will be forth coming as soon as I can!!
 

mountain80

Member
Aug 8, 2008
260
4
18
Red Deer, Alberta
Yes it is a puch head, had to reweld the holes and redrill as their is little room between the edge of the head gasket and the bolt hole pattern in the head. I also remachined the combustion chamber as the compression was way to high for the pk motor.

Neat times I understand, I have had some harshly serious setbacks in my life at this time and the revamped parts are on hold although I did gather most of the materials my puter died and I just got it fixed to boot. I WILL resize the photos and post as soon as possible, unfortuneately I have no time for the next couple of weeks or so I barely pop online at all I am so busy dealing with life, so patience guys I promise to get it done when i get other matters sorted, thx for the interest.
 

Dan

Staff
May 25, 2008
12,765
115
48
59
Moosylvania
Sorry to hear that MT.

Ya know your on to some thing good when we are chompin' at the bits for up dates. Is the highest compliment in this crowd.

Now get back to work! snork
 

mountain80

Member
Aug 8, 2008
260
4
18
Red Deer, Alberta
Had a few moments today to breathe so to say so I resized a couple of pics of me and my machine. The second one was under power and you can see the large variance in rail to rail width, that is what is causing problems initially and requires the revamped part. Sketches are waiting for when I get a chance for the improved parts. More info and pics to follow when life calms down a bit.
 

Attachments

slowenuff

New Member
May 5, 2010
25
0
0
baltimore,maryland
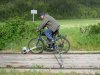
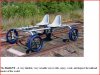
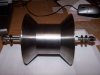
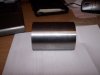
Finally it is done with the exception of two 90 degree plowlike pieces in front of the guide and outrigger wheel which will move objects off the track and keep me from derailing. We have 60 miles of abandoned and no longer used railroad at the relatives to use. After checking out various pics and videos on youtube etc I decided that I wanted a conversion that i could ride away short distances and not have a purpose built railbike. The front swingarm swings up and the outrigger is made so that the tubing will slide into each other and can be bungy corded on to my back rack. Except for a few pieces the entire setup is t6061 aluminum with stainless fasteners polished I wanted to keep the weight to a minimum. Figure it weighs about 15 lbs total. I have it all setup for the proper width of the rail and will be taking a testrun here in May. Note the 2 aircraft cable guy wires that keep it all in alignment, tried it down the street and it holds quite rigid.It only takes a 6'' crescent wrench to assemble and adjust. I designed and machined the project through winter so it should be fun if everything works properly!!
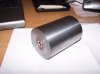
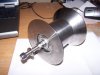
SWEET.....i always wanted a rail big...and lookie here, you made a nice! curious as to why no shoulder on the outrigger wheel...the old time rigs had a mini style RR wheel...as it sits it looks like your back wheel could just drop off the rail since the outrigger wheel appears to just roll on top of the track....and the old timer one's outrigger attached to the bike high up under the saddle, AND the bike actually leaned in to the center of the rails a little to counter the off camber sweeping turns.....love to see it in action, but please keep us postede as you refine your rail rider....really nice handy work!.duh.
 

TerrontheSnake

New Member
Jun 1, 2009
720
0
0
Oregon
DUDE! I am looking for abandoned rails in Oregon right now, if I find any worth it I am going to make a rail car, I'm not even going to worry about it being a bike at that point. Seriously cool concept though!
 

mountain80

Member
Aug 8, 2008
260
4
18
Red Deer, Alberta
Interesting concept. Anyways now that life has gotten back to semi normal and I have more time,thought I would post a few findings on the railbike trials. North american is normally 4' 8 1/2'' inside to inside rail and the railhead itself is 2.5'' wide. After coming off the track(yes i had helmet and safety gear on) myself and my uncle who is a train afficianado for 30 or so years went back and analyzed the situation. The variance we found was up to aproximately 1 5/8'' rail to rail and up to 3/4'' total variance in the railhead itself. After researching a bit in a railbook it was quoted in saying that plus or minus 1 inch is acceptable rail to rail. That now has made me design new parts for bothe the front guiding wheel and the outrigger wheel. No longer will I be using the narrow roller on the out rigger and snowmobile bogeys as a guiding wheel as the outrigger wheel does come off and if you set the guide bogeys to the maximum rail width you take a chance of it having to much sideplay on a narrow section which the rear tire will follow and possibly/unacceptably come off the rail.
What is the solution you ask? I will be machining a 4'' widw roller for the outrigger so it will always be on the rail no matter what. As for the guiding wheel I will have a tapered roller - basically looks like a large thread bobbin 5'' in diameter that the insides are tapered so that as the track width increases/decreases the roller can move up and down and stay in intimate contact with the rail. If you refer to the previous picture you see a small rod going from the front swingarm upwards through a heim joint. The updated rod is a little thicker and will have a spring that the preload can be adjusted by locking the collar on the shaft to vary the preload. The roller weighs about 8-10 pounds and is on bearings of course. A little long on the explanation but I thought I would share the info and will be trying it again in August hopefully.
Of course pictures will be posted when they are done for all to see maybe give you some ideas.
 

NEAT TIMES

New Member
May 28, 2008
1,964
1
0
PENSACOLA, FL
M80

Good To Hear From You. Glad Things Are Better.

M80, Your Build And Adventure Is Very Interesting. Am Glad Someone Is Doing It. Thanks Ron
 
Last edited:

mountain80

Member
Aug 8, 2008
260
4
18
Red Deer, Alberta
Neat times no offence taken, myself(machinist by trade) an ex engineer as well as a millwright put our heads together on the roller design so I am definitely not above taking input from others! As far as the wedging effect to the best of my knowledge if I have a small??? amount of spring pressure I feel it wont as I will be remachining the swingarm bars by having a bearing so that they can pivot on the front bicycle axle but I know what you what you were thinking and I forgot to include that piece of info so now it may be more clear how the roller will move to vary for railhead thickness. As far as the guide wheels Im not sure what exactly you mean as the guide wheel is one piece with tapered sides to allow the change of width it is not 2 halves, hence the spring will be on the rod pushing downward to keep the guide wheel against both sides of the taper. I will have a picture soon so that it will become clear. just like any prototyping you have to try it and make adjustments.
 

mountain80

Member
Aug 8, 2008
260
4
18
Red Deer, Alberta
Finally got the revised parts almost done. Both the outrigger roller and the guiding roller have been completed it is small details now to finish up the revision including bushings for the front swingarm so it can freely pivot but includes a spring on the rod that goes to a bracket on the bicycle. The outrigger roller is simply just a straight roller 2.875'' in diameter by 4.125'' long. the guiding roller is 5'' in diameter and 4.25'' long. Their are preload spacers in each one of them so you don not load up the ball bearings with side thrust which will eventually kill em. The outrigger wheel is mild steel and the guiding wheel started life as a 60 pound chunk of 8'' diameter cast iron that I was given permission to have as the material for this roller was going to be expensive even if mild steel was used!! Finishing up the bracket to house the outrigger wheel next week as well. As you can see from the picture of it it will now allow the difference in rail width to work and the outrigger roller will always be on the other track as railroad track has a crown in it and contacts aproximately 1.25'' of the roller allowing for a variation of 1 3/8'' EACH way from center or 2 3/4'' total variance which will easily work from my measurements of the track. Heres a couple of pics for you guys hopin to leave in 2 weeks and try it out again!!
 

Attachments

Last edited: