Apple juice tank

GoldenMotor.com

Rockenstein

New Member
Feb 8, 2009
442
0
0
Ontario, Canada
The leather is finally on and laced up...

I'm certainly no leather craftsman extraordinaire by any stretch but it's not so messy I suppose for my first kick at the proverbial can rotfl

The last little job is to make up the brass slosh guard parts for the cap vent, get it assembled with a fresh gasket and this apple juice tank should be good to go.

Here's some pics...
 
Last edited:

Rockenstein

New Member
Feb 8, 2009
442
0
0
Ontario, Canada
Here's an neat story...

I was having a hard time poking a needle and thread through 2 layers of leather when I was making the straps for my tank so I went to the sewing shop for a thimble...beside the sewing shop is a thrift store that I just had to venture into and in there I see an old and lonely looking Singer Spartan straight stitch sewing machine on the bottom shelf at the back of the store for 10 bucks.

I of course brought it home just because ;)

So I dusted it off, checked it over good, aligned the motor & belt, oiled it up, wound a bobbin and threaded the thing. After a dozen or so test runs so as to get the tension dialed in the darn thing sewed through 2 layers of old couch leather without even breaking a sweat! Not only did I sew my tank straps but that night I made my son a leather pouch for his iPhone too...lol...he's even using it! A few minutes of serial number research on the www says the old Singer is a 1959 model that was made in Clydebank Scotland and from what I read it's a well like little machine and I have to say I do like it very much myself. The wife has a newer model sewing machine that has so many buttons and dials labeled in some secret women only code that I decide to just steer clear of it for the piddly leather strap job I wanted to do but I did not fear the simple old Singer at all. Matter of fact I got quite the kick out of using it because my mom had a similar machine when I was a kid and she taught me how to sew on it...I did much reflecting on those long gone moments with my mom that night. She made many outfits for herself and many outfits for me to wear to school on her old Singer(s)...lol...I still remember how much I hated that itchy material she sometimes used.


Cheers...
 
Last edited:

silverbear

The Boy Who Never Grew Up
Jul 9, 2009
8,325
670
113
northeastern Minnesota
Very nice job. It looks professional. A very good older machine to use for leather is a Viking made in Sweden by Huskvarna. The old green ones are excellent for leather, vinyl and upholstery fabric and are not very expensive. They have a gear down device which is like four wheel drive in low range. I've gone through multiple layers of elk hide. The additional benefit of going slow is that you can see what you're doing if something starts to go awry. I think your apple juice tank is a fantastic success. Now we need to see it in use and know that the attachment point will hold up under vibration. I am very impressed with what you've done.This winter I'll be covering another tank with leather using a different method and will show pictures along the way.
SB
 

Russell

Well-Known Member
Apr 19, 2009
1,276
155
63
MA
With the leather wrap, it looks super. When I saw your apple juice thread, I knew that is what I needed to get rid of my standard HT tank.
Put it in my, behind the seat Brooks bag (just don't have the patience or probably the talent for the custom leather). Thanks for the idea.
 

Rockenstein

New Member
Feb 8, 2009
442
0
0
Ontario, Canada
Here's the slosh proof gas cap vent part I came up with...

Consists of a short length of 1" nylon rod turned down to size, drilled 1/16th and 5/64ths in a couple places and then I made up a leather gasket to seal things up...pretty simple deal and it should work just peachy. Next time I get outside to paint something I'll spray the cap itself with some flat black.

I think that's all folks...if any serious issues pop up or I add something else to the tank I'll post :)


Drilled holes were hi-lighted with a sharpie so they could be seen clearly in the pictures.
 
Last edited:

Outrunner

New Member
Dec 27, 2008
147
0
0
Atlanta, Georgia
The leather is finally on and laced up...

I'm certainly no leather craftsman extraordinaire by any stretch but it's not so messy I suppose for my first kick at the proverbial can rotfl

The last little job is to make up the brass slosh guard parts for the cap vent, get it assembled with a fresh gasket and this apple juice tank should be good to go.

Here's some pics...
Hey Rockenstein, I am very impressed with your idea's and the detail and
craftmanship that you so obviously show. Even your photo's are very clear.
The leather cover you made looks so cool, I just love to see the various inventive ideas that come up on this forum. Great job!
 

Lay'emLow

New Member
Nov 4, 2009
51
0
0
Gainesville, Fl
Nice work rock!

Home built always wins out in my book. Im sure youll have a great theme going with that leather wrapped tank, although I can imagine a pretty sick rat with that ribbed surface on the tank...

just food for thought
 

christopher fowler

New Member
Dec 17, 2009
105
0
0
p a washington
Thought I'd share this...

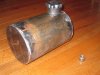
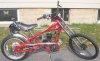
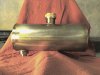
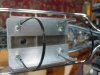
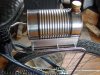
I was wanting a tank for my rat rod beach cruiser project that held enough fuel to go for a decent sunday cruise yet didn't stick out like a sore thumb...I seen an under seat roll up leather tool bag on a vintage bike on another site and well it gave me the idea for an under seat tank. I started out with an apple juice can that holds about 1.5 liters and an old contact cement can that I cut the top off of so as to salvage the spout and cap. I cut a hole in the juice can, carefully shaped it with my dremel, then inserted the contact cement can top and formed a flange after it was in. For the fuel drain side I bent up a length of annealed brass tubing with a tubing bender and then added a flange...now how do we get that sucker in the hole I just drilled?? lol...I ended up cutting a big hole in one end of the can and inserting the tube from the inside. After I got the cap and drain inserted I soldered them both in real well with a pencil torch and some silver bearing metal work solder...and...so far so good...no leaks! I still have to solder the cover over the big hole I made in the end plus figure out some mounting attachments and a cap saver but so far I'm quite happy with the how it's turning out. I have a bag full of leather that I salvaged from an old black leather couch that was sitting beside a dumpster and after I get the fabricating done and give it a coat of paint I plan on wrapping it in leather.

Should look pretty neat when it's completed and mounted under a fat vintage looking springer seat :)

.
you rock dude once again up- sourcing junk to rolling art awesome!
 

Elmo

New Member
Sep 3, 2009
748
4
0
Mississippi
I made mine from 6" exhaust tubing 9" long. Should hold just over a gallon. The fill neck and cap are from speedway, a present from a hotrodder friend, not installed yet. The fitting for the shutoff valve is from a hydraulic shop threaded for 1/4" pipe. Gonna paint it. I like the ideas in this thread, really used your imagination.
Elmo
 

Attachments

Russell

Well-Known Member
Apr 19, 2009
1,276
155
63
MA
Looks solid, and I like having the 1 Gal. capacity. I went with the standard apple juice can, 48 or so oz. Guess I won't be going for a all day ride, but it does fit in my seat bag!
 

Attachments

K.i.p

New Member
Nov 8, 2009
339
1
0
CNY
I was very much inspired by this thread. Mine is all stainless construction (cap is brass), all fittings where fabricated by me. My boss did the welding for me and did an awesome job. I dont have a recent pic but the weld seams have all been blended and polished as well as a general polish applied to the whole tank. It will be mounted behind the seat. Capacity .2 gallons.
 

Attachments

Elmo

New Member
Sep 3, 2009
748
4
0
Mississippi
Looks solid, and I like having the 1 Gal. capacity. I went with the standard apple juice can, 48 or so oz. Guess I won't be going for a all day ride, but it does fit in my seat bag!
Russel I think my motor is going to be too thirsty for a small tank. I have the 79cc HF motor and my bike is going to be on the heavy side also. Good idea with the bag.
Elmo
 

silverbear

The Boy Who Never Grew Up
Jul 9, 2009
8,325
670
113
northeastern Minnesota
Sir Rockenstein,
I wanted to thank you again for sharing your apple juice tank idea. I've made several now and one from a coffee can. I used a 3/4 inch cone shaped grinding attachment for the drill to make the perfect hole for the filler pipe which is a 3/4" male copper pipe fitting. The cap is a 3/4" brass hose cap. For the vent and gas line I used 1/4 inch copper pipe cut a few inches long and silver soldered in place. The vent line is black fuel line which goes up under the seat. I like these so much. I've been working on a 39 Elgin in the Rustoration buildoff thread and did two versions in harness leather stitched together with sinew. I made a little cradle to hold it on the rear rack and will fix the tank to the cradle with either leather straps, stainless hose clamps or just black zip ties which will blend right in. I also liked it plain and unpainted, boasting what it is or was... a juice tank made into a clever gas tank. So cool.
SB
 

silverbear

The Boy Who Never Grew Up
Jul 9, 2009
8,325
670
113
northeastern Minnesota
Thought I'd post a few photos of juice tank versions. First three are figuring out how to make my version of it and how to attach it to the bike. The fourth shows a coffee can version. I don't know how much gas this holds, but a good amount. I'll use it on another build. The last picture is what I have settled on for this 39 Elgin ( I think), a 48 Oz. size fitted cross wise. On another bike I might go under the seat, but with this Elgin the seat springs take up a lot of real estate. I've also been thinking about a version for my Worksman paperboy using soup cans soldered end to end to make an in frame tube, covered in leather. Just a thought at this point, but I'll probably make one to see how it looks.
SB
 

Attachments

K.i.p

New Member
Nov 8, 2009
339
1
0
CNY
This is the cradle for my tank. The tank will nest in the cross member and be strapped with two stainless hose clamps (tastefully oriented to hide their hose-clamp-ish-ness). Things are just tack welded at the momment.
 

Attachments