
You are using an out of date browser. It may not display this or other websites correctly.
You should upgrade or use an alternative browser.
You should upgrade or use an alternative browser.
Vintagizing a motor with hot rod wires :)
- Thread starter Velodrome
- Start date

Velodrome
Well-Known Member
Its off having the chainstays widened for clearence and the "oil pump" attachments welded on; as well as a second fuel spiggot ( fake ) for the Oil tank section of the fuel tank. Also, I have a Guyes seat being modified to sit really low, kind of like what Pat does on his fly'er bikes with flying buttresses. the motor mounts for the 2 smoke are getting chopped out and new motor mounts added for the 97cc flathead. Chill! It'll be OK ")
Velodrome
Well-Known Member
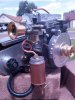
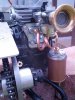
! BACK TO THE MOTOR ! I have my jackshaft on and the catch can repair'd. The can is just an old PVC adheasive can with the brush removed and holes drilled in the cap to let gasses out. Also drilled for a 1/8 compression fitting. I took the plate the had the motor vent off and drilled it for a 1/8 brass compression fitting. For the copper tubing I sifted some paver sand and packed the tube after crimping one end. I think I packed it in too tight as the copper deformed more than I had hoped. But It got the job done. Forgot to mention I crimped both ends prior to bending.
Attachments
Last edited:
Velodrome
Well-Known Member
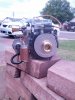
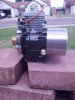
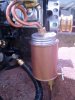
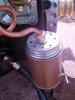
The tube for the can goes almost all the way to the bottem. lining the inside of the can is coarse steel wool to help trap the oil vapor. To drain the thing I put a tap and barb on the bottem to periodically drain the oil. A hand made L bracket is rivited to the side of the can and then bolted to the side of the motor where there were already some convinent holes giggity. The shroud on the jackshaft will be chrome plated locally.
giggity. The shroud on the jackshaft will be chrome plated locally.Attachments
Last edited:
truckd
Well-Known Member
Dammnnnnn! Velo I know you lost some hair off the palm of your hands putt'n that together, That is far Freak'n Out Dude, NICE!!!!!!!!!!!! you might try a couple of washers on top and bottom of nuts on the catch can so that the top of the canister lid does't bent so easy, but other wise DaMmmnnnn! BOY!!!
")
")