teh next avalon first build from h3ll...

noobtard

New Member
noobtube -> YouTube - Zoom Bicycles "80cc" Slant Head kit on a Next Avalon
3rd day of riding the thing.. I sooo, picked the wrong bike to start out with...(don't buy this bike if you have engine plans.... unless you get a shift kit...)

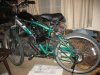
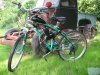
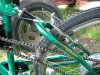
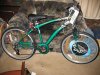
Pic1: The bike fresh off the rack at wally-world.
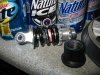
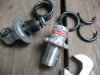
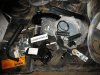
Pic2: My tinker toy kit finally came after 15+ days shipping..
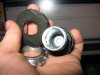
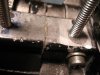
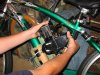
Pic3: Mounting wasn't looking too promising..
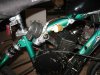
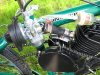
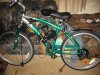
Pic4: Finally got it in there and tightened down..
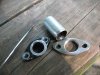
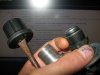
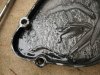
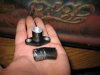
Pic5: My ghetto idea for a cheap intake mod..(shouldn't have cut it at an angle...)
 

Attachments

  • thewrongbananas.jpg
    thewrongbananas.jpg
    201.3 KB · Views: 1,218
  • crap.jpg
    crap.jpg
    262.7 KB · Views: 594
  • 1.jpg
    1.jpg
    277.2 KB · Views: 729
  • slow.jpg
    slow.jpg
    264.2 KB · Views: 961
  • slashcut.jpg
    slashcut.jpg
    131.7 KB · Views: 627
Last edited:
Well Done!

You persevered and now you get to reap the rewards. By now you probably have a very intimate understanding of your bike and you should be well equipped to handle any other challenges that come your way.

Enjoy the front suspension. I think it really helps the ride.
 
Pic1: The bike finally together after the first day I got to ride it.

Pic2: My ghetto intake.. aka heater hose off of my 1947 Ford pickup.. (ran fine until it melted and my carb fell off while riding...lol?)

Pic3 My sad attempt at bending some galvanized steal tubing..

Pic4: My 2nd attempt at making an in take.. metal off of the bed of my truck.. it was a long rectangular piece half a day of grinder/dremel/drill it looked like that.. my welding attempt with a steel coat hanger failed... oxy/mapp just isn't hot enough to weld steel I guess.. so, I just brazed it.. and wasn't too proud of how it looked.. so no pics of it, sorry.

Pic5: Next problem, the rear shock. it was making my chain pop off into my spokes...(at least 5 times..all at low speed luckily. . .)
 

Attachments

  • mudisgudpaint.jpg
    mudisgudpaint.jpg
    277.3 KB · Views: 532
  • lolintake.jpg
    lolintake.jpg
    248.2 KB · Views: 491
  • fail.jpg
    fail.jpg
    240.3 KB · Views: 391
  • intakeone.jpg
    intakeone.jpg
    205.3 KB · Views: 409
  • grrshock.jpg
    grrshock.jpg
    272.6 KB · Views: 437
Pic1: The rear spring had to go.. I cut it with a dremel, was kind of scary since it still had tension on it, barely moved when I cut through though. that First aluminum adjuster nut still refused to budge... it was just eatiing all the threads off.. so I cut it off.. (wanted to keep it to adjust chain tension... oh well.)

Pic2: Here we see what holds the whole rear suspension together... 2 plastic nuts. . . Quality Much?(I used Teflon tape on them at least..fingers crossed..)

Pic3: My ghetto non-spring. cut off some galvanized steel pipe from our old trampoline(which died..) ground it level.. ended up painting it because it was rusty inside.. (thought galv.steel "never" rusted?..)

Pic4: Putting it together after the paint cured.. rubber gaskets cut from a old van tire.. and more heater hose stolen off my 47' truck.. to keep the tube from moving too much.
 

Attachments

  • funfun.jpg
    funfun.jpg
    182.3 KB · Views: 323
  • junkjunkjunk.jpg
    junkjunkjunk.jpg
    123.3 KB · Views: 327
  • ubar.jpg
    ubar.jpg
    92.6 KB · Views: 365
  • almost.jpg
    almost.jpg
    124.1 KB · Views: 317
Last edited:
Pic1: The bike finally together and semi-safe to ride. . .

Pic2: no more rear suspension.

Pic3: Ghetto intake.. used high temp diesel fuel line this time.. works well for now.(except I noticed it's leaking gas out of the air filter...probably not a good thing.)

Well, that's it for now.. still tons of work to do to it. probably up around the 100-mile mark so far..(need a speedo and lights still...) on my 2nd gallon of gas.

I think my chain finally "broke in" during my 30+ mile ride it was flopping around alot... but today it's "magically" tight. I changed nothing.

I've found no hill it can't climb.. hopefully a new plug and a long ride tomorrow.

P.S. even with the "intake" that long the throttle response is instant.
 

Attachments

  • finally.jpg
    finally.jpg
    363.5 KB · Views: 501
  • whatsuspension.jpg
    whatsuspension.jpg
    266.3 KB · Views: 478
  • getto.jpg
    getto.jpg
    236.2 KB · Views: 510
Last edited:
Respuesta: teh next avalon first build from h3ll...

good noob!! that ghetto intakes is cool....maybe you can think of a better looking setup, but thats pretty cool! good job on the rear suspension...
 
My question is, why get rid of the rear suspension? That is the only reason I would have tried so hard to get the motor in that cramped area. I'm not by any means trying to say it was a bad idea or flame you for it, just want to know the reasoning.
 
^ as I said it was popping the chain off into my spokes.. and I'm lucky as $*%^ that it didn't happen at high speeds..

yes, maybe a spring loaded tensioner would have worked.. but I wouldn't bet my life on it...

the suspension would have worked fine with a jack shaft build though.(still have fun with the mounting and intake...)
 
Hmmm, thanks for the info. I intend a full suspension, sorry I missed that part earlier didn't see it. I just want to know what I'm up against. I make a pretty awesome spring tensioner out of a rear derailuer that I think might work though.
 
It needs to be modded a bit no second plate, bolt big enough to slide the plastic derailleur gear onto (should have just a little play so it spins with lil to no resistance) and a couple of bolts to lock down the bolt on a single plate. Drill out the bottom bolt hole and put her together.
 
It needs to be modded a bit no second plate, bolt big enough to slide the plastic derailleur gear onto (should have just a little play so it spins with lil to no resistance) and a couple of bolts to lock down the bolt on a single plate. Drill out the bottom bolt hole and put her together.

let me know if you get any pics of that working please.
 
Thanks for sharing that problem solving process. We often see posts with pics of the completed job, but without the steps and misteps along the way.
A China motor may fit my Diamondback Voyager frame if I make an intake similar to yours. Hmmm...
 
Noob I have some posted in here already I'll try to locate them
ooo Search for new OCC paint and find that thread by me it's in there.
 
There should be a thread devoted to the wonders of the dremil.

Well... since you bumped the tread..
my bike was down for 3 weeks because of a broken rear mounting stud below flush... had it drilled out nicely(too lazy to find that pic)

I then had a drill tap snap off down in the hole......(don't ever try drilling taps out btw(common knowledge probably, But I'm a dumb#@%) Pic1:

I then tried drilling/tapping two holes above the stock holes(upon recommendation...), never do that by the way... unless you like cutting internal engine bolts in half.... Pic2:...

anyway, here's the 1/2" hole it took to get all of the Tap pieces out.... Pic 3...
 

Attachments

  • 10967d1248177012-totally-ruined-right-rear-mounting-hole-carnage.jpg
    10967d1248177012-totally-ruined-right-rear-mounting-hole-carnage.jpg
    225.5 KB · Views: 294
  • 11086d1248395000-totally-ruined-right-rear-mounting-hole-tofreakmeout.jpg
    11086d1248395000-totally-ruined-right-rear-mounting-hole-tofreakmeout.jpg
    228.8 KB · Views: 250
  • 11155d1248501827-totally-ruined-right-rear-mounting-hole-topsekret.jpg
    11155d1248501827-totally-ruined-right-rear-mounting-hole-topsekret.jpg
    265 KB · Views: 305
Here's the "fix" which has been working quite fine, 1/2" steel plug hammered in.. and a bolt to hold it in.. 1/4" 20 studs in both holes...
 

Attachments

  • 11332d1248975920-totally-ruined-right-rear-mounting-hole-plug.jpg
    11332d1248975920-totally-ruined-right-rear-mounting-hole-plug.jpg
    163.7 KB · Views: 275
  • 11333d1248975928-totally-ruined-right-rear-mounting-hole-plugg.jpg
    11333d1248975928-totally-ruined-right-rear-mounting-hole-plugg.jpg
    161.1 KB · Views: 253
and of course my current problem... gas/oil leaking into my clutch case.............. "contact cleaner"works awesome for removing grease/black-poo/oil/gas btw... the "leak" is quite slow.. a dribble after a few miles.. (enough to splatter any grease you put on the gears onto everything) so... I'm running the gears with no grease ATM.. counting on the slow drip from the 20:1 gas/oil mix to lube it... I have the right bottom clutch cover screw out.. so that it "hopefully" drains any of that junk out....
 

Attachments

  • yummy.jpg
    yummy.jpg
    332.8 KB · Views: 234
  • bleargh.jpg
    bleargh.jpg
    261.3 KB · Views: 244
  • moregoo.jpg
    moregoo.jpg
    295.3 KB · Views: 210
  • poop.jpg
    poop.jpg
    152.1 KB · Views: 199
  • pads.jpg
    pads.jpg
    302.4 KB · Views: 223
Last edited:
Back
Top