Ryobi friction drive, fun build

timboellner

Member
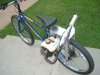
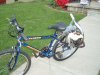
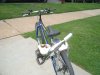
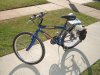
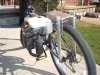
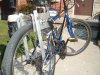
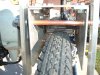
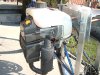
I started building my 2nd bike during the double back- to- back blizzards in February. I made everything
from scratch out of some aluminum stock I had found at work. I did buy the bearings from BMP.
Their customer service and shipping were excellent. I thought I would post some pics for anyone who might like to see what you can do with minimum expenditure and a whole bunch of free time.
 

Attachments

  • friction drive 001.jpg
    friction drive 001.jpg
    503.1 KB · Views: 1,001
  • friction drive 002.jpg
    friction drive 002.jpg
    502.3 KB · Views: 1,335
  • friction drive 003.jpg
    friction drive 003.jpg
    489 KB · Views: 969
  • friction drive 005.jpg
    friction drive 005.jpg
    483.5 KB · Views: 1,121
  • friction drive 006.jpg
    friction drive 006.jpg
    490.9 KB · Views: 978
Tim, Professional Job For Sure. Would You Post More Pic`s Showing More Detail Of Clutch And Rope Starter Configeration. That Is By Far The Neatest Weed Eater Friction Drive I Have Seen. Yes, Bmp Is A Great Guy To Do Business With, And Very Fast Shipping. Have You Seen His Vids On You Tube?? Ron .cvlt1
 
ERICH 870 I bought the muffler at Lowes in the lawnmower parts section. It's a 3/4"
outlet on one end. It will be the larger of the 2 "hot dog" style mufflers any mower place has in stock.
What I did was drill out the bottom of the existing muffler on the engine with an 1 1/8" uni- bit and thread a 3/4 copper male adapter into the bottom of the stock muffler. then I brazed it (not soldered ,it will melt)and some 3/4" copper elbows together with a short piece of 3/4" copper up in the hot dog muffler .Brazed it in with bronze brazing rod (Berzomatic WB-5 rod from ACE HARDWARE) . Then one more 3/4" street ell out the top to turn the exhaust stream to face the back of the bike. Oh, one more thing. I forgot to mention that after I drilled the hole in the bottom of old muffler I drillled a bunch of holes inside of the stock muffler and virtually hollowed the guts inside of it out to allow for better exhaust flow. Also pull out the spark arrester screen if you have one that is lodged in the cylinder head at the exhaust outlet, they really clog up over time and restrict flow. Notch the plastic muffler cover on the engine to allow room for the new pipe coming out of the old muffler. Its not that hard, it just sounds like a lot. Next I'm putting an expansion chamber on next week and doing away with this rig, it does sound nice though
 
ya know your eyes are getting bad when

you click on a thread thinkin , what the heck is that ?
because you thought it said Raviolli Friction Drive

nice setup , even if i was expecting a can of raviolli somewhere in there .
 
That is gorgeous ...you have given me ideas , if I may ask ,what did you use for a spindle and is that pattern of horizontal grooves wearing down the tire? because I have been thinking of taking my angle grinder to my bike peg...
 
Tim, The Link Showed It All, Thanks. Nice Job. Imho, If You Were To Spend The Money For The Bigger 78mm Clutch, Maybe Just Buy Eng With 76/78mm Setup On It ? Thanks Ron
 
Ron, Yes you would need a different engine to mount the 78mm clutch. The bolt spacing on the pull start housing is just big enough for the 65 mm clutch that came with the weed wacker. I thought of some other ideas but didn't want to increase the spacing any farther from the engine to drive roller housing.
 
Canadian Cheapskate,
I made that drive roller myself and it was a large pain in the butt.
I cut 1", 3/4," 1/2", and 3/8" black pipe ( used for gas piping) to 3 1/2" long
Then painstakingly reduced each pipes OD to fit inside each other. Overall dia. is 1 3/8"
A pipe within a pipe within a pipe within a pipe.
Brazed them at the ends with bronze rod to keep them as one
I used a hack saw to cut each horizontal groove , took forever and built forearms up good.
No it doesn't wear the tire very much. Slippage wears tires.
The right amount of contact pressure is the key. all of the bike pegs
I had were too large of a diameter ,1'" to 1 3/8 will work best
 

Attachments

  • blizzard 2010 101.jpg
    blizzard 2010 101.jpg
    483.2 KB · Views: 328
Really nice Tim. Was turned on to FDs end of last year. I was surprised how nice they run and ride. Really was. Might have to try and build one. Where did you get your motor, or did you say and I missed it?

Again, good job!
 
That is a nice build and I wish you all the luck in the world with it. Reminds me a lot of Comfortable Shoes Madwagon build, but yours is more finished looking by far.
 
Dan.. The motor was free. My brother in-law made the mistake of leaving his string trimmer at my house for about 2 years. I'm riding it now! 31cc. I just got done putting a nice chrome expansion chamber on it tonight. It sounds really nice. I need to build a support bracket tomorrow.

Shadowsaidhe....The bearings can't shift side to side because the clutch housing pins it on one side and the other shaft end has a locking collar. Snap rings around the outside of the bearing hold them outside the box. Here's what they look like:
BICYCLE ENGINE PARTS, MOTORIZED BICYCLE PARTS
 
New epansion chamber works great!

Thought you might like to see the latest update to my bike.
$10 expansion chamber off e bay modified it to fit.
Sounds nice and not too loud either. This thing really screams
at the top end. Tell me what you think
 

Attachments

  • 2010_0423ryobi0001.JPG
    2010_0423ryobi0001.JPG
    491.8 KB · Views: 393
  • 2010_0423ryobi0003.JPG
    2010_0423ryobi0003.JPG
    489.2 KB · Views: 396
  • 2010_0423ryobi0002.JPG
    2010_0423ryobi0002.JPG
    489.6 KB · Views: 381
  • 2010_0423ryobi0004.JPG
    2010_0423ryobi0004.JPG
    494.6 KB · Views: 318
Wow, looks great Tim. Has a NASA clean look. Did you polish the aluminum or is it stainless? Really looks awesome.

I want to polish our backing and mounting plates. Read a bunch of articles and am wondering if it will look as good as yours.
 
Back
Top