Pusher Trailer Possibility

Looks great LR! I did some reading on cargo trailer design a while back and looks like you have the optimum geometry. What do you think the traction will be with the engine foward like it is? If your bikes have the same size seat post, or you can easily add shims, why not just swap the seat and post(with trailer of course) from bike to bike. You also keep your fav seat that way. Speaking of which how is the Gyes working for you? I am eyeballing the 210x270 @$70 for the Lifan bike. I agree the 3 spring which I like, may sway from side to side.
 
CB2,
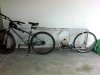
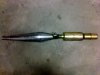
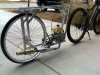
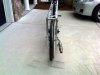
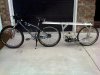
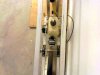
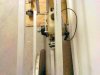
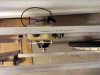
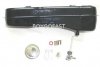
I'm not sure how traction will be since this aluminum trailer will be super-lightweight & high powered (Cag2) & the engine only weights about 7 lbs. The pillow block bearings have some weight & are further back closer to the wheel axle than the engine. I'm sure once its rolling, traction wont be a problem, but we will see. I plan on keeping a lower air pressure in the trailer tire to aid traction & contact patch. I received the aluminum yesterday & 5 out of the 6 pieces are the wrong thickness, so now I gotta wait longer for the seller to ship me the correct ones. As far as seatposts & saddles go, My bikes (7 of them now) have either 26.8 or 27.2 posts so full interchangeability is tough but I plan on only hitcing this to maybe three of them. I use a shim for the hitch mount (steerer stem mounted to seatpost) that acts as a bushing to handle the left to right motion. I grease the area well & it is pretty slick & simple.
I could always get another 26.8 to 27.2 shim & use this same hitch post & saddle on all the bikes? (thanks for the idea)
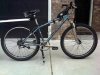
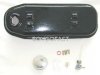
I have 3 Gyes saddles now & prefer the wider Gyes beach cruiser 2 spring saddle over the slightly narrower one (Parkside II) that I recently got for this bike. Bigger is better when your not pedaling...lol
p.s. I really like your new Lifan project
-lowracer-
 
Last edited:
Ok, I got the correct aluminum last night & started measuring, cutting, drilling & bolting things together today. Now I think I'm going to mount the engine off-center & drive the wheel directly instead of using the pillow block bearings & jackshaft. I haven't mounted the engine yet, but there may be some space limitations. I will also cut small pieces of aluminum bar to complete the cross bracing lattice framework I've been planning. I did test it today under human power to see how it tracks & feels. Definitely an improvement over my 1st try at push trailers. Its very light & is barely noticeable behind me. Lets see how things feel once the engine is mounted & it is pushing instead of being pulled.
Here is a pic
-Lowracer
 

Attachments

  • IMG01159-20120128-1530.jpg
    IMG01159-20120128-1530.jpg
    86.6 KB · Views: 140
Just a bit hanging off to the right like on my other 2 MB's.
We'll see, I have stopped working on it for today. I may be able to center mount & jackshaft it & I already bought the shaft, pillow blocks & collars. I am now researching some of those rear rack mounted fuel tanks that hold 4L. I could easily mount one under the top rails & run a longer fuel line to the engine thru a petcock & fuel filter. This thing could become my new commuter/work mobile. I took 'The Beast' to do my job the other day instead of the car & had alot of fun. I did run out of gas though (real close to my home).
-Lowracer-
 
I went back into the garage after our last exchange to see if I can get the engine mounted in the center & utilize the jackshaft I just bought. Looks like it will fit.
I took a few pics to show the mock up.
CB2, Do you think it wiser to center mount the engine & drive through the jackshaft, or off center the engine & straight direct simple drive?
-Lowracer-
 

Attachments

  • IMG01160-20120128-1733.jpg
    IMG01160-20120128-1733.jpg
    70.3 KB · Views: 146
  • IMG01161-20120128-1735.jpg
    IMG01161-20120128-1735.jpg
    58.6 KB · Views: 147
CB2,
In these next 2 pics, I removed the jackshaft & placed the engine where it would sit if I dont run thru the jackshaft. You can see its off center but not 'hanging out in the wind' too badly.
The clutch & pulley actually sticks out of the left side a bit but a little less than the engine sits out to the right without the jackshaft???
-Lowracer-
 

Attachments

  • IMG01162-20120128-1747.jpg
    IMG01162-20120128-1747.jpg
    62.4 KB · Views: 136
  • IMG01163-20120128-1747.jpg
    IMG01163-20120128-1747.jpg
    62.3 KB · Views: 128
Last edited:
I dunno LR. I like the jackshaft set up as most of the mass of both is pretty much centered. Also ratio changes woud be as simple as a pulley and primary belt change If the need should arise. I think I would spend the time to get it as balanced as possible, the handling can only be better if you do. Looks like there would be a lot of possible ways to configure this thing for various uses utility wise. Sorta similar to what we hauled surf boards on behind bikes when I was a kid. Cool!
 
CB2,
Thanks for the input. I got my eye on this 4L fuel tank that would mount right up under the twin top beams & get me roughly 130-150 miles per fill-up of pre-mix (about a gallon).
-Lowracer-
 

Attachments

  • Fuel tank1.jpg
    Fuel tank1.jpg
    13.7 KB · Views: 105
  • Fuel tank.jpg
    Fuel tank.jpg
    13.9 KB · Views: 103
Hey LR, am thinking you need some form of diagional bracing from the lower angles to the upper, to transfer the driving loads from the engine to the upper angles and to the bike. two flats from the front of the lower angles to the rear of the tops should do as a minimum. X bracing would be ideal.
 
CB2,
I still have 10' of 1/4" aluminum bar to do the bracing.
I want to get the primary AX20 v-belt that I ordered hooked up 1st which will determine the final height of the engine placement. I also need to work out the details on either running the expansion chamber along one lower side or the little exhaust can (I got from u). I got the jackshaft mounted & the belt mounted from wheel pulley to jackshaft. Adjusting belt line is a snap having this jackshaft in between :)
-Lowracer-
 
Sounds good, glad you are going the JS route, makes things easier in several aspects. If it can be fitted a spring loaded primary idler is a good thing, especially if you are thinking of ratio changes. Looks like the frame would accept almost any type of engine on down the line if you need to change course. Looks like a great design.
 
CB2,
Thanks.
We will soon see how it works out in 'the real world' once I get it going on gas power.
Similar to a Forrest Gump line, one of the charms of building these DIY MB's is you never know what you're gonna get...lol
-Lowracer-
 
Made some real headway today getting the frame supports mostly done (still need to do the 'crane like' criss crossing. Also got the pulleys, jackshaft & belt tension completed. Also made the throttle cable, having to resolder the end tip 3 times to get the length just perfect. Now I still need to get the exhaust dialed in with either some copper tubing from Lowes or some more of the flex pipe I've used in the past?
Here are a few pics.
-Lowracer-
 

Attachments

  • IMG01167-20120201-1658.jpg
    IMG01167-20120201-1658.jpg
    63.2 KB · Views: 127
  • IMG01168-20120201-1659.jpg
    IMG01168-20120201-1659.jpg
    70.8 KB · Views: 133
Here is a pic of the expansion chamber I'll be using. I added 2 store bought mufflers to quiet down this little screaming monster (Cag stage 2). I used Quick Steel putty to attach both mufflers. I've had great success using this putty in the past & wanna see how it holds up. I'll strap the muffler to the trailer frame for added safety.
-Lowracer-
 

Attachments

  • IMG01171-20120201-1903.jpg
    IMG01171-20120201-1903.jpg
    58.7 KB · Views: 120
Last edited:
The jackshaft turned out great! The corner bracing should do the job. This should be a nice ride with the vibes and most of the noise behind you. Will you have to get a trailer tag-lol.
 
I installed the Maxxis Hookworm tires and Kenda Downhill tubes today.
OMG....these tubes are HUGE!!! When I took the package out of the mail box I couldn't believe how much it weighed. I eagerly opened it up to inspect the goods. The tubes are 2.25mm's thick. The Hookworms are 2.5 slicks & also super heavy duty. Mounted on the Sun Ryno Lite wheelset these wheels are looking FAT.
I'll take some pics tomorrow in the sunlight & post them up.
-Lowracer-
 
I got the pipe fitted & mounted today. I found some 1" flex pipe at Lowes for $1.98
& if it holds up for awhile it would be well worth the money.
Here are the latest pics of it nearly completed. I haven't test driven it under gas power yet. I'm waiting to fully brace the frame structure & the Quick Steel putty to dry for a few days.
-lowracer-
 

Attachments

  • IMG01176-20120204-1502.jpg
    IMG01176-20120204-1502.jpg
    82.9 KB · Views: 132
  • IMG01174-20120204-1501.jpg
    IMG01174-20120204-1501.jpg
    99 KB · Views: 128
  • IMG01177-20120204-1503.jpg
    IMG01177-20120204-1503.jpg
    70.4 KB · Views: 137
  • IMG01172-20120204-1500.jpg
    IMG01172-20120204-1500.jpg
    80.9 KB · Views: 116
  • IMG01175-20120204-1502.jpg
    IMG01175-20120204-1502.jpg
    90.3 KB · Views: 134
Wow LR, thats just too cool! Looks like its flyin just sittin still. Love how narrow it is. Cant wait to hear how it goes.
 
Thanks CB2.
I may take it for a ride tomorrow if the weather is nice.
Hope I dont hate it...lol
-lowracer-
 
Back
Top