Petcock hitting frame,what now?

rwquiring

New Member
Just recently I ordered a kit and I was putting it together today and at the very end I found that the petcock hit the frame of my Huffy Cranbrook. Has any one ever had this problem? Or am I the only one that is having problems (to numorus to count)? Is there a fix for this or am I screwed? thank you for any suggestions.


Q
 
There are numerous Cranbrook builds. We need pictures if possible. What do you mean "It's hitting the frame"? When you try to turn either on or off? If that's the case you can add a washer before the red seal and change the "Tight" point.
 
I have had this problem and I usually just remove the fuel shut off at the tank and use a fitting. Then I just use the fuel shut off at the carb if you have this option.
 
The bottom where the hose attaches to is actually hitting the frame the two parts of the frame along side of the top tube. I will go out and take a pic of it so you can see.

Q
 
Or, not the best option but you could tilt the tank just a bit, move the tank on the top tube to where you get the best clearance. Some that I have done by tilting you cannot tell unless you really stare at it.
 
Attached are some pic of the problem.
 

Attachments

  • SSCN0027.JPG
    SSCN0027.JPG
    47.2 KB · Views: 315
You should be able to slide the tank up closer to the handlebars.
 

Attachments

  • 100_1026.jpg
    100_1026.jpg
    192 KB · Views: 211
Please forgive me but what is the "washer method" I noticed that you gave a different petcock than I do, Mine is a lot bigger than yours.

Q
 
Please forgive me but what is the "washer method" I noticed that you gave a different petcock than I do, Mine is a lot bigger than yours.

Q

The washer won't help in your case. Sometimes when you try to turn the valve off it will hit the frame not allowing it to be turned off. By adding a washer it moves the petcocks fully tight position a little..... allowing full movement.
 
Your best bet rwquiring is to replace the valve with a short fitting and use the shut -off valve on the carb. Or tilt the tank slightly to clear the hose. If you do not have a shut-off on carb you can always add a in-line shut off valve.
 
The simplest suggestion has already been offered: Move the tank forward just an inch or two. The cantilver bars drop away quickly toward the front and should give ample clearance. Maybe less than an inch will do it.
Tom
 
Tried moving it forward but no luck, went and bought a 90 degree fitting and all is good, that is for that situation, tried to get it started and had the chain derail, Thought that I had it in line, back to square one....

Q
 
I was going to suggest changing the petcock to one without a shutoff and then installing an inline shutoff between there and the carb unless as has been suggested, you have a shut off on the carb itself. But you have figured out another way to fix it. Another suggestion before riding is to get the chain lined up by eye and then walk along with the clutch in (engine not running) to see how it looks as it is moving. If after a fifty foot or so walk it still looks good, hop on and take it for a spin. Wear a helmet and have fun!
SB
 
On my mountain bike the top tube is the same size all the way up, so big I can't even use the bolts and clamps that came with the tank :( 
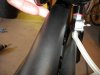
(JB Weld or Duct tape?). The washer method worked for my petcock.

You could probably use JB Weld or buy a 90 degree petcock too, like this one (fuzzy image):

DEGREE%2090%20PETCOCK.JPG
 
Yahoo! success at last, Got the beast running this afternoon, put a temp petcock in just to get it running, was running kind of rough until I remembered that the choke was still on, live and learn I guess.

Thanks for all the suggestions that you guys made.

Q
 
there not the smoothest running i,ll tell ya, we polished everything posible and bought new american bearings for the crank and a great improvement in power and noise
 
I do have one more question, In the instructions it says to grease the whole behind the small sprocket on the engine, well I looked and there is no hole behind the sprocket, it is a sealed bearing. Do they mean the whole that the clutch cable guide is screwed into? sorry no pics for I am at work.


Q

I think what they mean is add a small dab of grease on the small gear on the clutch side. But I could be wrong?
 
I think what they mean is add a small dab of grease on the small gear on the clutch side. But I could be wrong?

Fairracing31:

I did do the dab of grease on the small gear but this is what the instructions say as per bikeberrys instructions,

"Left side drive: Routinely pack grease in the shaft hole behind 10t drive sprocket and also in cover bushing hole. This will also help reduce noise."

I looked and could not see any shaft hole, I think there instruction suck, can I say that?

Q
 
Back
Top