New Build: Cranbrook/Lifan 152F Flathead/TAV2

GoldenMotor.com

JerryAssburger

Active Member
Mar 11, 2017
208
124
43
Salem Oregon
It's ALIIIIVE! (of sorts). Sooooooo, this afternoon I took an angle-grinder to the sprocket and now the #41 chain works beautifully on it.
At that point, I decided to mount the carb (a delorto clone RT?) and thumb throttle, and, after sitting dead in various sheds since 2008, the little Lifan fired right up and runs pretty good with the carb.

It all kinda snowballed from there.

Next, I zip-tied a plastic gas tank on, and then attacked the TAV2 install. A few hiccups (driver and driven alignment had to be messed with) almost had me re-thinking the whole Lifan / TAV2 combo, but for now it's working.

So about 15 minutes ago, in the dead of night, I puttered up and down our street a few times with no brakes and no foot-rests. (Yes, I know- my wife already reamed me.) But the good news is, it works, and surprisingly, it pulls pretty darned good! Much stronger than my China-Girl was. I got it up to about 20mph, just puttering, but it held together and was even starting to advance the TAV2 ratio a bit.

I realized my stupid act was going to end badly if I didn't end it quick, so back into the garage for the night. I need to definitely get some lock-tite and tweak the length of the bolt that holds the driven-unit on the crankshaft, and then gas tank, brakes, pegs, lights, etc.I also think it might be running a bit lean, but it was no-where near even close to being warmed up. Funny thing is, I KNOW an 8T sprocket on the TAV2 would really be closer to the correct ratio, but for now, it's good. By the way, I am 230 lbs., and our street is dead- level. The present ratio is 10T-60T on the chain end.

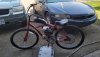
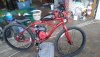
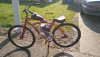
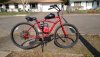
Here a couple of pix... sorry about the fish-eye effect.
HD0002.JPG
HD0003.JPG
 

JerryAssburger

Active Member
Mar 11, 2017
208
124
43
Salem Oregon
So.... here's a bit of an update... The M6x1 bolt that threads into the end of the crankshaft barely holds the driven-unit on for very long, and I'm thinking lock-tight isn't going to help things much. AFTER I figured out that it sure helps to have the tires properly inflated, I did hit 30mph on the level, but the the little Lifan was pretty much tapped out. Probably could gain a bit of shove if I took off the stock exhaust and cobbled a free-er flowing one.]

Ultimately, I'm just looking for an excuse to throw the 212 on there! :)
 

MEASURE TWICE

Well-Known Member
Jul 13, 2010
2,742
1,212
113
CA
I know that my little 3.5hp Briggs already had threads in the end. My 3hp Briggs did not and I made them myself. I did not need a left hand thread tap as a regular right hand type (normal tap) ends up tightening the bolt naturally as the engine rotation plays that part. Engine crankshaft at crankcase cover is counter clockwise rotation as seen on my bike looking at the left side of the frame.

I also use a split lock washer along with a flat washer and the clutch or pulley set screws. I've had the set screws missing and though of using some thread lock of some kind, but that mostly on jackshaft where they are not adjacent to the end of a shaft. I know the 6.5 hp engine probably has more vibration so that will loosen things. I also use on jackshafts metal sleeves to take up all the excess space on the shaft ensuring that key in keyways can't come out. Nothing can shift left or right on the shaft as all is in between hanger bearings.

If you have closer up lighter pictures would like to see what you have!

MT
 
  • Like
Reactions: JerryAssburger

JerryAssburger

Active Member
Mar 11, 2017
208
124
43
Salem Oregon
I know that my little 3.5hp Briggs already had threads in the end. My 3hp Briggs did not and I made them myself. I did not need a left hand thread tap as a regular right hand type (normal tap) ends up tightening the bolt naturally as the engine rotation plays that part. Engine crankshaft at crankcase cover is counter clockwise rotation as seen on my bike looking at the left side of the frame.

I also use a split lock washer along with a flat washer and the clutch or pulley set screws. I've had the set screws missing and though of using some thread lock of some kind, but that mostly on jackshaft where they are not adjacent to the end of a shaft. I know the 6.5 hp engine probably has more vibration so that will loosen things. I also use on jackshafts metal sleeves to take up all the excess space on the shaft ensuring that key in keyways can't come out. Nothing can shift left or right on the shaft as all is in between hanger bearings.

If you have closer up lighter pictures would like to see what you have!

MT
Thank you for the info! I also thought that the rotation of the crank vs the end-bolt would be to my advantage, but I can't make it a 1/4 mile without it loosening up, so I need to re-examine my options.

I had a friend who had a 3 1/2hp Briggs- that was an amazing motor!

It's a 5/8" to 3/4" slotted shaft-adapter, and then the TAV2 driver unit mounts over that. I also had to make a sort of spacer to keep the driver unit out from the engine, otherwise, it'll rub on the engine block and not line up with the driven-pulley. It works, but it is by no means trustworthy. I've made like three or four "hi-speed" (relative to glacier-movement) runs and each time, I was eagle-eyes watching that driver unit!

I'm pretty sure, with access to proper machining tools that a MUCH more dependable set-up can be done, but I'm also considering making things EASIER on myself by going with the 212, since the TAV2 is a perfect match for it, and the Cranbrook can take it. (That rear axle is a different story, I'll address that soon, too.)

I'll fish through my drawer full of digi-cams and see if I can get better, NON-fisheye pix posted.
 
Last edited:

JerryAssburger

Active Member
Mar 11, 2017
208
124
43
Salem Oregon
...so I have an idea for my TAV2 Driver Troubles.... I am going to get a 5/8" collar with set-screws, crank it down onto the Lifan's shaft at the appropriate position, and then use THAT as the now-non-existent shoulder for the driver to butt up against. That SHOULD work, but we'll see.
I'm just wondering if others have ran inti this issue with the TAV2s on engines with 5/8" shafts....? The diameter obviously needs to be shimmed larger, but the shaft-length is also an issue, which I failed to anticipate... OOPS.


Oh! Almost forgot! I finally did order that 8T sprocket for the TAV2 output, so the final drive will go from 6>1 to 7.5>1... should make a difference!
 

JerryAssburger

Active Member
Mar 11, 2017
208
124
43
Salem Oregon
Ready for more of my drivel?.....
Okay! So I tried a 3/4" split collar, clamping both the sleeve adapter and providing a spacer for the TAV2 driver to butt up against... SUCCESS! I rode it for quite a bit with no loosening of the driver or bolt. One small problem down, a Butt-Ton more to go!
58to34final.png
 

JerryAssburger

Active Member
Mar 11, 2017
208
124
43
Salem Oregon
Update- I'm loving the TAV2 setup, now that the issue of the driver is sorted out. Still haven't mounted the 8t sprocket, but that will definitely help the situation. Also, messing the jetting on the carb is next- AFTER I eliminate a possible manifold leak.

Okay... so I'm on the fence about the Cranbrook rear-axle/bearing setup. I have eliminated the peddle-chain/coaster brake mechanism (don't need it for what I'm building) but geez, those bearing suck. I love the look of the rims, but now I'm leaning towards a set of mag-rims with sealed bearings. What say The Populous?
 

JerryAssburger

Active Member
Mar 11, 2017
208
124
43
Salem Oregon
Not to pester, but does anyone have suggestions on the rear-hub issue?
Option 1 is to somehow upgrade the bearing set-up on the existing Cranbrook wheel/hub.
Option 2 is to replace both rims with mag-rims with sealed bearings, etc.
Option 3 is to buy a decent coaster hub and have it laced into the Cranbrook rim.
Option 4 is to do nothing but keep checking and lubing the bearings every time I fire it up.

I have no clue what it would cost to have the wheel re-laced with a new hub- any clue? Even though I'm not really fond of the look of the mags, I might be forced to go that direction.

You guys weren't kidding about the Cranbrook's cruddy hubs. It's an issue, all right.
 

5-7HEAVEN

Well-Known Member
Aug 2, 2008
2,661
240
63
I'd suggest replacing the entire wheel with a hub having sealed bearings.

Then no labor cost on relacing the hub.

Orrrr, use a 3-speed hub.
 
  • Like
Reactions: JerryAssburger

JerryAssburger

Active Member
Mar 11, 2017
208
124
43
Salem Oregon
I'd suggest replacing the entire wheel with a hub having sealed bearings.

Then no labor cost on relacing the hub.

Orrrr, use a 3-speed hub.
Thank you. Besides the not-so-classic looks of mag-wheels, is their a downside to going with them? I'm looking at a front / rear set for $115, which seems pretty reasonable.
I would LOVE to find an old spoked 26" cruiser wheel that I can paint to look like the Cranbrook's wheel, but this Plan-demic has put a real pinch on finding bicycle parts cheaply.
 
  • Like
Reactions: 5-7HEAVEN

5-7HEAVEN

Well-Known Member
Aug 2, 2008
2,661
240
63
Thank you. Besides the not-so-classic looks of mag-wheels, is their a downside to going with them? I'm looking at a front / rear set for $115, which seems pretty reasonable.
I would LOVE to find an old spoked 26" cruiser wheel that I can paint to look like the Cranbrook's wheel, but this Plan-demic has put a real pinch on finding bicycle parts cheaply.
What you could do is place a want ad on Craigslist, needing that rear coaster wheel.

You might find a free wheel.
 
  • Like
Reactions: JerryAssburger

WECSOG

Member
Nov 10, 2014
138
13
18
North Alabama, USA
Update- I'm loving the TAV2 setup, now that the issue of the driver is sorted out. Still haven't mounted the 8t sprocket, but that will definitely help the situation. Also, messing the jetting on the carb is next- AFTER I eliminate a possible manifold leak.

Okay... so I'm on the fence about the Cranbrook rear-axle/bearing setup. I have eliminated the peddle-chain/coaster brake mechanism (don't need it for what I'm building) but geez, those bearing suck. I love the look of the rims, but now I'm leaning towards a set of mag-rims with sealed bearings. What say The Populous?
This member of the populace says: moped hub!
 
  • Like
Reactions: JerryAssburger

JerryAssburger

Active Member
Mar 11, 2017
208
124
43
Salem Oregon
YET ANOTHER BRIEF UPDATE: ...so I tried to put the 8t countershaft sprocket on and it won't line up like the 10t did. If I really want to pursue it, I'd need to open the center hole on the rear sprocket so that it fits properly on the Cranbrook's rear wheel, yada, yada, yada.... When I have time, I'll do it.

The TAV2 is working great, the motor needs an issue or two sorted out- the throttle response from about 2/3 to full is flat- in that you can't tell the difference. I'm guessing (probably wrongly) that it's jetted lean. I also have to fab a different exhaust if I want the TAV2 cover to fit on. Small potatoes.
 

JerryAssburger

Active Member
Mar 11, 2017
208
124
43
Salem Oregon
I know that my little 3.5hp Briggs already had threads in the end. My 3hp Briggs did not and I made them myself. I did not need a left hand thread tap as a regular right hand type (normal tap) ends up tightening the bolt naturally as the engine rotation plays that part. Engine crankshaft at crankcase cover is counter clockwise rotation as seen on my bike looking at the left side of the frame.

I also use a split lock washer along with a flat washer and the clutch or pulley set screws. I've had the set screws missing and though of using some thread lock of some kind, but that mostly on jackshaft where they are not adjacent to the end of a shaft. I know the 6.5 hp engine probably has more vibration so that will loosen things. I also use on jackshafts metal sleeves to take up all the excess space on the shaft ensuring that key in keyways can't come out. Nothing can shift left or right on the shaft as all is in between hanger bearings.

If you have closer up lighter pictures would like to see what you have!

MT
I need to thank you and give credit for the split-collar idea- it has solved my driver issue PERFECTLY. Thank you.
 
  • Like
Reactions: MEASURE TWICE

MEASURE TWICE

Well-Known Member
Jul 13, 2010
2,742
1,212
113
CA
I need to thank you and give credit for the split-collar idea- it has solved my driver issue PERFECTLY. Thank you.
I didn't mention split collar on that post but elsewhere I probably did. The split collar come in half and full split. The half is the one I used. I suppose full split with two screws could be used if something needs one installed and you don't want to dis-assemble stuff to get access to end of a shaft.
 
  • Like
Reactions: JerryAssburger

JerryAssburger

Active Member
Mar 11, 2017
208
124
43
Salem Oregon
I didn't mention split collar on that post but elsewhere I probably did. The split collar come in half and full split. The half is the one I used. I suppose full split with two screws could be used if something needs one installed and you don't want to dis-assemble stuff to get access to end of a shaft.
...well, it sure solved my problem with the rapidly self-dismantling driver issue! :)
 

JerryAssburger

Active Member
Mar 11, 2017
208
124
43
Salem Oregon
On a different note, I noticed that now that the word is out about the 53cc vs 49cc 4-stroke kits, their prices have risen accordingly. I lucked out the other night and nabbed a 53cc/ belt-drive kit for $168. I will report back about it when it arrives. No bike or project in mind, but the price was really good, and you get so many useful parts with those kits!
 

JerryAssburger

Active Member
Mar 11, 2017
208
124
43
Salem Oregon
So I received the above-mentioned 4-stroke kit. No way that I can tell to verify if it's the 53cc without checking the bore.
Arrived with the large belt pulley bent from shipping. Does anyone know if those 100T pulleys are available by themselves? Otherwise, I'm going to try and straighten it. It's the belt-drive 5>1 ratio, and it appears there's no one-way clutch. Is that a 7g or 8g, then?