
You are using an out of date browser. It may not display this or other websites correctly.
You should upgrade or use an alternative browser.
You should upgrade or use an alternative browser.
MrLarkins Upgrades
- Thread starter MrLarkins
- Start date
MrLarkins
HS Math Teacher
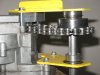
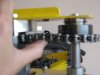
new problem...i had ordered/installed the upgraded clutch pull arm which had a thicker cover ...mounting the left bearing plate from the jackshaft kit didnt fit just right...so i am off to lowes for a couple more washers and longers hex bolts.
**EDIT**
lowes didn't have exactly what i needed...i probably could have found SOMETHING that might have worked...but i'll try ace hardware tomorrow.
i attached a picture of my dilema...pablo?? any suggestions?
and my chain seems loose...i have 15 outside links, but it is still a bit loose...is that normal?
Attachments
Last edited:
MrLarkins
HS Math Teacher
probably...
i can hold the chain straight, but not tight, and the left bearing plate (top) barely fits into the plate (about 1mm worth)
i can hold the chain straight, but not tight, and the left bearing plate (top) barely fits into the plate (about 1mm worth)
Attachments
Last edited:
Pablo
Master Bike Builder & Forum Sponsor
As Jim told you off line, you'll need another 5/8" washer. Plus you can pull back on the plate after you loosen the bolts. I know our kit will work with the CE clutch mod, because that's the set up I have on my mountain bike. I had to also use longer bolts to get more thread engagement.
MrLarkins
HS Math Teacher
As Jim told you off line, you'll need another 5/8" washer.
hadn't checked the email machine until i just saw your post

Ghost0
New Member
Nope, you didn't do anything wrong. You just happen to have one of those engines that has some funny hole spacings. This is why we supply the button head bolts. But with the button heads you will need to use the optional clutch cover mounting method. I would recommend that anyway as it makes adjusting the clutch easier anyway.
Ghost0
New Member
That is correct, basically you just run the bolts through the clutch housing from the back side instead of the front and in your case use the button head bolt where you are having the interference. It will require you to remove the pockets on the clutch cover but that is pretty easy with a hacksaw.
MrLarkins
HS Math Teacher
ok, i got it...i used a dremel to cut and grind it and did a test fit...it worked! but it was still touching...i did get it all the way on though...right now, it is apart painting the parts yellow again...b/c i roughed them all up trying to work them into place. you 3 guys are a HUGE help!
Ghost0
New Member
No problem and there are just 2 of us, Jim aka Ghost and Paul aka Pablo. It is always interesting watching a build. How some go smooth and some take some tinkering. If all the engines were the same it would make life a little simpler but might take out some of the fun, or head ache depending on how you look at it.
MrLarkins
HS Math Teacher
now i'm tired...been working at it for some time today (took a break to go swimming with my 4 kids) and I am glad to say I'm at a break point.
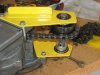
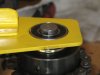
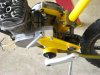
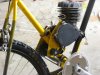
i have it mounted. i had to remove the pad on the clutch case and remove the adhesive as well...done that though. right now the new one is glued and setting up as i type. i must say, it is looking pretty sweet! the pictures don't show it, but i DO have all 3 chains on the bike
finally, i am forseeing a clearance problem with the air filter...any suggestions before i get to that point?
Attachments
Last edited:
Creative Engineering
New Member
Looking good MrLarkins!!!
I have a "shift kit" version of my clutch kit...If you have any problems, let me know.
Jim
I have a "shift kit" version of my clutch kit...If you have any problems, let me know.
Jim
Creative Engineering
New Member
dang! i wish i would have known that before i bought mine... please elaborate on the differences between your two versions.
The shifter kit version has a thinner housing...no cap screw counterbores, and a supply of shorter pins.
Jim
MrLarkins
HS Math Teacher
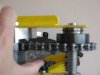
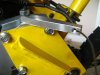
ok, just a few more items and these upgrades are done...right now i am re-cabling it. and this clutch arm is new to me and i want to do it right the first time. check out the picture, and please tell me the correct way to attach the pull cable to that arm.
Attachments
Ghost0
New Member
Attaching the cable should be no different than before. It appears from your photo that your cable housing is not going through the cable end that sits under the carburetor. Then just attach the brass end with the set screw over the cable like you should have had on your stock set up.