You are using an out of date browser. It may not display this or other websites correctly.
You should upgrade or use an alternative browser.
You should upgrade or use an alternative browser.
mock up kinda rough
- Thread starter thegnu
- Start date


Bike Monster
New Member
Im really liking its stance and look!
thegnu
New Member
it just occured to me to link this build with the other thread where the build is finishing things have slowed way down between waiting on the final parts an wiring this monster not to mention all the adjusting I will have to do soon as well .
hope you all enjoy .
http://motorbicycling.com/f26/not-mock-up-anymore-34960.html
hope you all enjoy .
http://motorbicycling.com/f26/not-mock-up-anymore-34960.html
Crazy Horse
Dealer
Please get a video of this build, and share it with everyone if you want to.
Peace Crazy Horse.
Peace Crazy Horse.
thegnu
New Member
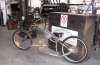
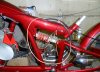
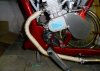
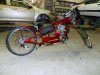
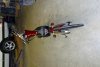
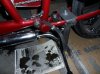
had a lil time to kill today an a small job to do for my neighbor that I had been putting off for like ever...basicly it gave me an excuse to get in the shop an do a few more things on the mb (got to love them ulterior motives ! ) the wife new what I was up to an didnt care so . here ya go .
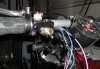
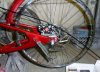
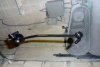
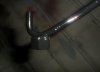
I found a switch housing laying around an a like new tachometer mount it took some doing but now its a perfect switch an mount. an behind the covers I built to hide the cdi are more wires than I care to count anymorethe only real places you see wires are at their ends an under the motor an where they cross over to the swing arm,got some small tool bags to hang on either side below the seat an behind the tank for the battery on one side an the obvious tools on the other, an finally fitted up the rear brakes. an as I have promised when it runs video will follow .
I found a switch housing laying around an a like new tachometer mount it took some doing but now its a perfect switch an mount. an behind the covers I built to hide the cdi are more wires than I care to count anymorethe only real places you see wires are at their ends an under the motor an where they cross over to the swing arm,got some small tool bags to hang on either side below the seat an behind the tank for the battery on one side an the obvious tools on the other, an finally fitted up the rear brakes. an as I have promised when it runs video will follow .
Attachments
thegnu
New Member
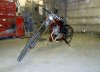
BOY OH BOY , got happy today my tool bags showed up so I installed them , an made sure they would never move I drilled 3 small holes in the back side an used auto upholstery screws to tightly attach to the frame then laced them together across the top for the illusion , also finally finished my kick stand .
Attachments


thegnu
New Member
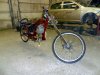
My tires came today with the battery pedals tubes an rim strips , an for the first time in a month an a half it is on the ground on its wheels , I took care of a bunch of loose ends now if the shock an seat show up monday I will put up finished pics ,I cant wait you guys got to see this thing it looks incredible .
thegnu
New Member
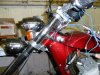
Re: mock up kinda rough , finished
All done, everything adjusted an working fine, just need to start it an put on the new seat when it gets here . I am sooooo ready for that !
All done, everything adjusted an working fine, just need to start it an put on the new seat when it gets here . I am sooooo ready for that !
Attachments
-
 everything done but the seat 001 (600x450).jpg288 KB · Views: 300
 -
 everything done but the seat 002 (600x436).jpg272.5 KB · Views: 294
 -
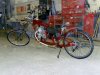 everything done but the seat 003 (600x450).jpg294.5 KB · Views: 306
 -
 everything done but the seat 004 (600x450).jpg285.3 KB · Views: 309
 -
 everything done but the seat 005 (600x407).jpg240.4 KB · Views: 300
vincent713
New Member
It turned out awesome! I especially like the 2 disc brake, the fact that you put multi gears to make it easy to pedal and the saddle bag is the icing on the cake. Nice job!
")
")
thegnu
New Member
Well for the last 2 days I have started that bike a dozen times maybe more , tonight I let it run for half an hour before closing the fuel off an its starting to have moments where it runs sooooooo much better , tonight most noticably while I was making an exhaust tip for I had shut off the fuel an was waiting for it to run out an stall it started to run soooo smooth then stalled out of gas . I think I should rejet or at least raise the c clip on the needle 1 notch (maybe I will do that first ) . but heres the tip I made while it was running .
Attachments
CRANKIT
New Member
hey it looks like you and me are on the same page !!, i know by looking at your bike i am gonna have some issues on where to position the motor,, you have the luxury of extra space above the crank hub, my bike has no room above so i am gonna have to juggle with where the motor and jackshaft are going,, i can see myself maybe having to add some detouring sprockets to clear the motor,, i will see when i get to that stage,, thanks for redirecting me to your pics,, looks like a neat ride,, what colour she gonna be? bet you cant wait till its finished,, these damn things are an itch you gotta scratch,, my wife is worried .