Ralph hop
Well-Known Member
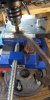
This predator was originally purchased years back for a "mud motor" on a boat but was traded to me. Been roto tilling with the Kohler brand equivalent of this motor today, just hope I can get the predator running smooth on this bike. Time will tell if the exhaust will want to shake undone but some say stainless is a pain to unbolt after being exposed to heat. Also, I did a double take on the engine size Moto, think I need rest lol.
")