Left Leaning Rubber Engine Stopper

solokumba

New Member
Perhaps this has already been covered, but I couldn't find it.
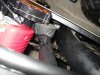
I wanted to fix my engines slight lean to the left and I slapped this together.
1. Rubber stopper from Ace.
2. Carved it to frame. (Snug fit between clutch and seat frame)
3. Drilled hole and inserted 2 ties.

Works Like a charm.
Always stays straight as an arrow.
 

Attachments

  • enginestop1.jpg
    enginestop1.jpg
    96.5 KB · Views: 343
lots of torque.pulled itself over by pulling on the chain.you can only tighten those u bolts so much before they break/strip/kink the frame.im assuming kits use U bolts for the mounting bracket anyway.
 
What was causing it to lean in the first place?
Actually unless the seatpost mount is broke, the 'leaning' is just twisting, and that is almost always a poor front motor mount.
Dandy and clever cheap 'remedy for the symptom' and all, but not a 'cure for the problem' if the front mount is the problem.
 
I agree with KCvale. If the engine moves its because there's a problem with how its mounted. Probably the front mount because the rear can't move if the front stays put. Take another look at how you've mounted the front of the engine. 'Solid' is the secret. If you're using rubber or any kind of resilient material get rid of it and mount the engine rigidly to the bike's frame.
Tom
 
A little trick that I use is to cut a 'shim' from EMT pipe & put it in between the rear mount & the frame... Many of the newer rear engine mounts are made for large diameter seatpost tubes, & they allow unwanted movement. This shim 'locks' the engine in a upright position.
Also in this pic is one of my chain tensioner shims at work, (between the engine & mount.)
vmbshim.jpg
 
Last edited:
Actually unless the seatpost mount is broke, the 'leaning' is just twisting, and that is almost always a poor front motor mount.
Dandy and clever cheap 'remedy for the symptom' and all, but not a 'cure for the problem' if the front mount is the problem.


Yes, the front mount is a drill bolt (large heavy frame) so it would tend to twist a bit. While getting the beast up and running we had a major chain failure and it wrapped up like a ... well I dunno what it wrapped like. Anywho... I saw one of these at Ace and decided to use it to my advantage.
 
Yes, the front mount is a drill bolt (large heavy frame) so it would tend to twist a bit.
Indeed they do, the longer the bolt the more they tend to twist, especially with a powerful motor.

A closeup pic of your front mount would really help.

It all dpends on how much room you have but the only IMPORTANT factor is that there is something ridged between the motor and frame that rests on the right side of the frame.
Your bolt secures it in, but it is a lever in itself with only the frame hole as the only residence.

Think back to your high school math regarding leverage.
In this case you have two levers, the second being the bolt through the frame itself.

If you secure the long end of a lever (front motor mount) the pivot point (rear motor mount) can't move, and in this case it's only one direction it wants to move, left.

That should spark some ideas for you as you seem like a pretty creative guy to me ;-}
 
Last edited:
so the big tube mount on my bgf kit and the rubber i used to take up space is y i cant no way no how get a 1/4 throttle befor the motor pulls it self right far enoughf it jumps the chain?
 
so the big tube mount on my bgf kit and the rubber i used to take up space is y i cant no way no how get a 1/4 throttle befor the motor pulls it self right far enoughf it jumps the chain?
If you're using rubber betwen the engine and the frame it contributes to engine instability. The engine needs to be mounted solidly to the bike frame...and I mean solid.
Any resilient material or flexible mounts will allow movement and increase the chances of engine mount fastener failure. This is not just my opinion but has been proven time and again. Get rid of the rubber and find a way to mount the engine to the bike that allows for no movement and you'll be way ahead of the game. Rubber in the mounts DOES NOT eliminate vibration but just transfers it to the mounts and fasteners.
Tom
 
I have seen on a thread here ,someone made a small L braket maybe an inch and bent the distance to the frame and used the clutch cover hole to hold it in place against the seat tube ,,for the starting the motor twist(torque) these get,,,,the rear and hopefully the front mounts need to fit mirrored image curves against the seat and down tube to assist in a straight setting motor,,,chain wip ,a lot of the time from not quite evenly mounted rear sprokets,will exagerate the side torque on the motor also when going down the street
 
There's some merit to the concept of a third motor mount - the HTs only having two points of contact & quite low compared to it's center of mass, there's the potential for an undue amount of lateral motion under strain...

However - a chunk of rubber won't do as it allows movement, even the "L bracket" may not be much more than a work-around as it's small and easily bent. A proper, third mount high on the engine, near the head is prolly the best, other engine manufacturers have done something similar, yet I gotta say I've had no movement or flex problems with my hard-mounted HT using only it's original (if modded to fit) mounts... which leads me to believe that any flex is the fault of an oversight and not the engine design, that the engine is poorly fitted and/or "soft" mounts were used *shrug*
 
SickBikeParts.com has two different sized Universal Front Mounts that will pretty much fit any sized downtube.

IMG_0091.jpg


According to the instructions you can flip it over or mirror it so it goes under the motor and put washers or shims in to adjust length to tube.

I haven't used one, but it looks like a better solution than gasbikes universal kit.
A single long bolt going through a frame hole sure isn't the best mount.
 
Last edited:
I would not mount a third motor mount from the head or cylinder due to the little motors low head torque specs and the usually tremendious amount of viabration when running ,but you could mount accross the bolt pattern on either side of the lower side of the motor clutch cover or the other side and up to a higher point on the frame,the seat tube possibly the top tube for more support leverage , creating a triangle pattren with the motor mount points of contact w/the frame ,
 
Harley did this many years ago on their 2 strokers. Yes, I'm sure the cylinder head was designed for this type of mount but if you're so inclined you could copy this idea with a little fabrication and ingenuity.
I still maintain that if installed correctly and firmly, the original 2 point mount design is sufficient.
Tom
 

Attachments

  • Harley 2 Stroke.jpg
    Harley 2 Stroke.jpg
    116 KB · Views: 181
I've been sitting back and enjoying all the banter, tips and causation analysis. I've been mulling over my next build and have decided to attempt a 3 point mount for fun. It might not be the most clean mount, but I won't be worrying about cracked fittings. At least I hope not. And for the bonus point... no welding involved.
 
SickBikeParts.com has two different sized Universal Front Mounts that will pretty much fit any sized downtube.

IMG_0091.jpg


According to the instructions you can flip it over or mirror it so it goes under the motor and put washers or shims in to adjust length to tube.

I haven't used one, but it looks like a better solution than gasbikes universal kit.
A single long bolt going through a frame hole sure isn't the best mount.

Just ordered that one....Ill let you guys know how it works for me. Looks solid but only time will tell. Should have it in the next couple of days and it will probably beat the heck out of the jerry rigged one I made for mine just to get her rollin.
 
Back
Top